
DX App Synthetic Monitor SaaS

DX App Synthetic Monitor SaaS
Table of Contents
Getting Started..................................................................................................................................... 5
Release Notes and Information...................................................................................................................................... 6
April 2024.4.1.............................................................................................................................................................. 6
October 2023.10..........................................................................................................................................................7
April 2023.3................................................................................................................................................................. 8
December 2022.8.8.....................................................................................................................................................9
August 2022.8........................................................................................................................................................... 10
April 2022.02.006.......................................................................................................................................................10
February 2022.02...................................................................................................................................................... 11
January 2022 10.7.9..................................................................................................................................................12
December 2021 10.7.8............................................................................................................................................. 12
July 2021, 10.7..........................................................................................................................................................13
December 2020, 10.6............................................................................................................................................... 13
September 2020 10.5............................................................................................................................................... 14
March 2020 10.4....................................................................................................................................................... 15
December 2019 10.3................................................................................................................................................ 16
July 2019, 10.2..........................................................................................................................................................16
Knowledge Base Articles.............................................................................................................................................. 17
Third-Party Software Acknowledgement..................................................................................................................... 19
Features........................................................................................................................................................................... 20
Track Website Performance with Monitors................................................................................................................. 24
DNS Monitor..............................................................................................................................................................25
Domain Monitor......................................................................................................................................................... 27
Full-Page Monitor (FPM)...........................................................................................................................................29
Real Browser Monitor (RBM) for Firefox.................................................................................................................. 31
Configure DX App Synthetic Monitor.......................................................................................................................... 33
FAQs.................................................................................................................................................................................35
Compatibility and Security............................................................................................................................................38
Product Accessibility Features.....................................................................................................................................39
On-Premise Monitoring Stations (OPMS)........................................................................................ 42
Pre-Installation Checklist...............................................................................................................................................46
OPMS Deployment Information.................................................................................................................................... 49
Install an On-Premise Monitoring Station................................................................................................................... 51
Installation process....................................................................................................................................................51
Station management with OPMS Installer................................................................................................................60
Set Up Monitors........................................................................................................................................................ 64
2

DX App Synthetic Monitor SaaS
Update the On Premise Monitoring Station................................................................................................................ 65
Remove an On-Premise Monitoring Station................................................................................................................66
OPMS Maintenance........................................................................................................................................................ 66
Troubleshooting..............................................................................................................................................................67
Reference.........................................................................................................................................................................69
Migrate OPMS 8.2 to Later Versions............................................................................................................................70
Using....................................................................................................................................................72
Account Management.................................................................................................................................................... 72
Scheduling Monitor Checks..........................................................................................................................................73
Set Up a Public Status Page to Display Web Server Information............................................................................ 76
DX App Synthetic Monitor Plug-in............................................................................................................................... 81
Use (JMeter) Scripts to Test Web Servers.................................................................................................................. 83
JMeter samplers blacklisted on ASM....................................................................................................................... 86
JMeter Timeouts........................................................................................................................................................87
Failing Assertions on Script (JMeter) Monitor Timeouts...........................................................................................88
Supported JMeter Plugins.........................................................................................................................................89
Use Real Browser Monitors (RBM) Scripts to Test Web Servers with Script Recorder..........................................89
WebDriver Monitor......................................................................................................................................................... 91
Build WebDriver Scripts............................................................................................................................................ 94
Supported Selenium Commands.....................................................................................................................101
Webdriver Script Editor....................................................................................................................................108
WebDriver Selectors............................................................................................................................................... 115
WebDriver Placeholders..........................................................................................................................................116
WebDriver Authentication.................................................................................................................................... 117
WebDriver CLI.........................................................................................................................................................118
Using Remote Windows Browsers with WebDriver Monitors.................................................................................119
Install Internet Explorer....................................................................................................................................120
Install Google Chrome..................................................................................................................................... 122
WebDriver if-else Branching and JavaScript.......................................................................................................... 124
World Map Metrics....................................................................................................................................................... 129
Use the API................................................................................................................................................................... 129
API Access.............................................................................................................................................................. 130
Call Syntax.............................................................................................................................................................. 131
Parameters.............................................................................................................................................................. 132
Use of Cookies........................................................................................................................................................134
API Use Examples.................................................................................................................................................. 135
Using Swagger API in DX ASM.................................................................................................................................. 138
REST API for ASM................................................................................................................................................. 142
Event Stream API................................................................................................................................................... 152
Monitor List Search......................................................................................................................................................153
3

DX App Synthetic Monitor SaaS
Schedule Maintenance.................................................................................................................................................155
Manage Users in ASM................................................................................................................................................. 158
Error Messages................................................................................................................................ 162
Usage Data (Telemetry)....................................................................................................................182
Documentation Legal Notice.......................................................................................................... 184
4
DX App Synthetic Monitor SaaS
Getting Started
Start monitoring your web performance with synthetic transactions from CA ASM.
Follow these steps:
1. Create an account with CA ASM at asm.saas.broadcom.com and tell us the URL that you want to monitor for your free
trial.
2. Select the monitoring plan that suits your requirements.
3. Define your monitors. As soon as the monitors are defined, they are sent to our international monitoring stations and
we start collecting data.
4. Take your monitoring to the next level with Full-Page Monitors, Monitor Scripts, and Real Browser Monitors.
Create an Account
To create an ASM account, go to our registration page and register for the free trial. You receive an email with your initial
login details. Your first monitor is set up for you. Go to the dashboard to see the results.
ATTENTION
In the above video, to setup, configure or report an account, navigate to asm.saas.broadcom.com. The URL
www.asm.ca.com is deprecated.
Select a Monitoring Plan
To get the full benefit of ASM monitoring upgrade to one of the monitoring packages. You can also tailor the package to
your needs. Select the package that suits your needs from the product plan page. Upgrade to your new plan.
Follow these steps:
1. In the main menu, select Subscriptions, My Current Plan, then select Edit.
2. Select the plan that closest suits your needs and select Next: customize.
3. Select more monitors and features and select Finish.
Define Monitors
To define a monitor, specify the URL (web page) to monitor. Define how often you want the page to be checked.
TIP
To verify that specific text appears correctly on the page, instruct the monitor to match strings or RegEx. You can
also match text that should not appear on the page, for example, any text that contains 'Error'.
Follow these steps:
1. In the main menu, select Monitoring, Monitors.
2. Select New Monitor.
3. Select a monitor type.
4. Complete the New monitor form.
5. Select Save.A detailed analysis of the new monitor appears.
6. Select Activate.
The new monitor is active. If you set the monitor time delay to 5 minutes, you see the first result within 5 minutes.
5

DX App Synthetic Monitor SaaS
Configure Alerts
If one of your monitors fails to meet your standards, ASM sends you e-mail or SMS alerts. ASM lets you fully define your
criteria for triggering alerts and you can define who the alert is sent to.
Create Advanced Monitors
Create a script so that our monitor can test the functionality of your web page, for example, login or shopping cart. For
more information, see Use (JMeter) Scripts to Test Web Servers (How to).
Use Full-Page Monitors to ensure all your Web 2.0 functionality is correctly displayed. ASM uses a real browser to load
all the web page content. ASM shows you a download sequence report so you can identify any bottleneck in the user
experience. To schedule Full-Page Monitors, go to Scheduling Monitor Checks.
ASM API
You can access ASM data with applications using the ASM public API. See API Reference.
Monitor a Secure Environment (Intranet)
For secure Intranet installations, you can install an ASM monitoring station inside your environment. The On-Premise
Monitoring Station provides all the functionality of ASM monitoring from within the secure environment. For more about
On-Premise Monitoring Stations, see On Premise Monitoring Stations (OPMS).
Release Notes and Information
Release Notes inform customers of improvements and fixes to DX APP Synthetic Monitor. DX APP Synthetic Monitor
contacts customers when Release Notes are published.
•
April 2024.4.1
•
October 2023.10
•
April 2023.3
•
December 2022.8.8
•
August 2022.8
•
April 2022.02.006
•
February 2022.02
•
January 2022 10.7.9
•
December 2021 10.7.8
•
July 2021, 10.7
•
December 2020, 10.6
•
September 2020 10.5
•
March 2020 10.4
•
December 2019 10.3
•
July 2019, 10.2
April 2024.4.1
Features and Enhancements
The current release contains the following enhancements:
•
Upgrade the OS of all Docker Images
6

DX App Synthetic Monitor SaaS
Upgrade the Operating System to the latest version of all docker images and use SSL v3.0. With this upgrade, the
weak ciphers are removed (for example, SHA1 in SSL signature in SAML/SSO is no longer accepted.)
•
Asynchronous Monitor Mode is the Default
Users cannot change the Mode in Monitor setting page.
•
Monitor Summary Report Chart Type
Monitor changes can be viewed in the graphs under "Audit events" type of report.
•
New APIv3 TAGS Endpoint
Added new APIv3 endpoint for retrieving all TAGS.
•
Restricted Obsolete Firefox Monitors
Users cannot create, activate or edit the Obsolete Firefox monitors. For more information, see Real Browser Monitor
(RBM) for Firefox.
•
Added Optional Time Zone to the Monitor Scheduling Time
When setting up a monitor, the custom time zone can now be entered so running times do not need to be recalculated
to the owner's timezone, just like it works with contacts' on duty hours or maintenance windows.
•
Upgraded Webdriver Agent Browser Versions
The Webdriver agent browser versions are preserved/upgraded/removed as follows:
–
Firefox:
•
The versions 110 and 119 are preserved.
•
The version 122 is newly added and is used as the default version.
•
The version 91 is now removed.
–
Chrome:
•
The versions 110 and 117 are preserved.
•
The version 121 is newly added and is used as the default version.
•
The version 91 is now removed.
NOTE
Users are expected to upgrade to the latest browser manually using the documentation.
Issues Resolved
The current release contains fixes for the following issues:
•
Fixed the timeout “-97 internal error” on Full-Page agent.
•
Fixed the internal error in asynchronous mode.
•
Fixed the password reset functionality.
•
All timezone fields are now named as 'timezone' (not timeZone).
•
Fixed the webdriver host remapping issue with Kerberos.
•
Bypassed the entire proxy for websocket protocols.
•
Fixed the long recovery on check crash for webdriver, full-page, and Jmeter agents.
October 2023.10
Features and Enhancements
The current release contains the following enhancements:
•
New Webdriver Script Editor
The Webdriver Script Editor is an extension of the ASM Webdiver monitor UI designed to edit Selenium XML scripts
directly on the ASM dashboard. It offers two editing modes: Text Mode and Visual Mode. For more information, see
Webdriver Script Editor.
•
New Webdriver Monitor Setting
7

DX App Synthetic Monitor SaaS
Webdriver monitors can be configured to bypass the system proxy based on the domain.
•
Response bodies can be recorded for JMeter monitors running on On-Premise Monitoring Stations.
When troubleshooting events that are no longer occurring, JMeter can display the full response bodies (based on the
monitor configuration). For more information, see Use (JMeter) Scripts to Test Web Servers.
•
New messaging system to unlock enhancements in the future versions.
•
Added support for filtering monitors by name in APIv3 GET /monitors. For more information, see https://
api.asm.saas.broadcom.com/v3/#/monitors/monitor-get-all.
Issues Resolved
The current release contains fixes for the following issues:
•
Upgraded the Google Chrome version for Webdriver monitors.
The existing monitors will continue running on the previous versions of Firefox and Chrome identified as Firefox 110
and Chrome 110. Monitors can always migrate to the latest browser using Switch to the latest browser option.
•
Fixed missing auth type configuration in the UI action URL form.
•
Fixed new Performance Chart (Performance Chart +) issue of not using account timezone.
•
Fixed FPM container restarting issue.
•
Inactive monitor re-enabled by finalizer (without audit log entry).
•
Fixed HTML injection in alert group management.
•
Improved the handling of PSP folder push.
•
Fixed reported vulnerabilities in used libraries and components.
April 2023.3
Features and Enhancements
The current release contains the following enhancement:
Core Servers enhancements
•
Upgraded all components
•
Option to switch globally from synchronous to asynchronous monitoring, thus saving resources, and increasing
throughput
•
Added new alerting service
•
Action URL alerting contact support credentials
•
Simple and OAuth API token management in the user interface
•
Contact management is upgraded to Single Page Application (SPA)
•
New performance chart page available for all users
Monitoring Stations enhancements
•
Complete containerization of all agents
•
Uses the latest operating system docker images (such as Debian 11). Also updated the corresponding components,
such as python2 to python3
•
New OPMS installer for docker containers and the docker-compose file. See Install an On-Premise Monitoring Station.
•
New simple monitor agent (for HTTP(s), FTP(s), IMAP, LDAP(s), SMTP, connect, etc.) that you can enable if required
•
Initial Kubernetes upgrade for public monitoring stations
CBOT Agent enhancements
•
Removed predefined list of user agents
•
Synchronize regex syntax in CBOT
8

DX App Synthetic Monitor SaaS
Change in Behavior
Monitor Settings
Earlier, while editing a monitor's settings, the Alerting tab settings were ignored if the Alert contact was not set.
As none of the settings on the Alerting tab has any impact in this case, the Alerting tab is hidden until the Alert contact is
chosen.
Issues Resolved
The current release contains fixes for the following issues:
•
APIv3
–
Validation of monitor schemas
–
/check is also allowed on active monitors
–
Fixed filter accounts by SAMLID
–
Fixed HTTP 400 issue while using example values in POST /v3/maintenances
–
Fixed the swagger json schema
•
User Interface
–
Relevant checks show "Waterfall view" icons even for http/s monitor types
–
Fixed the delete location issue
–
Removed old customer resold account token management
•
Bit flags for DOW - using different semantics UI vs. API
•
Dashboard showing old links to subaccount management
•
Fixed the gaps in the new performance charts, including the long list in filters.
•
Event stream Redis failover issue
•
Alerting: Duplicated UTC offset for timezones without abbreviation
•
Fixed WebDriver issues along with upgrading the Chromium browser
Deprecated Features
The Firefox monitor is removed from all public monitoring stations. Use WebDriver.
December 2022.8.8
Features and Enhancements
The current release contains the following enhancement:
•
PLA Telemetry Calculations update
Resolved Issues
The current release contains fixes for the following issues:
•
Addressed the following vulnerabilities
9

DX App Synthetic Monitor SaaS
–
Chromium browser zero-day
–
Bouncy Castle [BDSA-2022-3337]
–
SnakeYAML
–
log4j
–
jackson-databind
•
Internal errors in maintenance show up
•
Dependency of sched-event-logger on MySQL
•
Scheduler-stream: force a crash on Redis error
August 2022.8
Features and Enhancements
The current release contains the following new features and enhancements:
•
Support for Message Log Export with Advanced Filters
You can now use advanced filters and export the message logs to excel or CSV based on date and time.
•
Performance Charts Improvements
The Performance Charts are now improved with a whole new experience. You can access the Performance chart + tab
to view it.
NOTE
To use Performance Charts, you must enable the Beta testing mode in the Preferences page.
For more information, see Performance Charts.
•
Monitor Check Improvements
You can now configure your monitors to preserve the scheduling interval when the monitor fails. You can also prevent
your monitors from being scheduled during the maintenance period. For more information, see Scheduling Monitor
Checks
•
Support ASM rule_check in APIv3
A new APIv3 endpoint or check is added to perform an ad-hoc check for one or more existing monitors. For more
information, see Use the API
Resolved Issues
•
Mitigated issues found by various security scanning tools.
•
Fixed UI and API issues.
•
Fixed ADFS Token Signing Certificate issue.
•
Resolved product improvements, optimizations, and bug fixes.
April 2022.02.006
Release Date: 21 April 2022
Issues Resolved
The current release contains fixes for the following issues on the monitoring stations:
10

DX App Synthetic Monitor SaaS
•
Availability of the full-page monitor agent.
•
Short Solenoid session timeout.
•
The browser tab crash due to the low shared memory.
•
Spring remote code execution (RCE) vulnerability.
•
The dependency between CA and client certs in the JMeter agent.
•
The broken links in alert messages.
February 2022.02
Release Date: 23 February 2022
Features and Enhancements
The current release contains the following new features and enhancements:
•
WebDriver agent-client certificate support
Added SSL client certificate support to WebDriver Agent
•
Performance results added to the API output
These are the values used in the performance chart to display monitor performance based on the first and second limit
in the monitor configuration.
–
APIv1.6: performance column with value good, poor, or bad was added to rule_log and rule_check results.
–
APIv3: performance value was added to the result of GET /log.
•
APIv3 supports filtering results for monitors
•
Event Steam API
Event Stream is a preferred alternative to the ASM API calls rule_log (APIv1.6) and /log (APIv3). You can use the
event stream when the client consumes events as a live feed. The event stream lets you consume the events in near-
real time without repeatedly polling the API.
For more information, see Event Stream API.
•
Improved searching in the monitor list
New special searching strings are supported to find monitors based on alerting status. For more information, see
Monitor List Search.
Backward Compatibility
The following changes are implemented to the backward compatibility of the product:
•
Removed redirect from old *.asm.ca.com domains.
•
Removed trial registration page.
•
Rendering DX ASM in iframe is not allowed (X-Frame-Option is DENY).
•
A new IP address for all components:
–
34.107.229.103: asm.saas.broadcom.com
–
34.149.162.62: assetproxy.asm.saas.broadcom.com
–
34.149.162.15: mongocache.asm.saas.broadcom.com
–
34.149.162.107: status.asm.saas.broadcom.com
–
35.245.200.49: opp1.asm.saas.broadcom.com
–
34.150.145.187: opp2.asm.saas.broadcom.com
–
34.98.104.191: stream.asm.saas.broadcom.com
11

DX App Synthetic Monitor SaaS
Stability and Reliability Improvements
•
Migration to GKE
•
Migration from React to Angular
Issues Resolved
•
Mitigated issues found by various security scanning tools.
•
Addressing all the log4j vulnerabilities.
•
Fixed problem with missing audit logs (contacts, folders).
•
Fixed client certificate upload - separated CA and client certificates.
•
Many more Product improvements, optimizations, and bug fixes.
January 2022 10.7.9
Release Date: 26 January 2022
Features and Enhancements
The current release contains the following new features and enhancements as a Hotfix:
•
Added chrome on Windows in the UI. For more information, see Using Remote Windows Browsers With Webdriver
Monitors and Install Google Chrome.
NOTE
Contact Broadcom support to get this feature.
•
Monitor status added to the results of the APIv3 requests (GET /monitors).
•
Fixed immediate maintenance functionality.
December 2021 10.7.8
Release Date: 16 December 2021
This release includes the following features and enhancements, limitations, and issues resolved:
Features and Enhancements
The current release contains the following new features and enhancements:
•
Webdriver monitor browser upgrade
For Webdriver monitors, upgraded both Firefox and Chrome to 91.0. Existing monitors continue running on the
previous versions of Firefox and Chrome. There is a bulk action available for migrating the Webdriver monitors to the
latest versions.
•
ASM Rest API v3 updates
Added new API v3 endpoints for immediate maintenance.
•
Microsoft Windows 2010 Support for OPMS -WeDdriver Monitor
Added Microsoft Windows 2010 support for WebDriver with chrome (manual installation).
12

DX App Synthetic Monitor SaaS
Issues Resolved
•
Fixed immediate maintenance in UI for Core Servers.
•
OPMS- Async checks are sent to ASM API through system proxy if configured. Speed optimization of the maintenance
windows management page.
•
Stability and security fixes.
•
Upgraded log4j to version 2.16.0 to fix the vulnerabilities CVE-2021-44228 and CVE-2021-45046.
July 2021, 10.7
Release Date: 8 July 2021
This release includes the following features and enhancements, limitations, and issues resolved:
Features and Enhancements
The current release contains the following new features and enhancements:
•
Single Sign-On and Sub Account Functionality
For the SSO-enabled users, a single user email can be used to create subaccounts in multiple master accounts.
•
Timezone Configuration to Alert the Contacts
Configure the Alerts contacts to receive alerts in desired time zones.
•
DX ASM Rest APIV3 Updates
ASM API v3 is in production with new APIs for user manipulations.
•
SPNEGO/ Kerberos Authentication Support in WebDriver Monitors
WebDriver can now monitor the applications that use SPNEGO/ Kerberos authentication schema.
•
New Full Page Monitor Agent Release in Public Stations and OPMS Builds
The new FPM agent that is based on Chrome, is built on the latest technology stack to support modern web pages.
The FPM agent improves the network performance and metrics accuracy.
•
JMeter log viewer UI Enhancement
Har structure and Summary table visualization improvements.
•
Webdriver Monitor Enhancements
Total time metric for web driver stages. Ability to customize an error message.
•
HTTP and HTTPS Monitor Enhancements
Added support to monitor HTTP and HTTPS methods can be configured for monitors. Support for binary data in
requests.
•
Script Monitor Enhancements
A WS-Security extension is added for SOAP requests. Apache Tika is added to allow content-matching of the binary
files.
Issues Resolved
•
Jmeter step metrics Latency and Time column that was mislabeled is fixed.
•
Invalid calculation of the Maintenance Window duration is fixed.
•
Improved UI session handling and expiration.
•
Har viewer fails to report the Jmeter error output.
December 2020, 10.6
Release Date: 13 December 2020
This release includes the following features and enhancements, limitations, and issues resolved:
13

DX App Synthetic Monitor SaaS
Features and Enhancements
The current release contains the following new features and enhancements:
•
Accessibility Support
ASM is now WCAG compliant. All pages in ASM have accessibility support, Support for Screen readers, Keyboard
navigation.
•
New Full Page Monitor Agent for Testing (On-demand only)
The New FPM agent that is based on Chrome, is built on the latest tech stack to support modern web pages. It
improves network performance and metrics accuracy.
•
HTTP / HTTPS Monitor
Support for Negative network tests has been added. Users can now configure ranges of accepted HTTP/HTTPS status
codes such as ‘400,403-404’.
•
Web Driver Monitor
Option to enable ‘Quiescence’ to wait for all the active requests to complete before executing the next step.
•
A new version of On-Premise Monitoring Station(OPMS)
10.6 version of OPMS available. Contains numerous enhancements and customer fixes.
•
Performance and Stability Improvements
Improved performance of the monitor listing page for a huge number of monitors and folders. Improved stability of the
scheduler to avoid gaps in logs.
Limitations
The current release contains the following limitations:
•
Alerting
Russian and Chinese phone numbers are blocked
•
All Public Tools Disabled
Traceroute, Ping, DNS analysis, Check Website
Issues Resolved
•
Missing proxy in docker configuration (OPMS only)
•
Wrong proxy detection in Jmeter agent on CentOS / RH (OPMS only)
•
OPMS installer configures Docker proxy based on the System proxy
•
Certificate related errors in HTTPS monitor are final (no second opinion is triggered)
•
Empty metrics in Jmeter agent
September 2020 10.5
This release includes the following features and enhancements:
Release Changes
The DX APP Synthetic Monitor 10.5 release contains the following new features and enhancements:
•
Migrated to Google Cloud (new domain):
The old domains are redirected to the new domain except for API (to keep POST requests working). Use the new
domain (asm.saas.broadcom.com).
•
HTTPS Support for API Connections:
the HTTP protocol for API connections is moved to a secured https protocol. Any HTTP communication will be
disabled.
•
Single sign-on Domain Change:
14

DX App Synthetic Monitor SaaS
If you use single sign-on, change your redirect domain to the new domain. The old domain will continue to work during
this year, so an immediate change is not needed, but recommended.
•
IP Addresses Change:
As a result of the infrastructure provider change, the IP addresses the product is running on has changed. If you are
running any IP based firewalls, please update them accordingly.
IP address and Domain Change Summary:
Old Domain Old IP address(es) New domain New IP address
asm.ca.com 52.23.104.102, 54.209.218.8 asm.saas.broadcom.com 34.95.70.100
api.asm.ca.com 52.202.117.40, 54.209.2.179 api.asm.saas.broadcom.com 34.107.149.199
opp1.asm.ca.com 52.70.85.108 opp1.asm.saas.broadcom.com 35.245.163.23
opp2.asm.ca.com 35.172.254.215 opp2.asm.saas.broadcom.com 34.86.17.8
Issues Resolved
The following defects were fixed in the current release:
•
WebDriver domain blacklisting/whitelisting
•
Root cause link in rule_log API call
•
OPMS installer to configure the proxy for docker daemon
•
Many performance issues
March 2020 10.4
This release includes the following features and enhancements
Release Changes
The DX APP Synthetic Monitor 10.4 release contains the following new features and enhancements:
•
Ability to configure an HTTP proxy at the monitor level.
–
Now you can use a custom proxy server while creating a new monitor or edit the existing monitor to use a custom
proxy.
Supported Monitor Types: HTTP, HTTPS, Fullpage, Webdrive
–
You must provide proxy details (protocol, address, port, username, password) for configuration.
•
Support for Basic Digest Authentication in the Webdriver monitor. For more information, see Authentication type in
Webdriver Monitor.
•
Webdriver monitor supports all *Eval commands. For more information, see Supported Selenium Commands-10.4
section in Build WebDriver Scripts.
•
Webdriver command-line interface supports an option to ignore SSL certificate checks. For more information, see
Webdriver CLI.
•
Improved Jmeter Errors validation - better handling of 401 HTTP Response.
Issues Resolved
The following defects were fixed in the current release:
•
Querying an API script does not return the updated script.
•
Filter graph by location - fixed performance.
15

DX App Synthetic Monitor SaaS
December 2019 10.3
This release includes the following features and enhancements:
Release Changes
The DX APP Synthetic Monitor 10.3 release contains the following new features and enhancements:
•
Introduction of Persistent Maintenance window, ability to see affected monitors even if I do not have edit rights
•
Use WebDriver Monitor with Internet Explorer
•
WebDriver CLI
•
Real Browser Monitoring
–
Internet Explorer support for OPMS
–
Local variables and script parameters support
–
Debugging tools — details logs and command-line utility, commands pause and echo
–
Video download
–
Show browser messages
•
OPMS Improvements:
–
Support to run monitors more than 120 seconds for OPMS (RBM, Jmeter)
–
OPMS installer — more sanity checks (XFS compatibility with docker overlay2, latest installer), docker download
during installation
•
HTTPS is the only supported API endpoint
•
Performance chart — Last hour detail, and improved UX
•
Monitor search — Search by hostname, support for regular expressions
Issues Resolved
The following defects were fixed in the current release:
•
JMeter monitor result gets cached results
•
Webdriver shows steps in old logs after script replacement
•
Update permissions of multiple folders fail
•
Dropdown in performance charts is not alphabetically ordered
•
JMeter monitor timeouts behave oddly
Deprecated Features
The following features are not supported from the current release:
•
Italian and German localization
•
HTTP as an API endpoint
July 2019, 10.2
CA App Synthetic Monitor 10.2 Release Items
Release Changes:
•
The new WebDriver Monitor can be used to record and run performance scripts for specific browsers and platforms.
You can record or upload your own XML scripts, which are translated to WebDriver commands and passed to a
16

DX App Synthetic Monitor SaaS
Selenium server. Selenium runs the scripts in a real browser and operating environment. The collected results are then
sent back to the ASM Dashboard. More Information: WebDriver Monitor, Build WebDriver Scripts.
•
With the introduction of the WebDriver Monitor, RBMs for Firefox will be deprecated. It will not be possible to create
new RBMs by default.
•
Scheduler Redesigned
•
Korean, Dutch, Chinese (both simplified and traditional) are now not supported in ASM.
•
JMeter agents are activated by default and waiting in warm-up mode. This setting improves JMeter script performance.
•
It is now possible to create a ASM user that is based on an existing user. This feature lets you directly propagate
permissions and roles to new users. In the new user dialogue, select Clone user and specify the user to be cloned.
•
Admin users are tagged with the admin role in the user list. All users can now identify their admins.
•
Maintenance windows can be created with immediate effect and can run through midnight.
•
When you assign a maintenance window to a monitor, you can see all monitors in the list, regardless of your access
rights.
•
A new PDF generator was implemented for invoices. Invoices were redesigned.
Issues Resolved in 10.2:
Core Servers
•
An alert notification was not sent to the email group, but was sent to the main email account.
•
The change_passwd.php page is disabled if SSO is enabled for an account. The API password change is on the same
page as is thus inaccessible.
•
The maintenance period and group is not displayed correctly in UI.
•
After creating a new maintenance window, the maintenance window does not appear and the maintenance window list
is empty.
OPMS
•
A Docker container is stuck and cannot be stopped. You cannot exec into it.
•
An on-premise monitor executes a script every 5 mins and periodically receiving the following errors:
–
(-98) No checkpoint available for check type script/IPvANY
–
(-94) Checkpoint timed out
–
(-94) Checkpoint connection error: 200
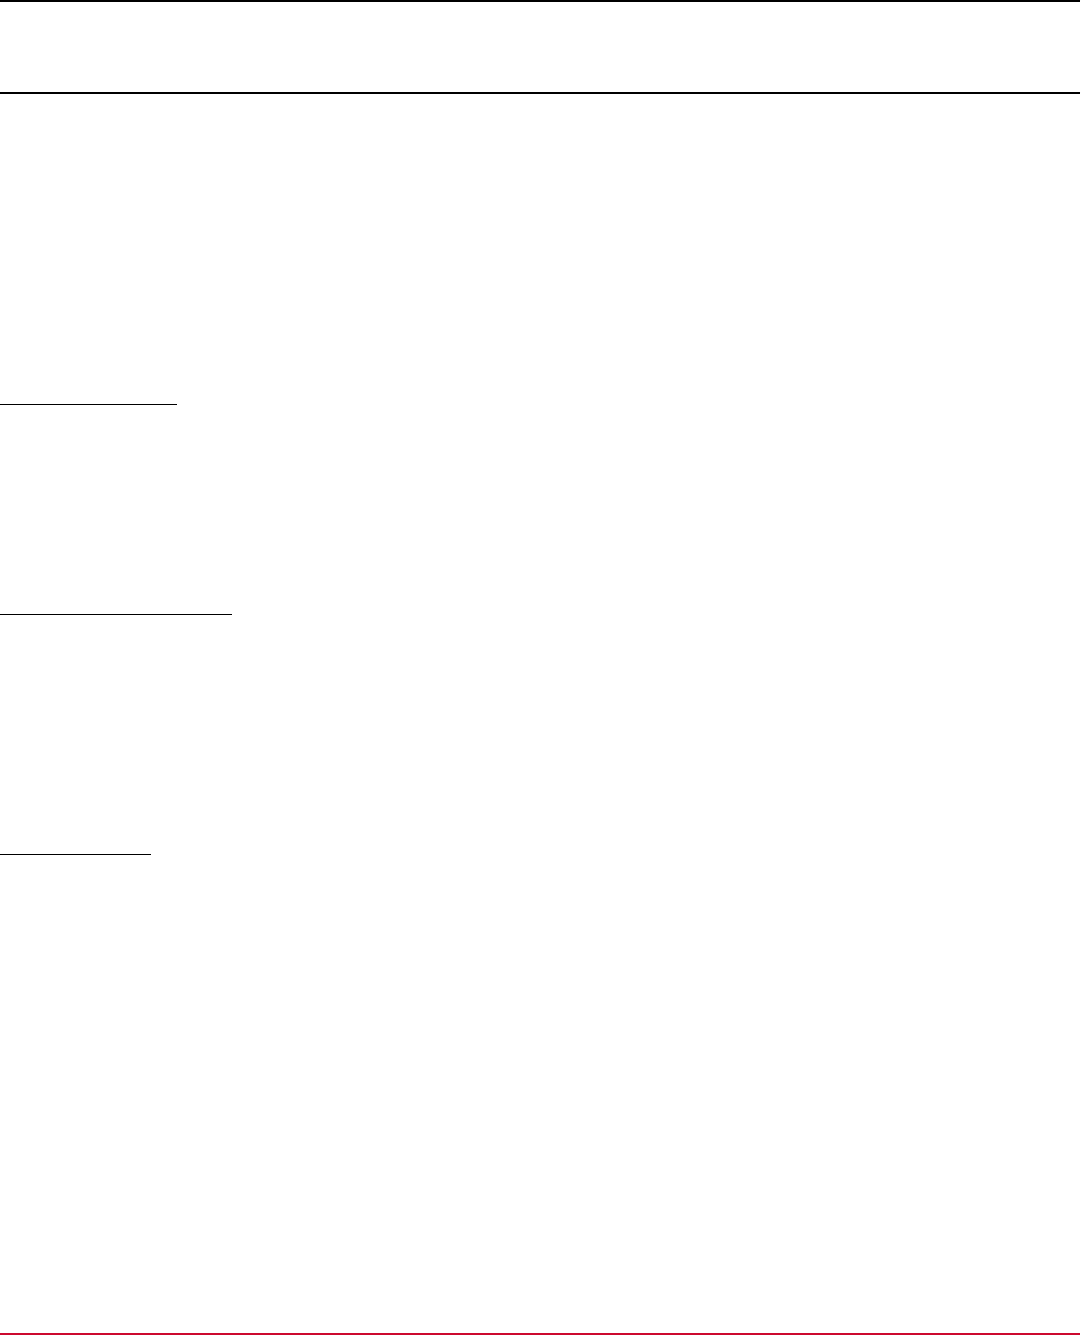
Knowledge Base Articles
To view the full list of Knowledge Base articles for DX App Synthetic Monitor, click here.
Use the Advanced Search filters to narrow down your search criteria.
1. Select Knowledge Articles from the list of options available under Sources.
17
DX App Synthetic Monitor SaaS
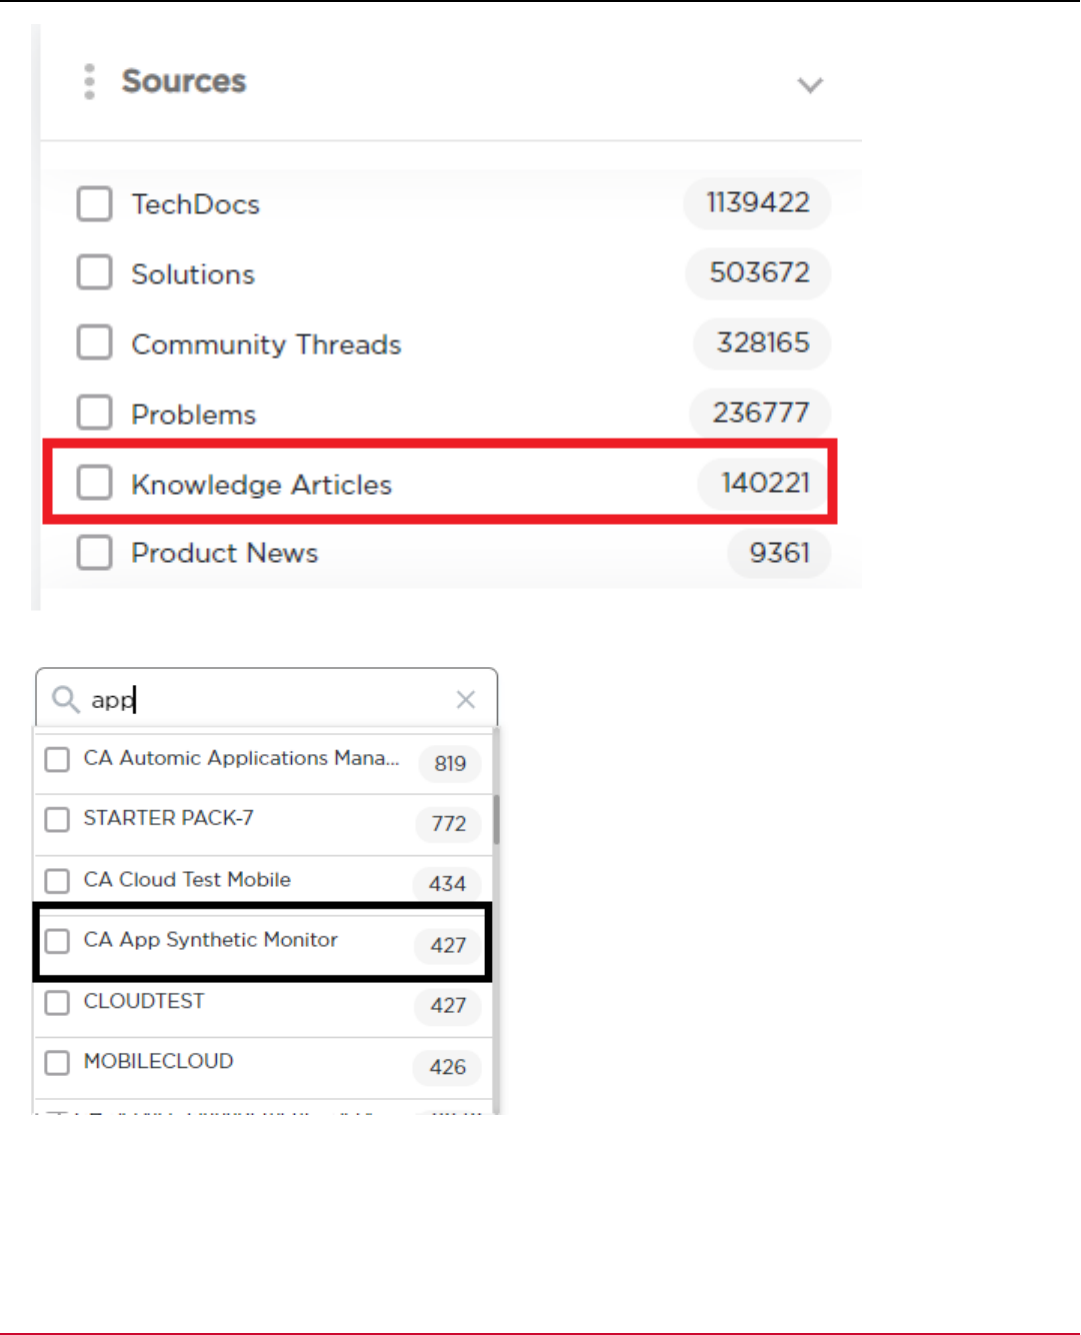
2. Based on your entitlement, search for your product and select your product from the Product options.
3. Select the required language.
4. Select the required duration from the Updated Date options.
18
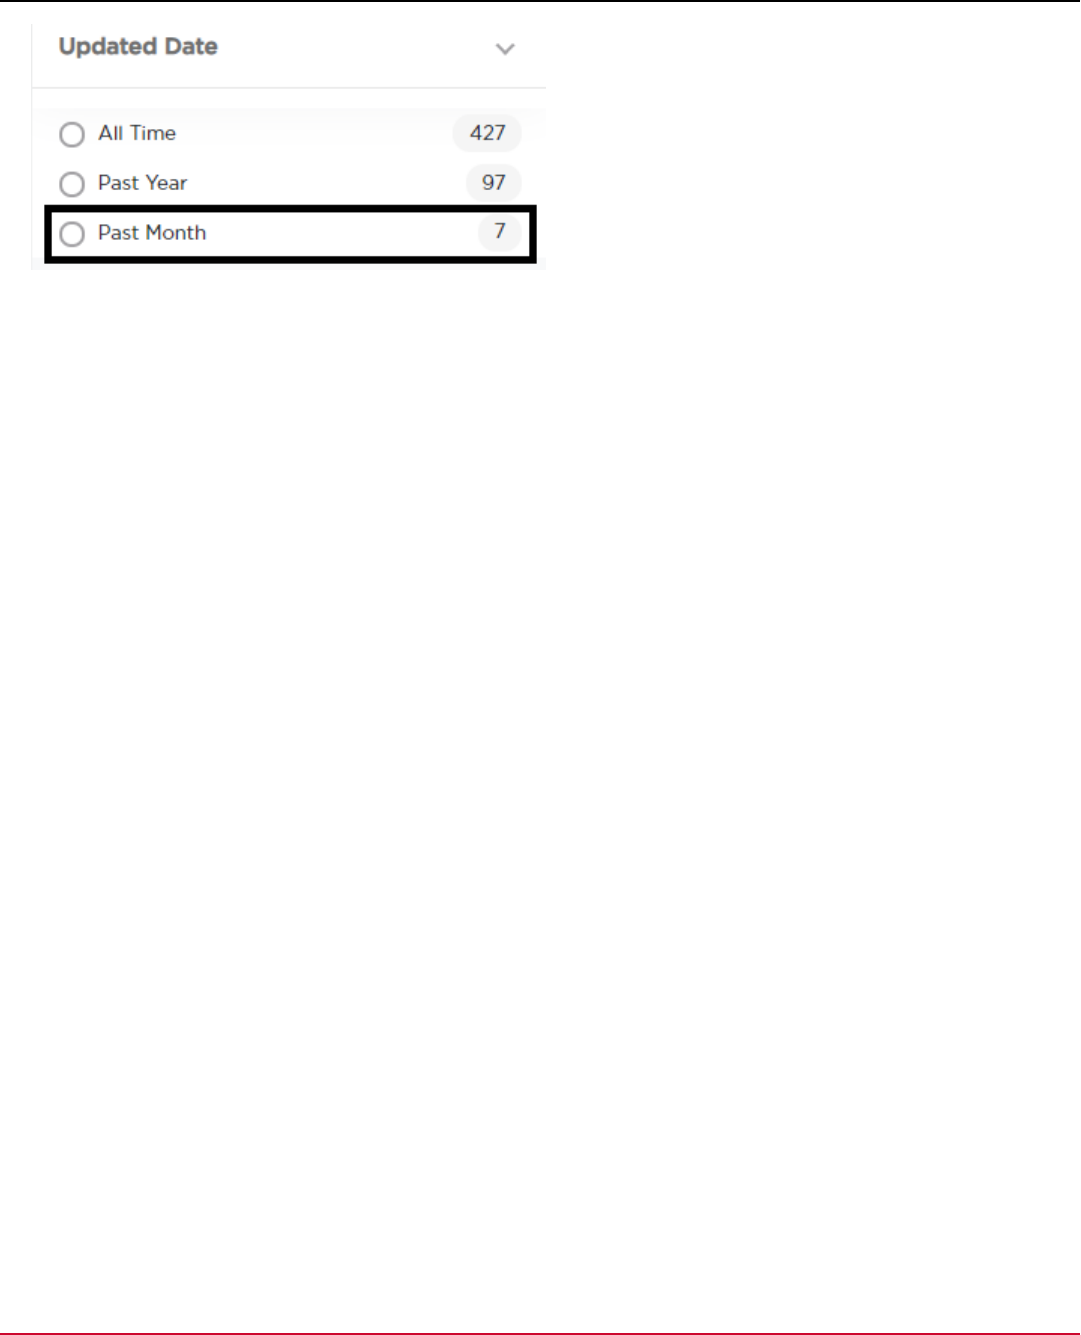
DX App Synthetic Monitor SaaS
5. The relevant knowledge articles for the specified filter criteria are displayed.
Third-Party Software Acknowledgement
This section contains third-party software license agreements for applications that are added/included as part of the
current release of DX APP Synthetic Monitor. To view the license agreements, see SAAS and Stations.
19

DX App Synthetic Monitor SaaS
•
analytics-php 1.6.1-beta
•
axios 0.16.2
•
babel-core 6.24.1
•
babel-loader 7.0.0
•
babel-plugin-transform-object-rest-spread 6.23.0
•
babel-preset-es2015 6.24.1
•
babel-preset-react 6.24.1
•
base32 1.3.1
•
Bouncy Castle 1.46
•
BrowserMob Proxy (BMP) 2.1.5
•
classnames 2.2.5
•
commons-io 1.3.2
•
cpp-redis 3.5.4-1
•
css-loader 0.28.4
•
dompdf 0.8.2
•
fontawesome 4.6.3
•
Guava 27.0-jre
•
guice 4.2.2
•
guzzle 6.3.3
•
jackson 2.9.7
•
JAXB 2.3.1
•
Jedis 2.9.0
•
jsonmapper 1.1.1
•
lodash 4.17.4
•
nlohman/json git commit 52ca35b2b0, 18.11. 2017
•
otphp v9.1.0
•
phprbac 2.0.0
•
php-saml 2.10.7
•
prop-types 15.5.10
•
react 15.5.4
•
react-inlinesvg 0.6.2
•
react-redux 5.0.5
•
react-router 4.1.1
•
redux 3.7.1
•
redux-saga 0.15.4
•
Selenium 3.141.59
•
selenoid 1.8.2
•
selenoid/chrome-72 72.0
•
selenoid/firefox-65 65.0
•
selenoid/video-recorder 4.0
•
symfony/process v4.0.10
•
vfsStream v1.6.5
•
webpack 2.6.1
Features
20

DX App Synthetic Monitor SaaS
General Features
•
95 website monitoring stations worldwide in 47 countries
•
Introduction to Synthetic Monitoring
•
Up and running in 5 minutes without any additional software requirements
•
Root cause analysis
•
Functional tests (website monitoring scripts)
•
26 protocols: HTTP(S), DNS, FTP, and more
•
Maintenance slots support
•
Alert escalation
•
Fully featured reporting tools
•
SLA compliance reports
•
Fully featured website monitoring API for seamless integration
•
8 SMS gateways with 5 providers
•
Public Status Pages (Health) that is hosted in the cloud
•
Full-Page Monitoring
•
Real Browser Monitoring
Reporting
•
Reporting can be configured in the console
•
Statistics and reports on availability and response times are available per hour, day, week, month, and year
•
On-demand PDF report generation available
•
PDF reports are sent by email on a daily, weekly, or monthly basis
•
Raw data can be downloaded in Excel, CSV, and XML formats
•
Charts are available as PNG or interactive Flash objects
•
Raw data is available for 30 days
•
Root cause analysis details are available for 48 hours
•
Statistical data is available for at least 1 year
Alert Triggers
•
All triggers are fully configurable in the console
•
Absence of content in a page or file can be tracked
•
Presence of content in page or file can be tracked
•
Content matching on strings or regular expressions
•
When a service remains down, reminders can be sent at configurable periods
•
When a service is up again, notifications can be sent
•
When a service remains down for a longer period, an alternative contact can be alerted
•
All time-out errors are checked from a second location to prevent false positives
Alert Notifications
•
Alert notifications can be configured in the console
Alerts are sent the following formats:
21

DX App Synthetic Monitor SaaS
–
Email
–
Text
–
RSS feed
–
Forwarded to a web page (API)
•
Work schedules can be defined per contact
•
Contacts can be grouped
•
Escalations can be defined in contact groups
•
Receipt of alerts is logged where available
Functional Tests (scripting)
•
Support for JMeter and CA App Synthetic Monitor Recorder (Badboy) file formats
•
Multi-step functional and performance testing
•
Recording with CA App Synthetic Monitor Recorder (Badboy) or JMeter
•
Up to 5-MB transfer per functional test
•
Script check frequency from 5 to 60 minutes
User Management and Security
•
Sub-accounts can manage monitors, contacts, or maintenance windows based on the assigned roles or individual
permissions. For more information, see User Management.
•
User Management can be configured in the console
•
Multiple accounts for master access
•
Console access is protected with a username and password
•
HTTPS is enforced for console access
•
Access to the API is protected with a username and password
Performance Chart
•
The Performance Chart can be configured in the console
•
The Performance Charts shows the following information:
–
Historical availability and recent alerts
–
Results of the scripts on the top-level dashboard
–
Near real-time information about availability per day and per hour
–
Availability for each of the scripts
Performance Chart+
•
Check results on the timeline with the proximity from one minute to one hour
•
Information about availability per one hour and up to 24h.
•
Realtime availability.
•
Results of the checks.
•
Color-coded SLA input: 100-99 percent - green, 90-99 percent - yellow, under 90 percent - orange
•
Availability for each monitor.
•
Capability to drill down to the single check result.
•
Full-screen view.
•
Two color schemes for better focus either on the performance or errors.
22

DX App Synthetic Monitor SaaS
Alert Configuration
•
Alert windows can be set for all channels
•
Alert windows can be set per script
•
Alerts can be switched off manually during incidents
•
An alert contains the following attributes:
–
timestamp
–
name of script
–
error type
–
step in error
Online Tools
•
Website check from 8 locations worldwide
•
Ping from 94 locations worldwide
•
Online Traceroute tool
•
DNS analysis and performance checks from 3 locations worldwide
Notifications
•
Alert notifications can be configured in the console
•
Work schedules can be defined per contact
•
Contacts can be grouped
•
Escalations can be defined in contact groups
•
Receipt of alerts is logged where available
Protocols
•
Web protocols: HTTP(S), including redirects, compression, user agents, and others
•
File transfer protocols: FTP(S), SFTP, TFTP, SCP
•
Name service protocols: DNS, Domain
•
Directory service protocols: LDAP(S)
•
Email protocols: POP3, IMAP, SMTP
•
Network level checks: ping, and TCP connect
•
Other protocols: SIP, XMPP
•
Username and password authentication on all applicable protocols
•
Client certificate authentication
•
IPv6 support
•
Full page support with scripts
•
SSL certificate expiration checks
Root Cause Analysis
•
Detailed insight into problems and incidents
•
Shows the steps of the scripts that were completed, or not completed during an incident
•
After a monitor is triggered, the following data is collected:
23

DX App Synthetic Monitor SaaS
–
Screenshot
–
Traceroute of one or more stations
–
Raw HTML
–
DNS analysis
–
Domain analysis
Track Website Performance with Monitors
CA ASM offers several monitors that you can use to measure page performance. Monitors also check whether your
website is serving or providing content correctly. If a performance issue occurs, the monitor sends an alert. You can then
view a breakdown of the page load in a waterfall view.
CA ASM Monitors
DNS Monitor
A Domain Name System (DNS) monitor checks DNS servers for the correct resolution of a hostname. DNS monitors
perform the following tasks:
•
Query one or more DNS servers (local or remote) for a given resource record and verifies its response.
•
Prevent errors due to a mis-configured DNS.
•
Provide consistent results when queried for resource record of the given hostname.
NOTE
More Information:
•
DNS Monitor
Domain Monitor
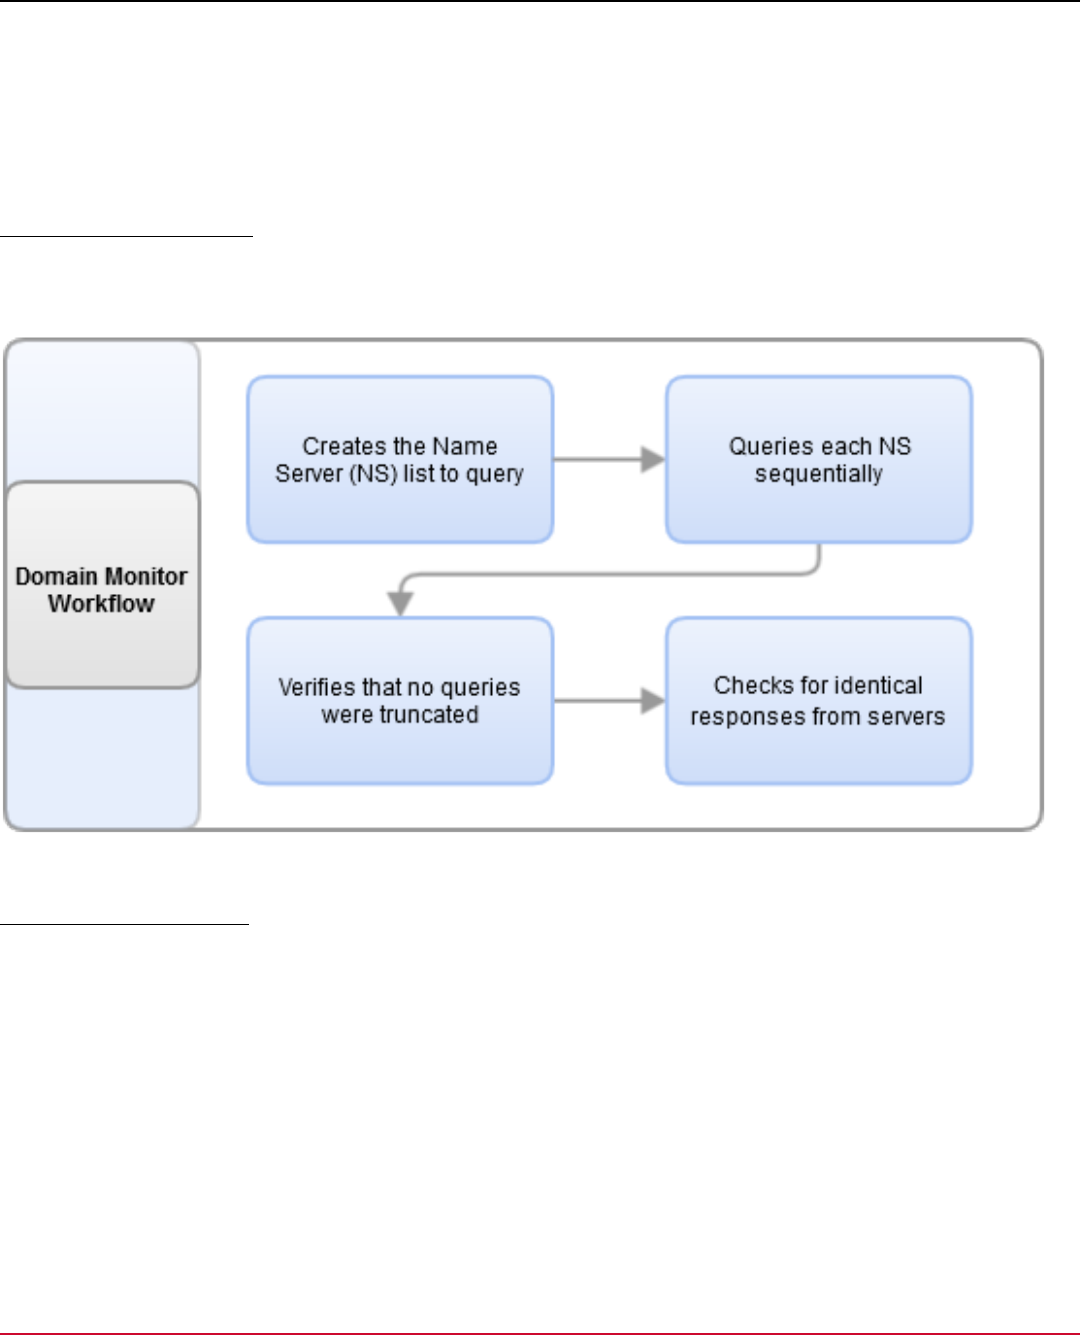
A Domain monitor checks the consistency of the data that is provided by the Name Servers (NS). This monitor queries
local and remote DNS servers for all records (ANY or AXFR requests). The monitor then compares the results for
consistency.
NOTE
More Information:
•
Domain Monitor
Full-Page Monitor
Full-Page Monitors (FPM) measure the performance of real browser visits. An FPM performs the following tasks:
•
Uses multiple connections to render a page
•
Builds a DOM and executes JavaScript that a simple HTTP web check cannot execute
•
Provides waterfall charts of all embedded elements in a page, for example, images, CSS files, and so on
NOTE
More Information:
•
Full-Page Monitor (FPM)
24

DX App Synthetic Monitor SaaS
Real Browser Monitor for Firefox
A Real Browser Monitor (RBM) with a DX APP Synthetic Monitor recorder script can perform the following tasks:
•
Record and playback user navigation and interactions on web sites
•
Play a recorded script in a real Firefox instance on monitoring stations
NOTE
More Information:
•
Real Browser Monitor (RBM) for Firefox
Related topics:
•
DNS Monitor
•
Domain Monitor
•
Full-Page Monitor (FPM)
•
Real Browser Monitor (RBM) for Firefox
•
WebDriver Authentication
•
WebDriver Monitor
•
WebDriver Selectors
•
WebDriver CLI
•
Build WebDriver Scripts
•
WebDriver Placeholders
•
WebDriver if-else Branching and JavaScript
DNS Monitor
Resource Records
The DNS monitor supports the following Resource Records:
•
A
Address
•
AAAA
IPv6 Address
•
MX
Mail Exchange
•
NS
Name Server
•
CNAME
Canonical Name
•
PTR
Pointer
•
SOA
Start of Authority
•
TXT
Text
Configure DNS Monitor
DNS monitors have the following configuration options:
•
Record Type
25
DX App Synthetic Monitor SaaS
Defines the Resource Record that you want to query.
•
(Optional) Expected Result
Signifies the expected answer of the DNS server. If set, the answer of the queried DNS server matches against the
setting.
•
Number of Retries
Sets the number of unanswered requests that the monitor waits for.
•
Use TCP Instead of UDP
Enables communication through the TCP protocol.
•
DNS Servers
Specifies the server that the tests query. Select one of the following options:
–
Local
Uses a local DNS resolver (with cache) on the Point of Presence to monitor the experience of a real user. This
option mimics the lookup behavior of a local user.
–
As Listed by DNS
Queries all the name servers that are listed in the NS records for hostname .
–
Custom
Lets you enter a custom list of name servers to query. Enter the IP addresses of the servers in a comma-separated
list.
–
Minimum
Specifies the minimum number of servers that respond to the monitor.
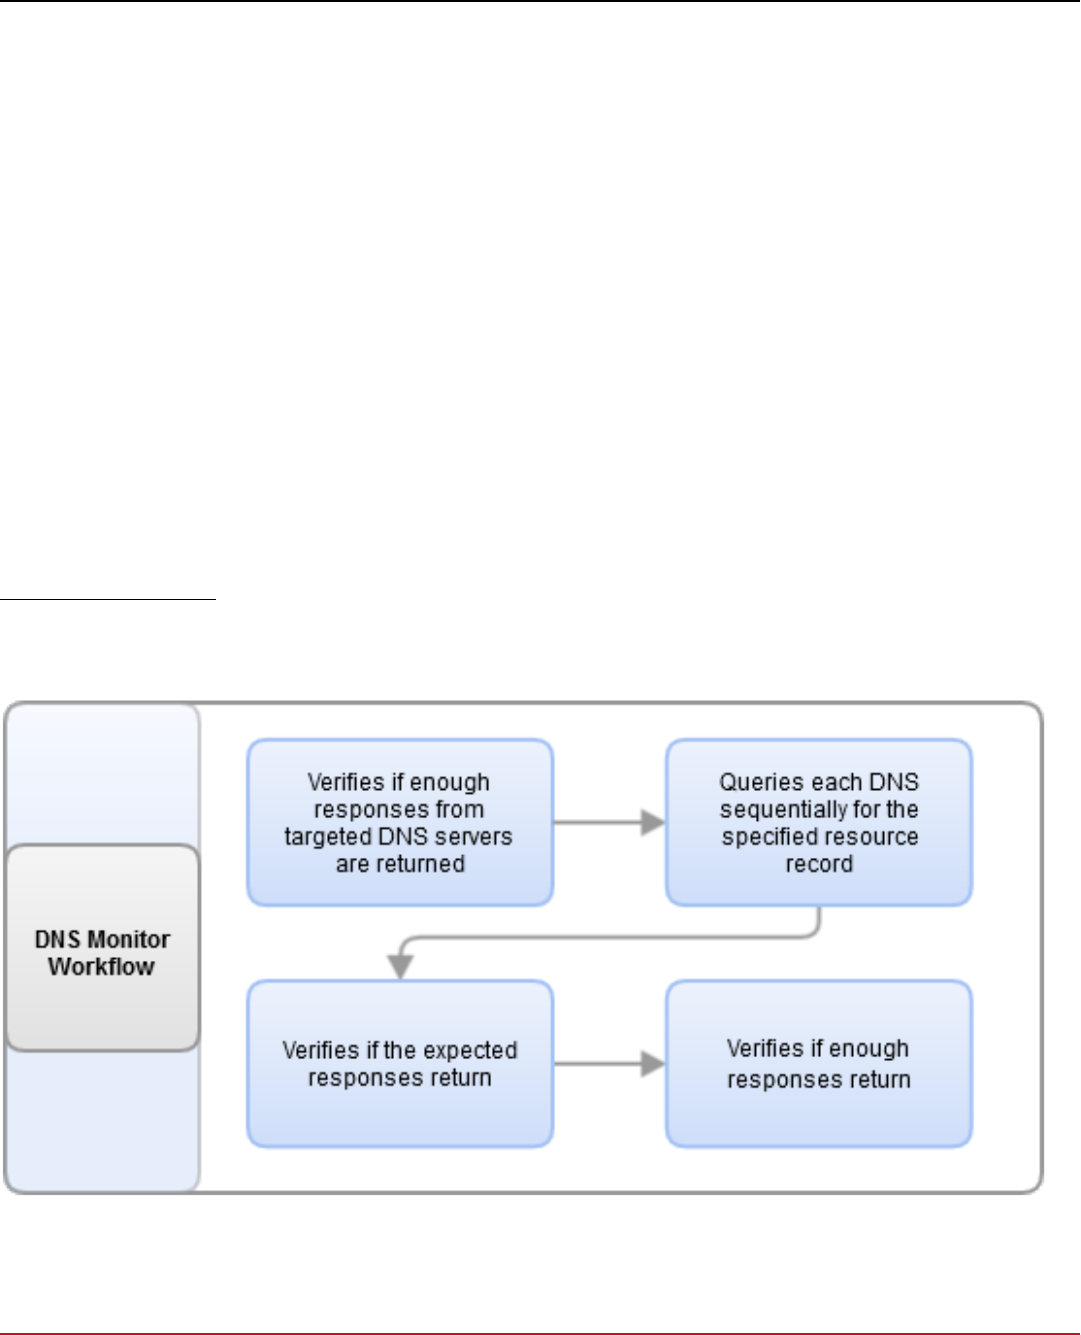
DNS Monitor Workflow
The following diagram shows the DNS monitor workflow:
Figure 1: DNS Monitor Workflow
26

DX App Synthetic Monitor SaaS
Collected Metrics Process
The following diagram shows the metric collection process of the DNS monitor:
Figure 2: DNS Monitor Metrics
Collected Metrics
Metric Name Unit Description
Resolve Time ( rtime ) Milliseconds The time to retrieve the NS Resource
Record This metric is applicable only when
you select the As Listed option.
Query Time ( qtime ) Milliseconds The time to query one NS
Processing Time ( ptime ) Milliseconds The duration of the fastest response
Query Time ( dtime ) Milliseconds The average duration of all NS lookups
Download Size ( dsize ) Bytes The average size of all NS responses
Error Messages
For more information about possible error messages, see Error Messages.
Domain Monitor
Configure Domain Monitor
Domain monitors have the following configuration options:
•
Number of RetriesDefines the number of times that unanswered requests are retried.
•
TCP or UDPSpecifies the communication protocol.Default: UDP
NOTE
Not all servers support TCP. Some firewalls do not allow TCP communication to DNS servers. To use TCP,
verify that your DNS servers support TCP.
•
Minimum Number of NS that RespondSpecifies the minimum number of servers that require a correct response for
the monitor. Use UDP for faster delivery.
•
DNS Zone TransferSpecifies the transaction type. Select ANY to execute requests from all locations.Default: ANY
27
DX App Synthetic Monitor SaaS
NOTE
AXFR servers can be restricted. Not all servers respond to zone transfer queries or reply to all requests.
•
DNS ServersSpecifies the server that the test queries. Select one of the following options:
–
DNS ListQueries all the name servers that are listed in the NS records for the hostname .
–
CustomLets you enter a custom list of name servers to query. Use commas to separate the IP addresses of the
servers
Domain Monitor Workflow
The following diagram shows the Domain monitor workflow:
Figure 3: Domain monitor workflow
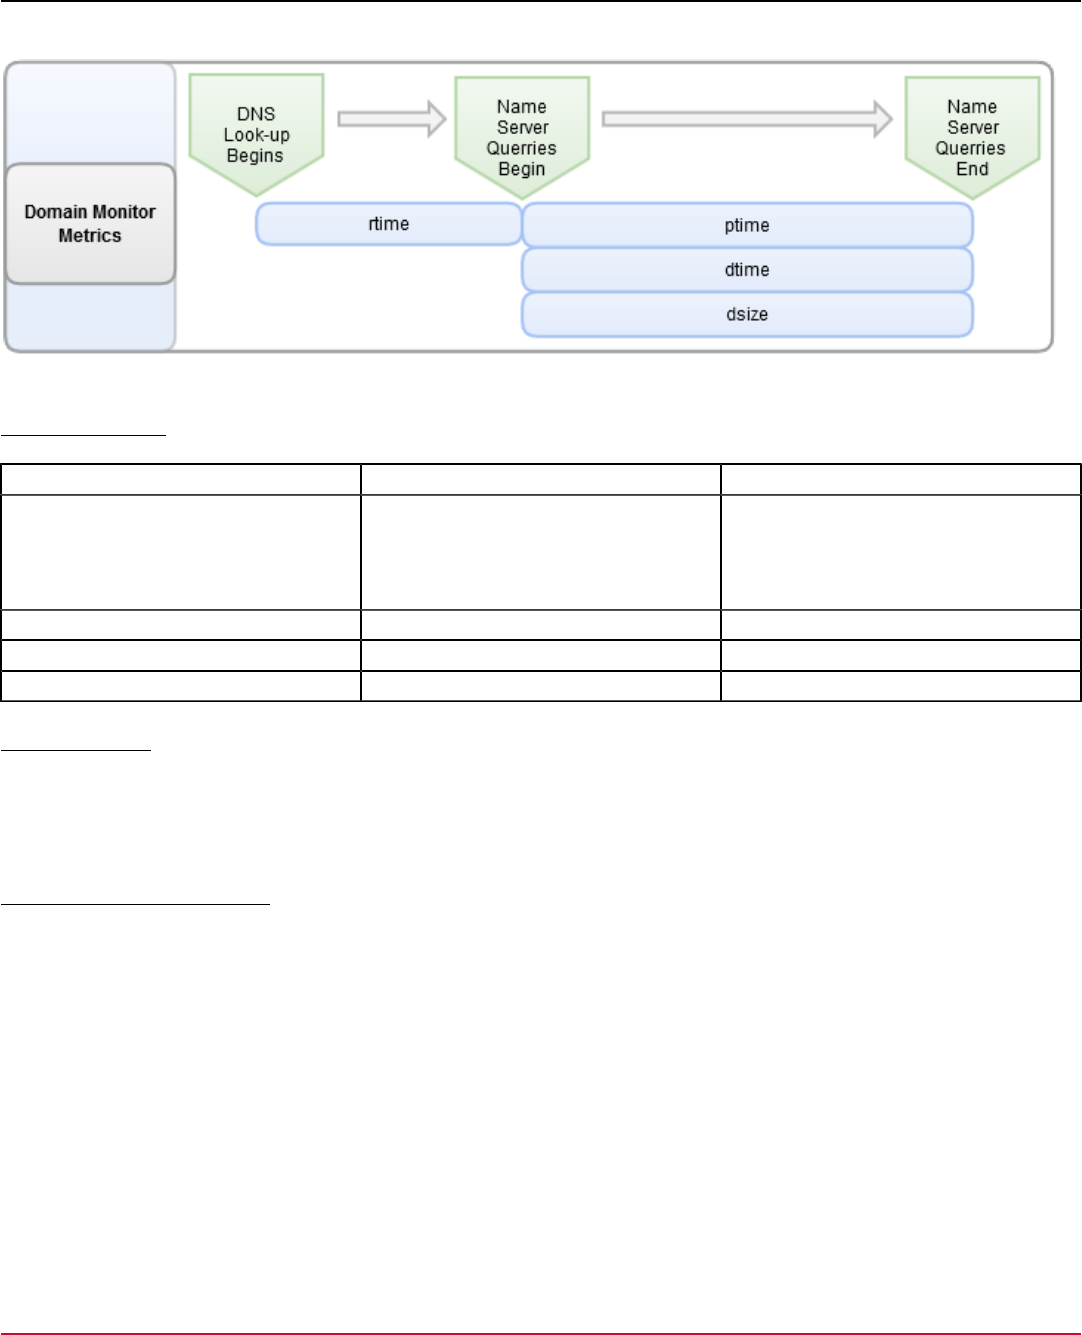
Collected Metrics Process
The following diagram shows the metric collection process of the Domain monitor:
28
DX App Synthetic Monitor SaaS
Figure 4: Domain Monitor Metrics
Collected Metrics
Metric Name Unit Description
Resolve Time ( rtime ) Milliseconds The time to retrieve the NS Resource
Record
Note: this metric is applicable only when
you select the As Listed option.
Processing Time ( ptime ) Milliseconds The duration of the fastest response.
Query Time ( dtime ) Milliseconds The average duration of all NS lookups.
Download Size ( dsize ) Bytes The average size of all NS responses.
Error Messages
For more information about possible error messages, see Error Messages.
Full-Page Monitor (FPM)
Configure Full-Page Monitor
Full-Page monitors have the following configuration options:
•
Browser Profile (Chrome or Firefox)
Affects the waterfall chart and total timing. Browsers load and render pages and elements differently
•
Alert on JavaScript Errors
Sends alerts when JavaScript errors are detected on the page
•
Allow Browser to Make Requests
Specifies where the browser is allowed to make requests. Select from the following options:
–
The Site Domain Only
–
The Internet
–
Selected Domains
•
Deny Requests to Selected URIs
Specifies where the browser is not allowed to make requests. This setting can contain either a comma-separated list of
host names, or a regular expression that is delimited by slashes.
29
DX App Synthetic Monitor SaaS
NOTE
A regular expression must match the full URI string. For more information about supported RegEx constructs,
see the Java documentation. Modifiers are not supported.
•
Only Use Stations with IPv6 Connectivity
Enables the option to use IPv6 capable monitoring stations
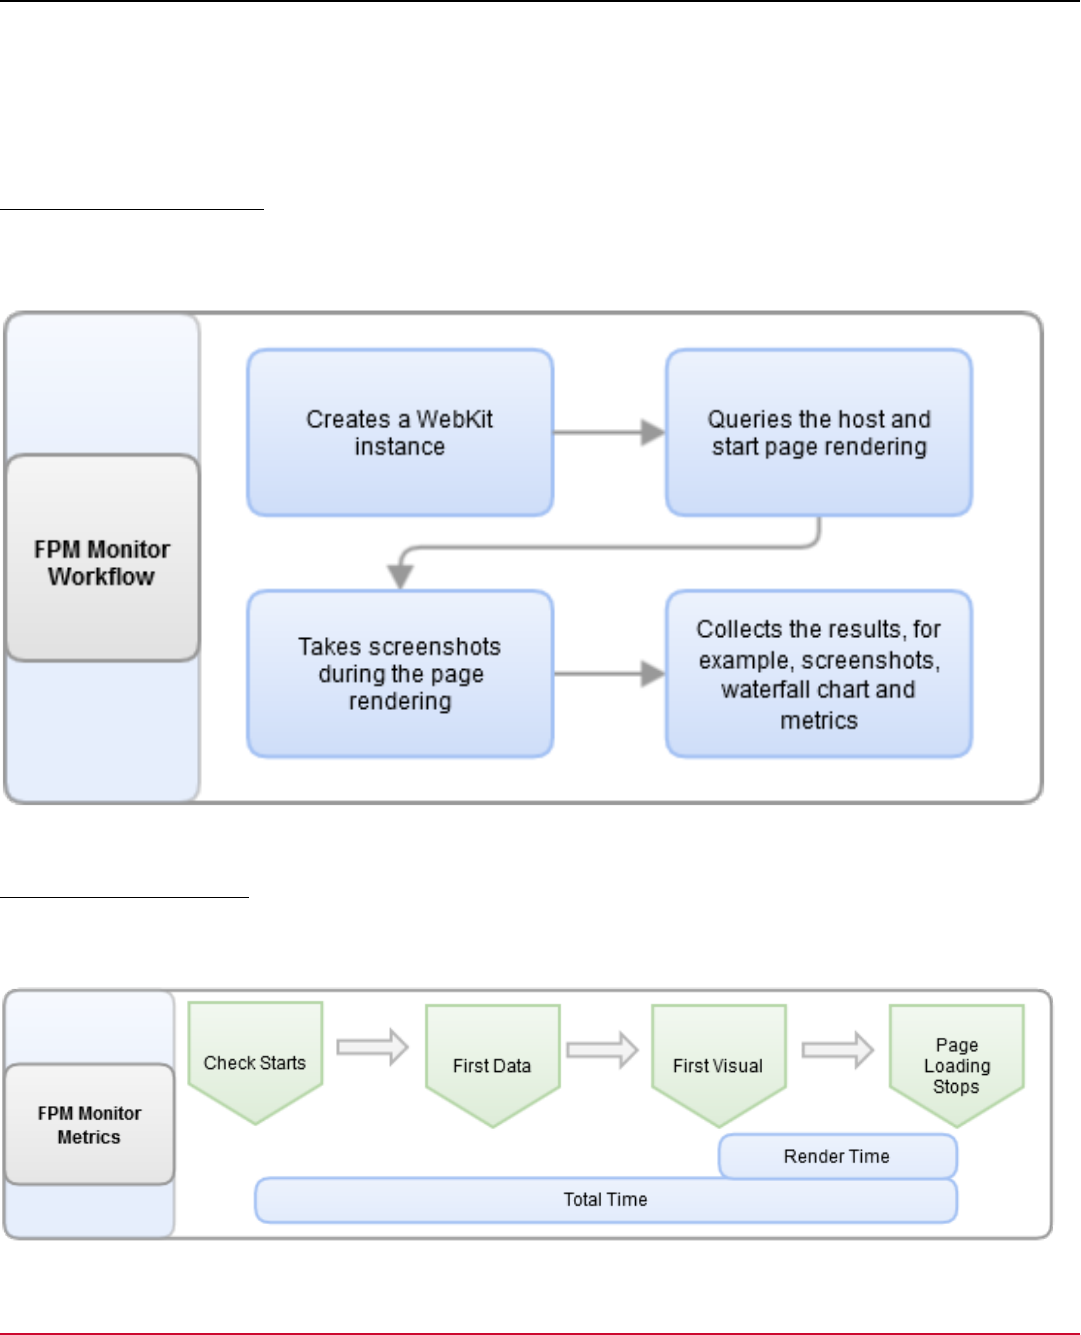
Full-Page Monitor Workflow
The following diagram shows the FPM workflow:
Figure 5: FPM Monitor Workflow
Collected Metrics Process
The following diagram shows the metric collection process of the Full-Page monitor:
Figure 6: FPM Monitor Metrics
30

DX App Synthetic Monitor SaaS
Collected Metrics
Metric Name Unit Description
First Data ( connect time ) Milliseconds Time to connect to host and retrieve first
data.
First Visual Milliseconds Time to start rendering a page.
Render Time Milliseconds Time to fully render a page.
Total Loading Time Milliseconds Total time of the whole check.
Document Size Kilobytes Total size of all downloaded content, for
example, HTML, CSS, and, images.
Requests Number of all subsequent requests, for
example, HTML, CSS, and, images.
Waterfall Charts Script Step Representation of embedded elements in a
page, for example, images, and, CSS files.
Error Messages
For more information about possible error messages, see Error Messages.
Real Browser Monitor (RBM) for Firefox
NOTE
For the latest implementation of the Real Browser monitor for Firefox, see WebDriver Monitor.
Users cannot create, activate, or edit the Obsolete Firefox monitors.
Configure Real Browser Monitor
Real Browser monitors have the following configuration options:
•
Allow Browser to Make Requests to
Specifies where the browser is allowed to make requests. Select from the following options:
–
The Site Domains Only
–
The Internet
–
Selected Domains
•
Deny Requests to Selected URIs
Selects where the browser is not allowed to make requests. This setting can contain either a comma-separated list of
host names, or a regular expression that is delimited by slashes.
NOTE
A regular expression must match the full URI string. For more information about supported RegEx constructs,
see the Java documentation. Modifiers are not supported.
•
Disable HTML5 Media
Blocks multimedia, for example, video and audio content, and saves monitor bandwidth usage
•
Script File
Uses a recorded Browser Transaction (.bx ) file
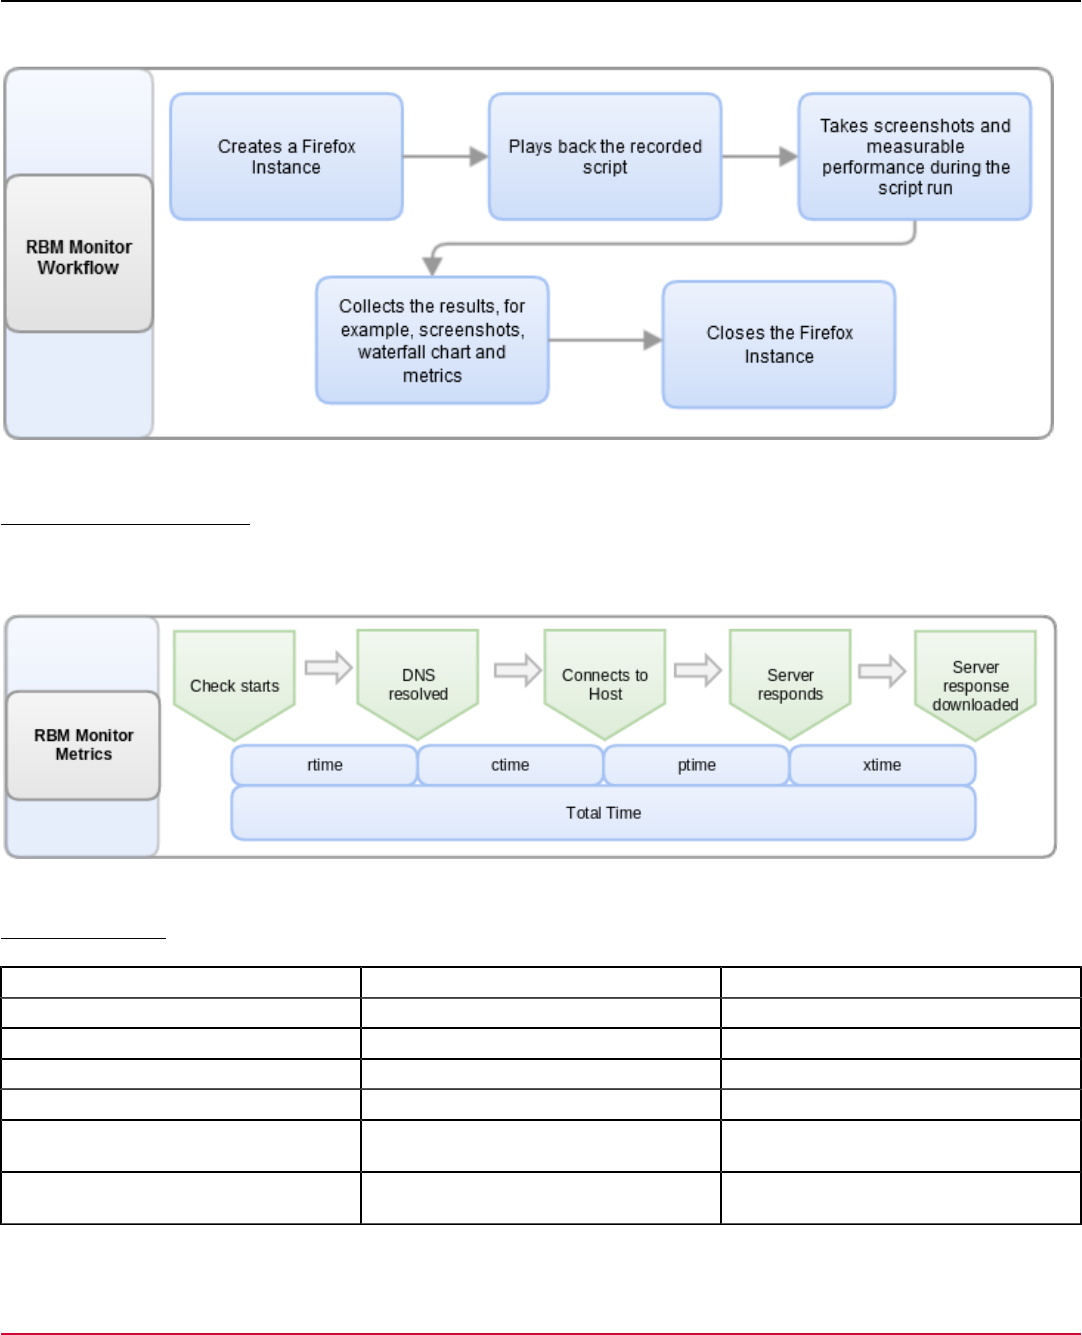
Workflow
The following diagram shows the RBM workflow:
31
DX App Synthetic Monitor SaaS
Figure 7: RBM Monitor Workflow
Collected Metrics Process
The following diagram shows the metric collection process of the Real Browser monitor:
Figure 8: RBM Monitor Metrics
Collected Metrics
Metric Name Unit Description
Resolve (rtime ) Milliseconds DNS resolution time of the target host.
Connect (ctime ) Milliseconds Time to connect to the target host.
Processing (ptime ) Milliseconds Time for the server to respond.
Transfer (xtime ) Milliseconds Time to download the server response.
Total Time Milliseconds Duration of the check. This check is
performed without user interaction.
Download Size B/kB/MB Total size of all the downloaded content, for
example, HTML, CSS, and images.
32
DX App Synthetic Monitor SaaS
User Interaction Milliseconds Extra time that is spent on browser actions
for example, filling forms, clicking buttons,
verify text assertions, and executing
javascript/AJAX calls.
Grand Total Milliseconds Total time of the whole check including user
interaction.
Waterfall Chart Script Step Representation of embedded elements in a
page, for example, images, and, CSS files.
Error Messages
For more information about possible error messages, see Error Messages.
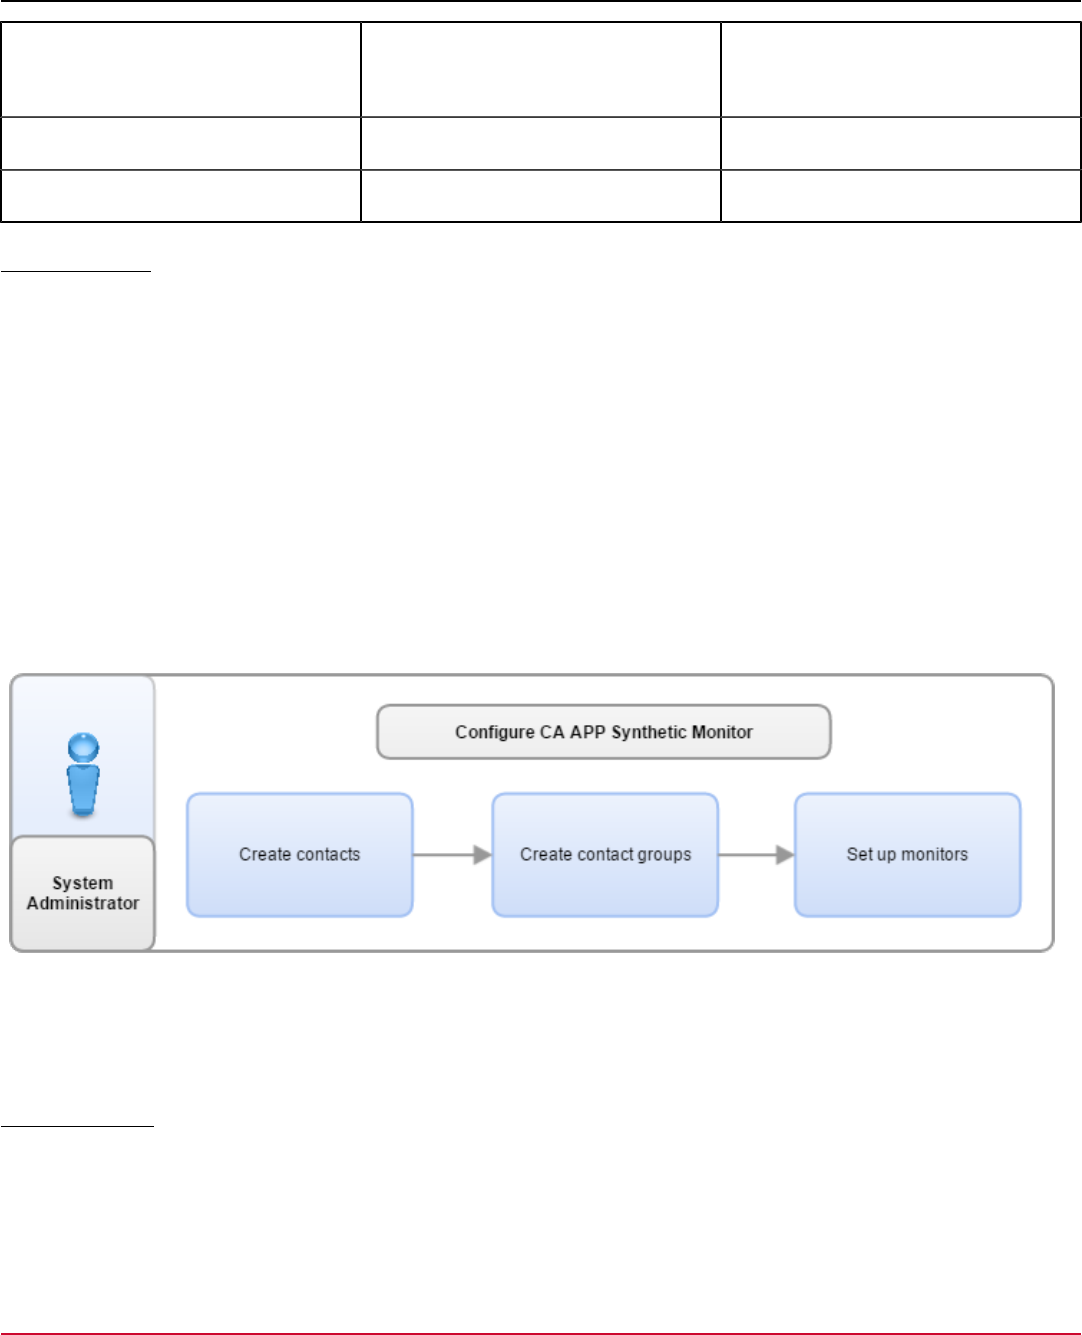
Configure DX App Synthetic Monitor
As a System Administrator, you are responsible for the performance of your web environment within set parameters. DX
APP Synthetic Monitor allows you to set up monitors, create contacts, and contact groups. The monitors send alerts to the
contacts and the contact groups when performance varies from the configured parameters of the following web elements:
•
Network Protocols
•
Applications
•
Application transactions
•
Service transactions
•
Servers
The following diagram shows the configuration process:
•
Create Contacts
•
Create Contact Groups
•
Set Up Monitors
Create Contacts
Create contacts that receive performance issue alerts.
Follow these steps:
1. In the Reports & Alerts section, click Alert contacts, then click Create contact.
2. Select the Type of contact, enter the contact information, and click Save.
The contact is created and a notification, 'The contact has been created' is displayed'.
33

DX App Synthetic Monitor SaaS
NOTE
•
You can change the primary default contact at any time.
•
The contact is set to default only if, you click Is Default or this is the first contact created.
3. A confirmation code is sent to the mentioned contact information. Enter the code in the Confirmation code, and click
Confirm. A notification, ''The contact confirmed successfully' is displayed.
–
Click Resend to receive the confirmation code again.
–
Click Later to postpone the contact confirmation.
NOTE
The confirmation code is sent only to the new contacts created.
Create Contact Groups
To receive alerts in a set order, put the contacts in a group.
Follow these steps:
1. In the Reports & Alerts section, select Alert contacts, then select Create group.
The Contact Group page opens.
34

DX App Synthetic Monitor SaaS
2. Enter a Group name and set the Alert order and Limits.
–
Alert order
Defines the order in which contacts in a group receive alerts.
NOTE
If the primary contact is not available, you can set the number of contacts to receive alerts.
–
Limits
Specifies the number of contacts that the subscription package sets.
3. Specify the number of consecutive errors that occur before an alert is sent in the After consecutive errors setting.
4. (Optional) Select Default contact to set the new group as the primary contact.
5. Select a Folder for the contact group
6. Select Save.
The group begins receiving alerts.
Set Up Monitors
Configure monitors to track the performance of your web environment from checkpoint locations around the world.
Follow these steps:
1. In the Monitoring section, select Monitors, then select New monitor.
2. Select one of the following monitor types:
–
Synthetic Monitor
Tracks unsecured or SSL-secured web sites.
–
Advanced Synthetic Monitor
Uses scripting, functional web application monitoring, and full-page monitoring to track web sites.
–
Script Monitor
Uses scripts that are created with JMeter.
–
Full-Page Monitor (FPM)
The monitor opens the page in the real browser (Chrome). The FPM verifies the performance of the website from
an end-user perspective.
–
Webdriver Monitor
Tracks the webpage by running performance scripts for a specific browser and platform using Selenium WebDriver
Engine.
The Create monitor page opens.
3. Complete the required fields depending on the monitor type.
NOTE
The default timeout for Webdriver Monitor is 20 seconds and 10 seconds for rest of the monitor types. If you
receive frequent timeout alerts or your session has multiple steps, consider increasing the timeout values.
4. Select Save.
FAQs
Read the following FAQs to learn more about CA ASM.
Should I have all my stations in the same country/region?
You should have every station in the country where it is really located. Otherwise, we'll report inaccurate data in reports or
charts (for example, when grouping by continent, on PSPs).
35

DX App Synthetic Monitor SaaS
Within the country, you can create a new location (for example, city) for every station or you can put all your stations in
one location.
The first option is good if you want to control if this particular monitor will be run on this station and not on the other.
The second way is good for improving the performance of a station. If your station is not performing well you just add
another station to the same location and do not have to reconfigure your monitors. Our system will automatically load
balance the load among the stations in the location.
Can I get an alert if a station is down?
During the installation, you are asked if you want the station monitored. This will monitor services on the station and send
an email (from the station) in case some error occurs, but it is self-monitoring with the drawback that it cannot inform you
if the station fails completely. For such cases, you can create a simple HTTPS monitor from any public station that will
monitor this URL
https://assetproxy.asm.ca.com/ oppop/XXX/localhost/api/ status/system
where XXX is the client tunnel CID you can find on your OPMS in /etc/asm/optunnel.yaml. Do not publish the client tunnel
CID anywhere, for example, do not place such monitors in public folders. In the future, we plan to automatically monitor
OPMS.
Can you save six months of logs?
We save the check results and metrics for 2 years. However, the details of the checks (jtl files, har files, videos of the
webdriver sessions etc.) are available for 14 days only to save space on the local disk on the stations. If you have a huge
disk on your on-premise station you can change the retention period of the assets by changing keep-jobs in /etc/asm/
smartpop.yaml and restarting the API.
Why are checkpoints not working as expected?
It can have many reasons. First of all you should check if all the services on your system are up and running by calling
"monit summary". All services should report OK. If not, try to restart the failing service, for example, "monit restart api". If
everything is running, try to test the station from DX APM web - go to On-Premise / Stations and select the station. First,
use the localhost as a URL and if it works try any service that is accessible from the station.
Can I remove bad data to improve my past SLAs?
Unfortunately not. We provide a monitoring system which reports what it finds. To save and retrieve such a huge amount
of data efficiently our storage is optimized for adding new entries but not for updating or deleting. Any update or delete
is very inefficient and generates new data (yes, even delete means adding new data!). The result is then suboptimal for
fast access and slows down all queries. Additionally, we generate reports from that data and send them via email. Such
reports cannot be modified retrospectively and could report different data than charts in UI display. That's why we do not
support the backward modification of monitoring logs. In very rare situations within 24 hours from the event we can mark
some error checks as maintenance checks (sometimes customers forget to create a maintenance window) but this must
always be done manually and we try to reduce such requests to a minimum.
My response looks different across stations. Why is this?
The stations are real stations around the globe and the conditions are unique at each station. The internet connection
in some countries or cities may be poor or there can be some weak point on the road. The internet routes often do not
follow the closest distance or real routes and even if the servers are geographically close internet distance may be much
longer (for example, different ISPs can route all traffic through their central routers in other countries). Some countries
have specific conditions (for example, China aggressively controlling and filtering web traffic). You should also keep in
mind that the speed of light can be a limiting factor in some cases. If you monitor your US stations for example, from India,
the direct (shortest) distance between India and U.S.A. maybe (it depends on the cities) approx. 12500 km (over Russia
36

DX App Synthetic Monitor SaaS
and the north pole - not respecting internet cable infrastructure). Since even the light travels this distance 12500/300000 s
= 42 ms, you cannot expect the ping response to arrive in less than 2*42 ms = 84 ms.
Some services use CDNs and the hostnames are resolved and the request directed to different servers based on your
geographical locations (for example, facebook, google, amazon, and so on). The result can also be affected by the current
date-time in both the monitoring station or the monitored service location (for example, overloaded internet when the
working hours start), accidents (service disruptions).
Thus, the monitoring represents "real life" tests and it is often very hard to hunt milliseconds and can be misleading to
compare the results from different stations, different or even the same time.
Can DX APP Synthetic Monitor work with local monitoring software?
Yes, DX APP Synthetic Monitor works with local monitoring software by using an OPMS.
How long are root cause analysis details available?
Error logs of root cause analysis details are available for seven days.
Do local internet problems affect monitoring?
Local internet problems do not cause interruptions in monitoring. Monitoring is performed from a network of servers that
are located outside your local internet network.
How can I select a monitor station by IP address?
Follow these steps:
1. Select Products, then select Monitoring Stations.
2. Note the name of the Monitoring Station with the IP address you want to use.
3. Select Monitoring, Monitors, New Monitor.
4. Select More Options, and then select Checkpoint Selection.
5. Select Clear to clear all monitors.
6. Select the monitoring station with the IP address that you want to use. Enter the other required fields and select Save.
A monitor is created with the IP address.
Which DX APP Synthetic Monitor plan is best for me?
To view available plans, log in to DX APP Synthetic Monitor and select Products, Plans. To select the package right for
you, consider the following questions:
•
Which services or protocols (http, https, SMTP, ftp, and so on) do you want to monitor?
•
How many sites or aspects of the sites do you want to monitor?
•
How often do you want checks?
•
How many contacts for alerts and reports do you want?
•
Do you want to monitor systems behind a firewall or do tailored checks?
•
How long do you want log files to remain?
•
Do you need phone support?
Why are Real Browser Monitors (RBM) more expensive than other types of monitors?
RBMs cost more because they are more expensive to operate. For example, RBMs run Firefox which uses more CPU
capacity and memory than other monitors.
37

DX App Synthetic Monitor SaaS
NOTE
Scripts can be recorded with the Script Recorder. RBMs allow screenshots (added in the tools window of the
Script Recorder).
How can I receive SMS or text messaging functionality?
SMS or text messaging is not included in the free package. To enable this functionality, subscribe to
the Basic, Intermediate, or Advanced Options.
How can I access test results?
Log in, mouseover Reports, select a report. Reports let you do the following actions:
•
See all monitor performance charts.
•
View Current Status of all monitors.
•
View monitor performance with graphs.
•
View all your monitors.
•
Browse Log Files.
Compatibility and Security
Browser
DX APP Synthetic Monitor does not support Microsoft Internet Explorer 8 and earlier versions.
HTTPS Monitors and Ciphers
If an encrypted connection to a server is considered, the secure ciphers that are used in the encryption must be strong
enough. Cryptography libraries that are used by both web servers and browsers (for example, OpenSSL) support many
different ciphers. During handshake the web server and client (browser) agree on the most secure cipher that is supported
and trusted by both sides. If they do not find such a cipher the connection fails.
Two problems arise. One is that the "trusted" cipher list changes in time with new vulnerabilities discovered and growing
computer power. If an administrator does not check and update, the web server regularly the configured cipher list
becomes weak. After some time, modern browsers might report that a site is not trusted and might discourage users from
visiting such sites.
The second problem is that the cipher list exchange is not symmetric - the browser offers a cipher list. The web server
selects one of the ciphers or rejects the connection. It might seem that the more ciphers that are included in the cipher
list, the bigger is the chance that the server accepts one of them. Unfortunately, some web servers refuse to communicate
with browsers offering weak ciphers because the browser is flagged as not trustworthy, even though a common strong
cipher is available. Browsers usually include an option (browser specific) to retry the connection, if the first handshake
fails. This situation complicates the decision over what is a failed test and what is not. The ASM HTTPS monitor does not
retry with alternative cipher suite lists.
WARNING
Any handshake which fails is reported as a failed connection.
To handle these situations with HTTPS monitors, use the option to select the cipher list. The easiest and recommended
way is to use the default which is a balanced list of ciphers. Take the ciphers from the underlying library (OpenSSL).
If your server does not work (handshake errors failure), try "All cipher suites" or "Low encryption cipher suites". This
solution is only temporary and we recommend that you ask your administrator to update the web server. If your server
is configured not to trust and communicate with browsers that are offering anything but strong ciphers, use the High
Encryption Cipher Suites option.
38

DX App Synthetic Monitor SaaS
SSLv3 Not Supported by Default
Due to several vulnerabilities found in the SSLv3 protocol, we are moving away from it. This situation primarily affects
HTTPS monitors. SSLv3 connections are not attempted when the Encryption option is set to “Negotiate” (default). If you
still need SSLv3, set the Encryption option to “SSLv3” explicitly.
You might find other consequences of SSLv3 not being supported by default. The handshake process has changed and
your server (the monitored service) can start reporting handshake errors even if it does not rely on SSLv3. This condition
depends on the server settings. For maximum compatibility, the TLS handshake process starts with TLS 1.0. The process
tries higher versions if their support is announced by the server. If, on the other hand, the server drops the TLS 1.0
connection attempt right away, the HTTPS monitor might report an SSL handshake error. In that case, we recommend
setting the desired TLS version precisely in the monitor settings Encryption option.
Product Accessibility Features
CA Technologies, A Broadcom Company, is committed to ensuring that all customers, regardless of ability, can
successfully use our products and supporting documentation to accomplish vital business tasks. This section outlines
the accessibility features of ASM.
Product Enhancements
ASM offers accessibility enhancements in the following areas:
•
Display
•
Sound
•
Keyboard
•
Mouse
•
Custom Controls
NOTE
The following information applies to Windows-based and Macintosh-based applications. Java applications run
on many host operating systems, some of which already have assistive technologies available to them. To
provide access to programs written in JPLF to these technologies, make a bridge. The bridge is between the
technologies in their native environments and the Java Accessibility support. The support is available from within
the Java virtual machine (or Java VM). This bridge has one end in the Java VM and the other on the native
platform. The bridge is slightly different for each platform it bridges to. Sun is developing both the JPL and the
Win32 sides of this bridge.
Display
To increase visibility on your computer display, you can adjust the following options:
•
Font style, color, and size of items
Defines font color, size, and other visual combinations
•
Screen resolution
Defines the pixel count to enlarge objects on the screen
•
Cursor width and blink rate
Defines the cursor width and blink rate to make the cursor easier to find or minimize blinking
•
Icon size
Defines the size of icons. You can make icons larger for visibility, or smaller to increase screen space
•
High contrast schemes
Defines color combinations. You can select colors that are easier to see
39

DX App Synthetic Monitor SaaS
Sound
To use sound as a visual alternative, or to make computer sounds easier to hear or distinguish, adjust the following
options:
•
Volume
Sets the computer volume
•
Text-to-Speech
Sets the computer hear command options and text read aloud
•
Warnings
Defines visual warnings
•
Notices
Defines the audio or visual cues when accessibility features are turned on or off
•
Schemes
Associates computer sounds with specific system events
•
Captions
Displays captions for speech and sounds
Keyboard
You can make the following keyboard adjustments:
•
Repeat Rate
Defines how quickly a character repeats when a key is struck
•
Tones
Defines tones when pressing certain keys
•
Sticky Keys
Defines the modifier key for shortcut key combinations. Examples of the keys: Shift, Ctrl, Alt, or the Windows Logo key.
Sticky keys remain active until another key is pressed
Mouse
You can use the following options to make your mouse faster and easier to use:
•
Click Speed
Defines how fast to click the mouse button to make a selection
•
Click Lock
Sets the mouse to highlight or drag without holding down the mouse button
•
Reverse Action
Sets the reverse function that is controlled by the left and right mouse keys
•
Blink Rate
Defines the cursor blink speed when the cursor blinks
•
Pointer Options
Let you set the following behaviors:
•
Hide the pointer while typing
•
Show the location of the pointer
•
Set the speed that the pointer moves on the screen
•
Select the size of the pointer and color for increased visibility
•
Move the pointer to a default location in a dialog
40

DX App Synthetic Monitor SaaS
Keyboard Shortcuts
The following list shows the keyboard shortcuts that ASM supports:
•
Ctrl+X
Cut
•
Ctrl+C
Copy
•
Ctrl+K
Find Next
•
Ctrl+F
Find and Replace
•
Ctrl+V
Paste
•
Ctrl+S
Save
•
Ctrl+Shift+S
Save All
•
Ctrl+D
Delete Line
•
Ctrl+Right
Next Word
•
Ctrl+Down
Scroll Line Down
•
End
Line End
Keyboard Shortcuts for Product Videos
ASM documentation includes product tutorial videos that are hosted on YouTube. When you view these product videos,
you can use the following keyboard shortcuts:
•
Tab
Scrolls forward through the functions
•
Tab+Shift
Scrolls backwards
•
Enter
Selects the function that is highlighted in a list
•
Forward Arrow and Back Arrow
Controls the video volume
41
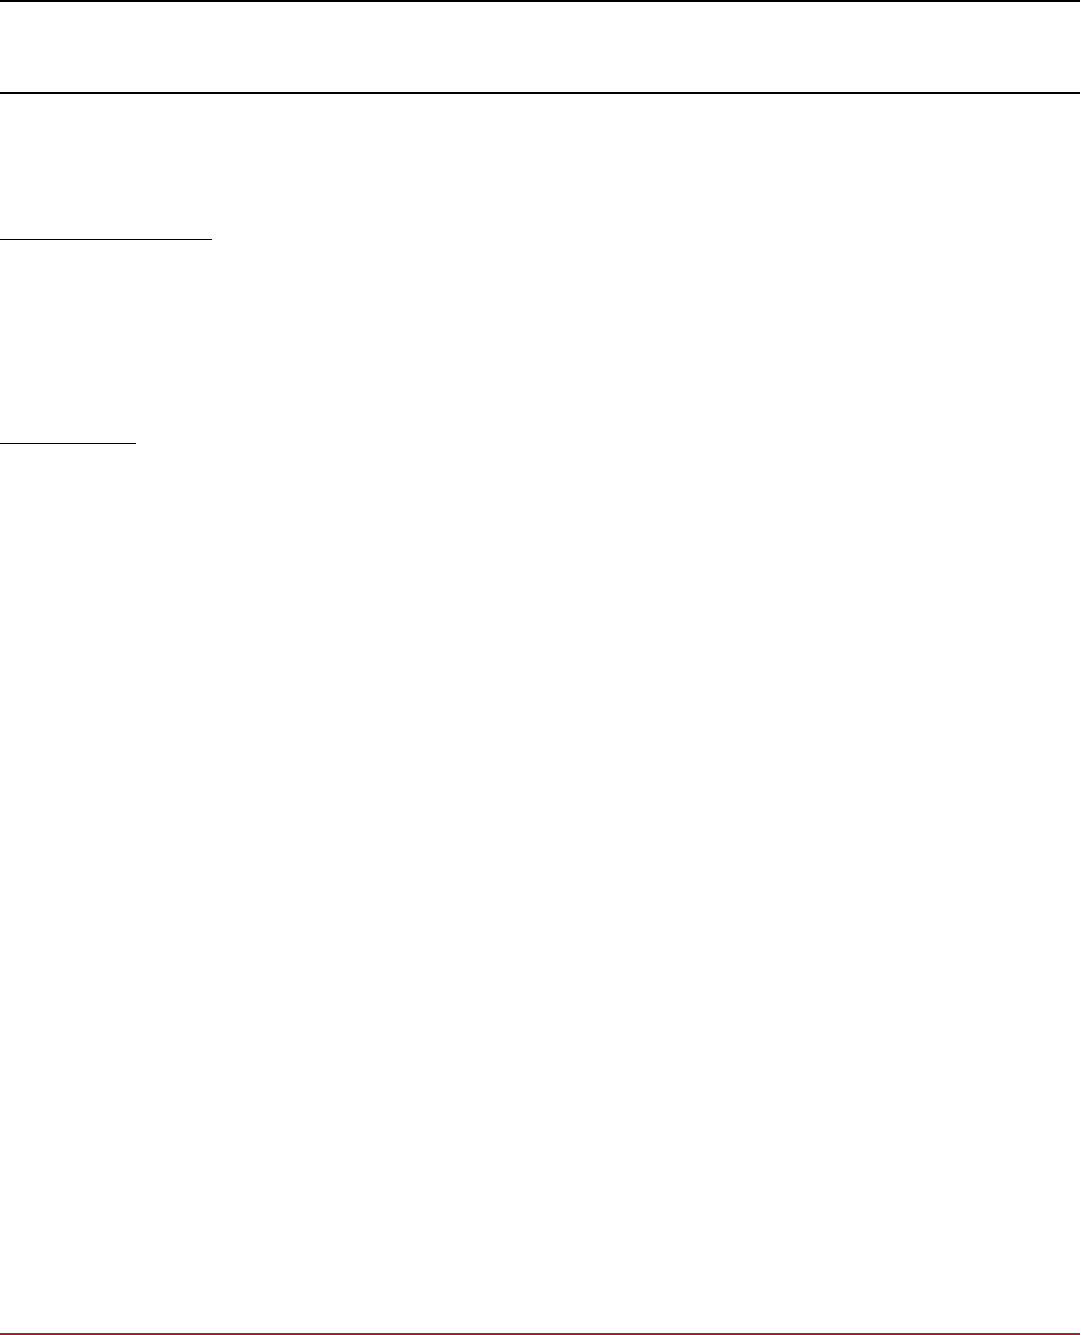
DX App Synthetic Monitor SaaS
On-Premise Monitoring Stations (OPMS)
To monitor transactions behind a firewall, install OPMS in your intranet. See the following demo on How to Deploy On-
Premise Monitoring Stations:
Architecture Overview
On-Premise Monitoring Stations were created to allow customers to monitor services that are only accessible from within
their internal network. OPMS is a server that performs the following tasks:
•
Processes check request from the monitors
•
Issues probes to monitored services
•
Returns results to ASM
Tunnel Clients
To be able to send requests to OPMS from the Internet, a WebSocket tunnel is used. The WebSocket tunnel has one
endpoint that is on the OPMS and the other one on ASM servers. Because the OPMS initiates the tunnel connection, no
NAT or VPN is needed. The only requirement is access to outbound port 443. Optionally, an HTTP proxy can be used.
Since ASM 10.1, OPMS maintains multiple redundant tunnel connections. Multiple stations can share a single tunnel
client but the client has to run on one of the OPMS instances.
42
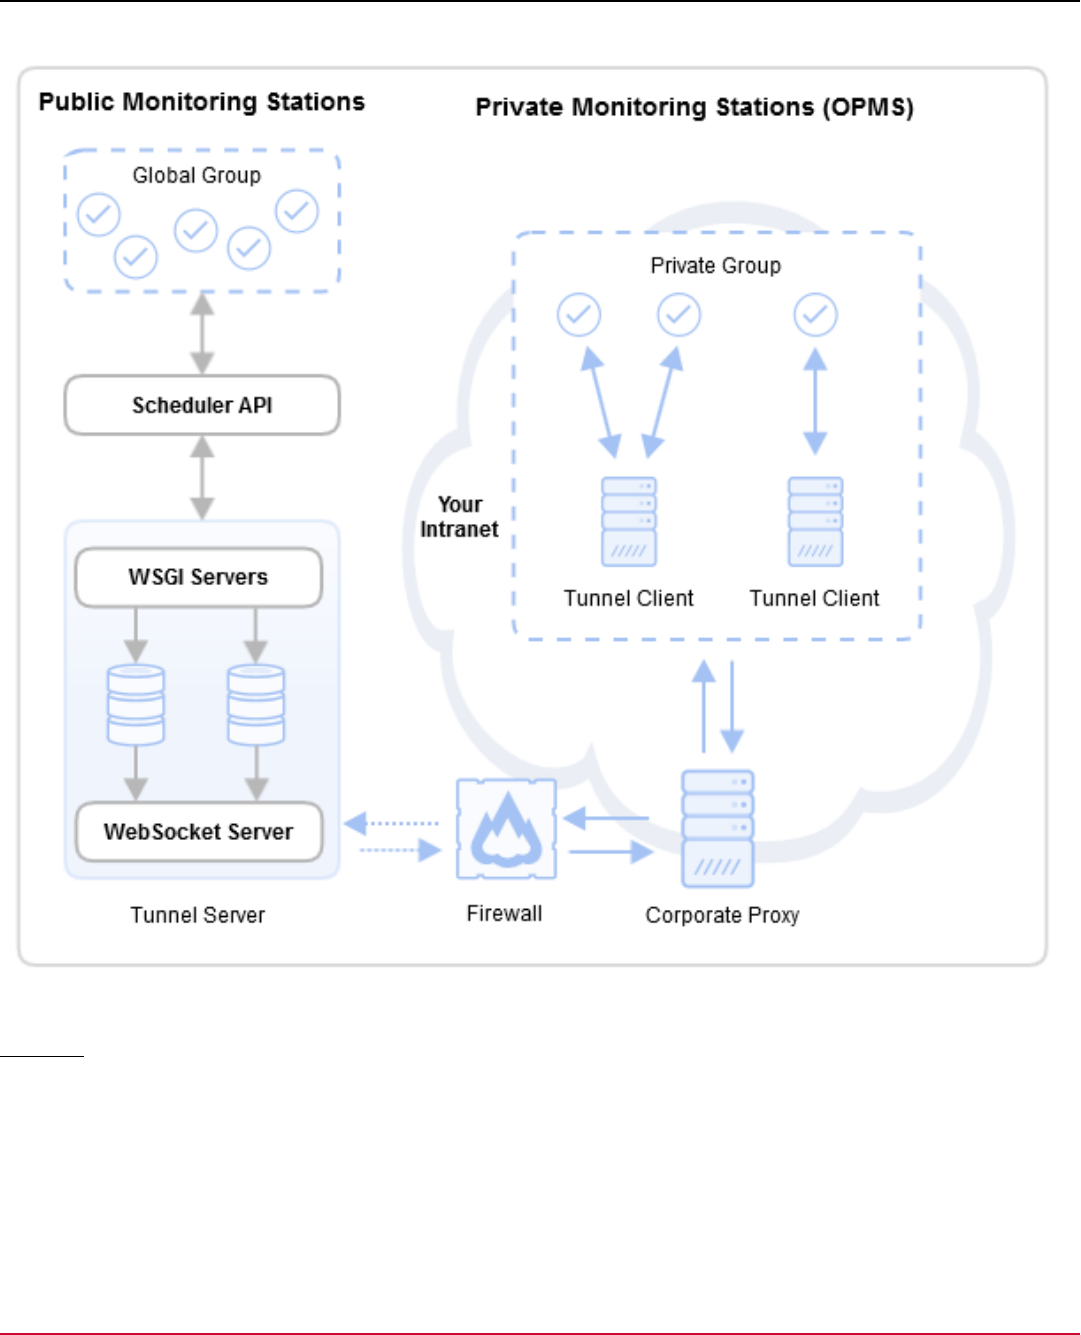
DX App Synthetic Monitor SaaS
Figure 9: Network Architecture
Monitors
To set up a monitor, one tunnel client and a group with one or more OPMS is required. Groups are created during
installation. After you install the OPMS, it is available on the monitor settings page, as a part of checkpoint selection
options.
43

DX App Synthetic Monitor SaaS
Groups
•
The installer lets you create a group and install a tunnel client on a host.
•
Each OPMS is assigned to a group.
•
Monitor uses the groups to select monitoring stations.
•
In the installation, you can use an existing group or an existing tunnel client.
The following architecture diagram shows the two typical host configurations:
•
Host configuration A (Recommended): Includes an OPMS and a tunnel client.
•
Host configuration B: Includes only the OPMS. Assign the OPMS to an existing tunnel client that runs on an installed
OPMS host.
WARNING
In configuration B, if the configuration A OPMS is removed, the configuration B OPMS does not work. To avoid a
non-working configuration B OPMS, Assign a New Tunnel Client.
44
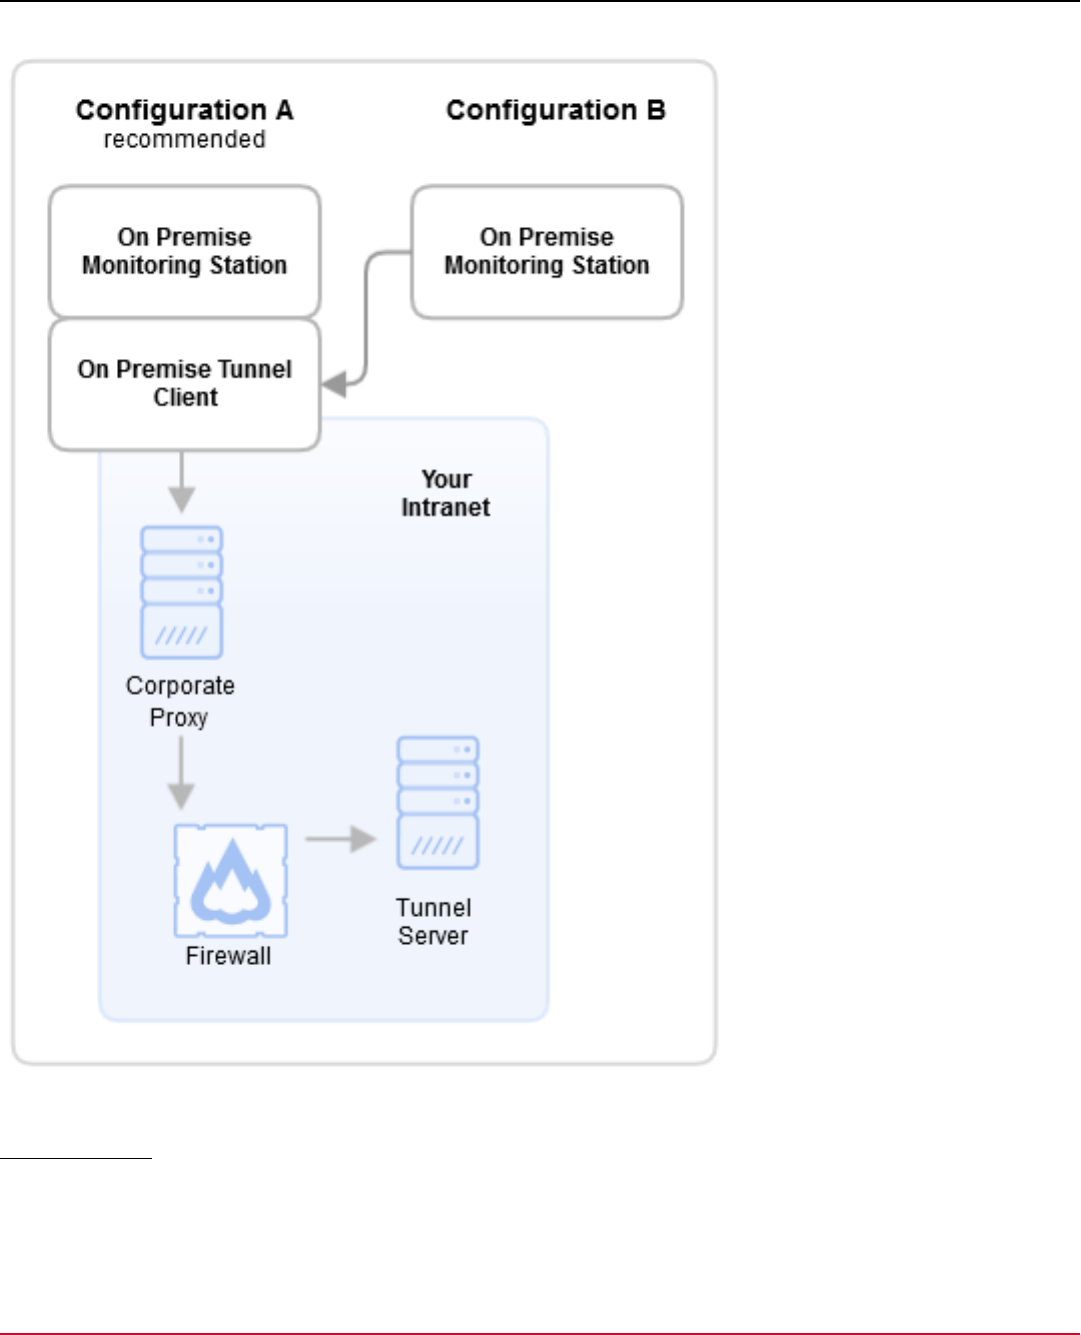
DX App Synthetic Monitor SaaS
Figure 10: Host Configurations
Multiple Groups
With multiple groups you can perform the following tasks:
45

DX App Synthetic Monitor SaaS
•
Perform monitoring checks with one OPMS group in your intranet.
•
Monitor applications that are intranet-based and in data centers that use different sets of OPMS.
•
Monitor applications in the intranet and in data centers with different sets of OPMS.
•
Create two groups to distinguish the OPMS based on the environment. For example, create one Intranet group in each
office, and one back-end group in each data center.
•
Create multiple groups for user access control. Give access to OPMS in a specific group only to certain users.
To manage your groups, go to the ASM Dashboard, select Subscription, Manage On-Premise, Groups.
FAQs
Is the data transfer secure?
•
All OPMS data stays inside the firewall
•
Secure intranet communications are allowed but not required
•
Only the tunnel client communicates with the public Internet and uses SSL encryption
•
The central-to-OPMS communication uses a secure Web Socket tunnel to pass through corporate proxies and
firewalls (HTTP Proxy)
Which data is transferred to the central servers?
•
The transported data includes check result metrics and check result details that are stored in a database. The
database is located in the USA.
•
The stations register themselves on the network to the central server. No transactional data is transferred publicly.
What data is stored on the OPMS?
•
Short-term cache for check results
•
Result assets like screenshots and HAR files that can be stored for up to a month. On first access, these assets are
cached on ASM servers.
Why use the Web Socket Protocol?
•
The Web Socket Protocol is the new standard for long-lived connections
•
The protocol passes through proxies transparently.
•
Plain tunnels are less versatile and less proxy-friendly
•
A VPN option would need significant configuration and is also not always compatible
How to Use Ports:
See Firewall settings.
How do I use SSH certificates?
The stations do not have SSH certificates set up by default. You can set up certificates inside your firewall.
Pre-Installation Checklist
Prerequisites
If you have all the following software and hardware elements, you can move directly to installing an On-premise monitor.
Required Details Cautions
Hardware Min, Med, or
Max
See the table below. The availability of functions depends upon hardware
capabilities.
46

DX App Synthetic Monitor SaaS
Network Access Outbound port 443 must be open. Alternatively, an
HTTP proxy can be used.
Only HTTP proxy (with optional password
authentication) can be used. HTTPS and SOCKS
proxies are not supported.
Software ASM on-premise is independent of the operating
system. The officially tested operating systems can
be found below. See Software Requirements.
Ensure that you follow the steps in Software
Requirements during the OS installation.
Access rights The OPMS installer must be run under the root user. Running the installer using sudo is not supported.
Hardware Requirements
The server hardware limits the type and number of agents that the OPMS can run. These hardware requirements also
apply to virtual machine installations.
Minimum Adequate Optimum
Operating
System
•
Red Hat Enterprise Linux 7, 8
•
Oracle Linux 7 or later
•
CentOS 7 or later
•
Red Hat Enterprise Linux 7, 8
•
Oracle Linux 7 or later
•
CentOS 7 or later
•
Red Hat Enterprise Linux 7, 8
•
Oracle Linux 7 or later
•
CentOS 7 or later
CPU Cores 2 or more cores at 2 GHz or higher 4 or more cores at 2 GHz or higher 4 to 8 core at 2 GHz or higher
Memory 2 GB or more 4 GB or more 8 GB or more
Swap Space 1 GB or more 1 GB or more 1 GB or more
Disk Space 70 GB or more 120 GB or more 250 GB or more
Disk I/O Low Medium High
Network
Bandwidth
10 Mbit or more 10 Mbit or more 100 Mbit
IPv6 Support Not Applicable Yes, native or tunneled Yes, native. Tunnels are not
recommended.
Minimum hardware requirements
A minimal OPMS host can run all agents.
Medium hardware requirements
A moderately sized OPMS host can run up to 5 FPMs concurrently.
Optimum hardware requirements
An optimal OPMS host can run at least five FPMs concurrently.
Bare metal hardware is recommended for optimum performance, but a virtual machine can be used too. For information
about compatibility with RedHat/Oracle Linux/CentOS, refer to your virtualization solution provider.
Recommended Disk Space
If you want the disk to be partitioned, use the following recommended disk space for special folders:
•
/tmp: 5 GB
•
/var/log: 5 GB
•
/var/lib/docker: 50 GB
•
/opt/asm: 100 GB
The /opt/asm directory stores all the assets (videos, screenshots, har files, and so on), and if there are more agents
running on the station, more space is needed. The /var/lib/docker directory may grow with every OPMS upgrade.
However, it is safe to stop all services on the station, delete the directory and restart all the services before or after the
upgrade. All the images are pulled automatically (several gigabytes). If the agents are not up and running within 20
minutes, a delay in the first start of all Docker-based agents is expected and the monitor may report failures.
47

DX App Synthetic Monitor SaaS
Packages
You must install the following packages on CentOS/RH stations:
•
docker engine 20.10 or later
•
docker-compose-plugin v2
•
containerd 1.6.6 or later
Software Requirements
If the XFS filesystem is used, the d_type (directory entry type) support must be enabled (XFS filesystem parameter ftype)
to comply with docker storage driver compatibility requirements.
NOTE
•
If the d_type is not supported, the installation stops. For more information, see overlayfs driver. Ensure your
system is configured to use the overlay2 storage driver.
•
Ensure the systems running RHEL or CentOS with your kernel version is above or equal to 3.10.0-1160.71.1
before proceeding with the installation to avoid issues with the OPMS.
You can check the compatibility using the xfs_info /var command. A result ftype=1, indicates a supported file system.
A result ftype=0, indicates an unsupported file system and you must recreate the compatible file system.
OPMS requires one of the following operating systems:
•
Red Hat Enterprise Linux 7 or later
•
Oracle Linux 7 or later
•
CentOS 7 or later
Install the Operating System
To use the OPMS installer graphical interface, the graphical desktop environment must be present. You can also use a
text console for installing the OPMS.
Follow these steps:
1. Obtain the installation image for your Linux distribution.
–
CentOS 7
2. Run the OS installer on the host.
3. Specify the hostname. Do not use the suggested default localhost.
4. Specify your network domain in the <domain>.<TLD> format. Do not use the suggested default local domain.
5. Specify the partition layout.
–
RHEL / CentOS / Oracle Linux
Delete the /home partition and enlarge the root partition to fill the unused space.
6. Optionally, specify the HTTP Proxy for the download of installation packages. The proxy configuration that is entered in
this step is used by the OPMS Installer and On-Premise Monitoring Stations (OPMS).
7. Specify the following software selection:
a. RHEL / CentOS / Oracle Linux
a. SSH server
b. Standard system utilities
c. Graphical desktop environment (optional)
48

DX App Synthetic Monitor SaaS
Post Installation Requirements
Install the Docker
To run the ASM On-premise station, it is essential to have Docker installed. To install Docker, refer to the Docker
installation documentation. Refer to the appropriate section based on your installed operating system. After installing
Docker, start the Docker service by running sudo systemctl start docker or by following the appropriate steps for
your operating system.
NOTE
Note that the Docker Compose used to run the ASM On-premise station must follow specification version two.
OPMS Deployment Information
Use the following configuration for firewall, HTTP proxy, partition layout, and automated deployment of an On-Premise
Monitoring Station.
Installation Resources
Follow these steps to download the latest OPMS installation file:
1. In the On-Premise section, click Stations.
2. On the On-premise Stations page, click Create Station. The OPMS Installer Wizard is displayed.
NOTE
The OPMS Installer Wizard will help you to set up the future station configuration and hence, select the most
suitable engine.
For information on prerequisites, see Pre-Installation Checklist.
3. Click Start Installation.
4. Enter or select the values in the fields for the General section. Click Next.
a. Follow the same process for Location, Engine, and Options sections.
b. In the Agents sections, select the agent(s) and click Create.
5. On the Installation instructions page, follow the instructions as mentioned. Click Next.
NOTE
The option to click Next will be enabled, only if you have done the installation correctly.
6. The station OPMS is installed successfully.
Click Open to open the station details or click Cancel to exit.
Firewall Settings
OPMS requires access to outbound ports 443. The installer issues HTTPS requests to api.asm.saas.broadcom.com,
scheduler.asm.saas.broadcom.com, scheduler2.asm.saas.broadcom.com,
apt.asm.saas.broadcom.com/yum.asm.saas.broadcom.com/ and registry.asm.saas.broadcom.com/
. During the normal operation, OPMS establishes a WSS (Web Socket Secure) connection to
opp1.asm.saas.broadcom.com and opp2.asm.saas.broadcom.com and performs HTTPS requests to
scheduler.asm.saas.broadcom.com and scheduler2.asm.saas.broadcom.com .
We recommend that you do not add firewall rules by the IP addresses of the hosts. IP addresses are subject to change
and might be location-dependent. If extra security is needed, we recommend that you set up an HTTP Proxy.
49

DX App Synthetic Monitor SaaS
IPV4 and IPV6 Support
By default ASM OPMS supports IPV6, which means that the installation program will create a new virtual network with
bridge type of this virtual network. If you do not want to create a network with IPV6 support (for example, due to security
policy), you can use the --ipv4 flag during installation, which will ensure that the station will only support IPV4.
However, note that this station will not support IPV6.
HTTP Proxy
You can set OPMS to direct all service requests through an HTTP proxy and, optionally, with plaintext authorization.
Requests issued by monitors are not routed through the proxy.
Debian
Enter the proxy configuration during Debian installation. The OPMS installer picks up the configuration from /etc/apt/
apt.conf . To change the proxy, edit the /etc/apt/apt.conf file.
RHEL / CentOS 7 / Oracle Linux
To enter proxy configuration, edit /etc/yum.conf after installation:
proxy=http://<proxy address>:<port>
proxy_username=<username>
proxy_password=<password>
Partition Layout
We recommend that you do not split the file system into separate partitions. If you use a different layout, ensure that you
allocate enough space for /tmp (at least 1 GB) and for /opt where all the assets (Full Page and Real Browser monitor
snapshots and HARs) are stored. If you use lots of FPM and RBM monitors, the assets might need as much as 50 GB.
Virtualization
You do not need any special requirements to run the OPMS as a virtual machine. For optimal performance, we
recommend that you install virtualization tools on the guest machine. For details, refer to the documentation of your
virtualization solution provider.
Automated Deployment
To automate the process of installing OPMS, use silent installation.
Follow these steps:
1. Run the installer using the following command:
# sh ./asm-opms-<version>.bin -r /tmp/opms.response
2. Specify your preferred OPMS settings in the wizard.
3. Start the installer with the response files as argument:
sh ./asm-opms-<version>.bin -i silent -f /tmp/opms.response
The software is installed.
NOTE
Deploying OPMS by cloning an existing installed VM is not supported. Instead, clone a clean OS installation,
change the hostname, and then run the installer.
Docker Limitations
The monitors that use Docker face limitations when accessing internal hostnames.
50

DX App Synthetic Monitor SaaS
WARNING
When referring to an internal hostname, the monitor must be resolved by DNS. This limitation applies to the
following monitors:
•
RBTM
•
(JMeter) Script
•
WebDriver
Install an On-Premise Monitoring Station
Install On-Premise monitoring stations if you have services that are not visible to the ASM public monitoring locations. Use
these monitoring stations if you require a specific location that ASM does not officially offer.
IMPORTANT
Always use the latest installer to install OPMS. Else the installation may fail during a sanity check or during the
registration phase.
NOTICE
Broadcom's responsibility is limited to operating the ASM components on the container level. Customers are
responsible for maintaining a Linux host with a functional Docker daemon that meets minimum requirements.
Broadcom cannot provide support for the host environment.
•
Verify the Pre-requisites
•
Installation process
•
Station management with OPMS Installer
•
Set Up Monitors
Verify the Pre-requisites
Firewall Settings
OPMS requires access to outbound ports 443. The installer issues HTTPS requests to api.asm.saas.broadcom.com
and registry.asm.saas.broadcom.com/. During the normal operation, OPMS establishes a WSS (Web Socket Secure)
connection to opp1.asm.saas.broadcom.com and opp2.asm.saas.broadcom.com.
We recommend you do not add firewall rules by the IP addresses of the hosts. These rules are subject to change and
might be location-dependent. If extra security is required, set up an HTTP Proxy.
HTTP Proxy
You can set OPMS to direct all service requests through an HTTP proxy and, optionally, with plaintext authorization.
Requests issued by monitors are not routed through the proxy.
There are two ways to set up a proxy in ASM OPMS Installer. First, configure the proxy only for the installation process
through the Options step in the wizard. Second, use the on-premise installer to permanently configure the station to use a
proxy server. For more information, see the proxy command under the Station Management section.
Pre-Installation checklist
Ensure that your system has the pre-requisite third-party software and set-up before installing an On-Premise monitoring
station. For more information, see the Pre-Installation Checklist.
Installation process
51
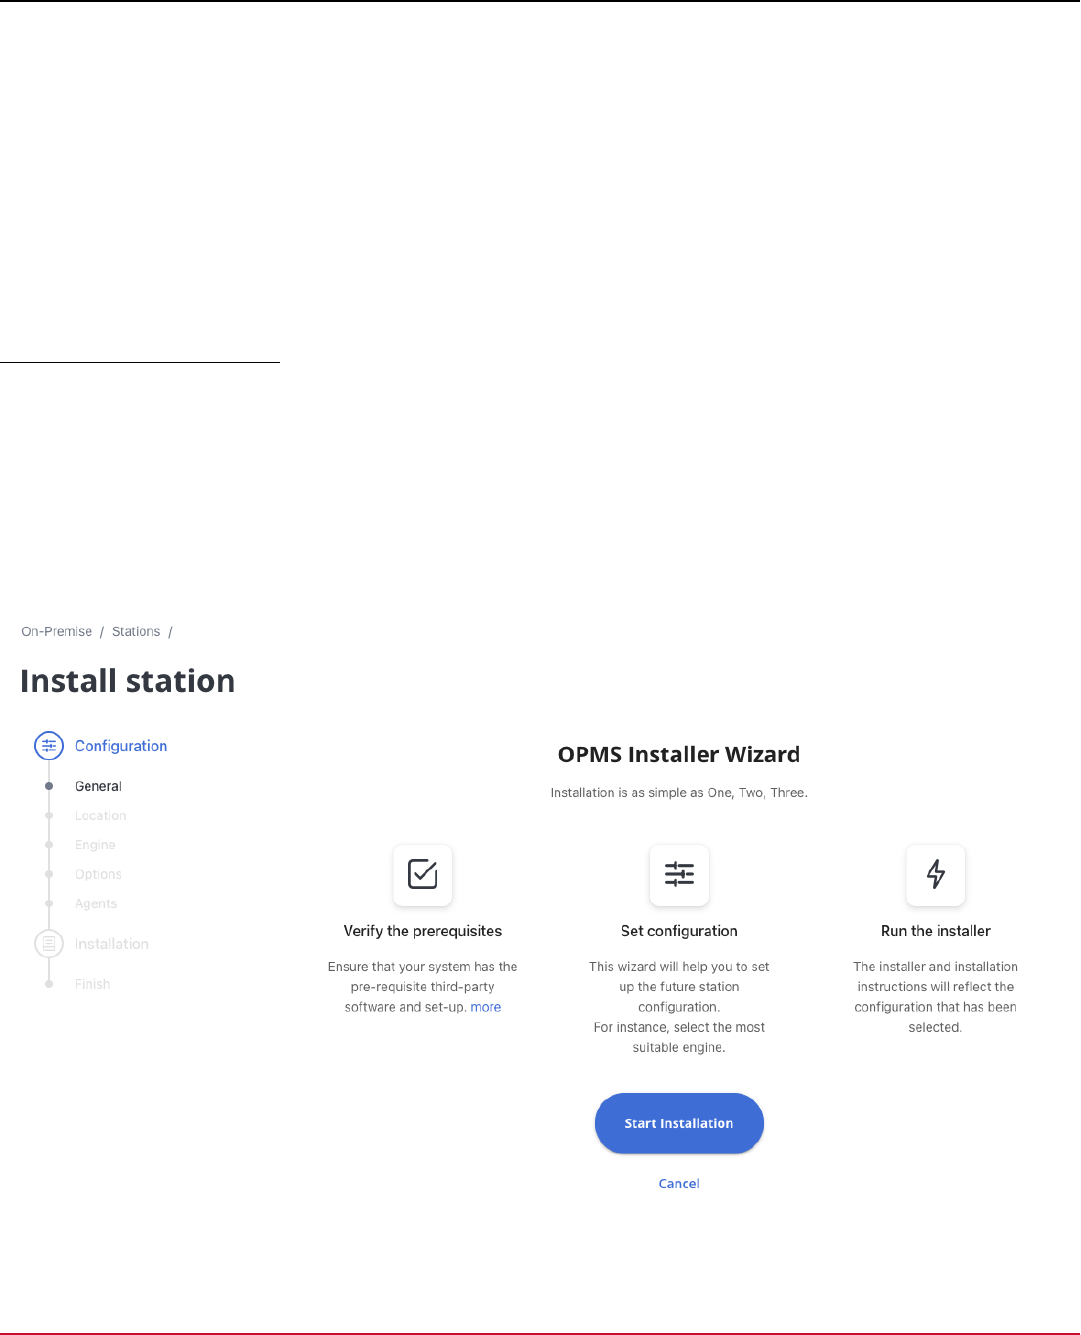
DX App Synthetic Monitor SaaS
NOTE
The installation process is completely redesigned to be more streamlined and efficient, allowing for easier
configuration and setup.
The installation process consists of two main parts:
1. Configuration through a web wizard: This step allows users to customize the software according to their specific
needs and requirements. It provides an intuitive interface for configuring various settings, such as server and proxy
information, engine support, and monitoring options. Once the configuration is complete, the wizard shows the
instructions to download and install the software package.
2. Download the configured installer and install using the command line: Once the configuration is complete,
users can download the installer that includes custom settings. The installation is done using the command line. The
command line installer provides suggestions and descriptions of each stage.
Part 1: OPMS Installer Wizard
To initiate the OPMS Installation Wizard, navigate to the "On-Premise - Stations" page and select "Create Station". This
initiates the configuration process and opens a web-based wizard that guides the user through the setup and configuration
of the OPMS software.
The web wizard comprises two sections: a step navigation pane on the left, which displays a list of all steps in the wizard,
highlights the current step and allows for navigation between completed steps. The right section of the wizard displays the
content of the current step, including any relevant fields that need to be filled out.
Screen 1: Information
52
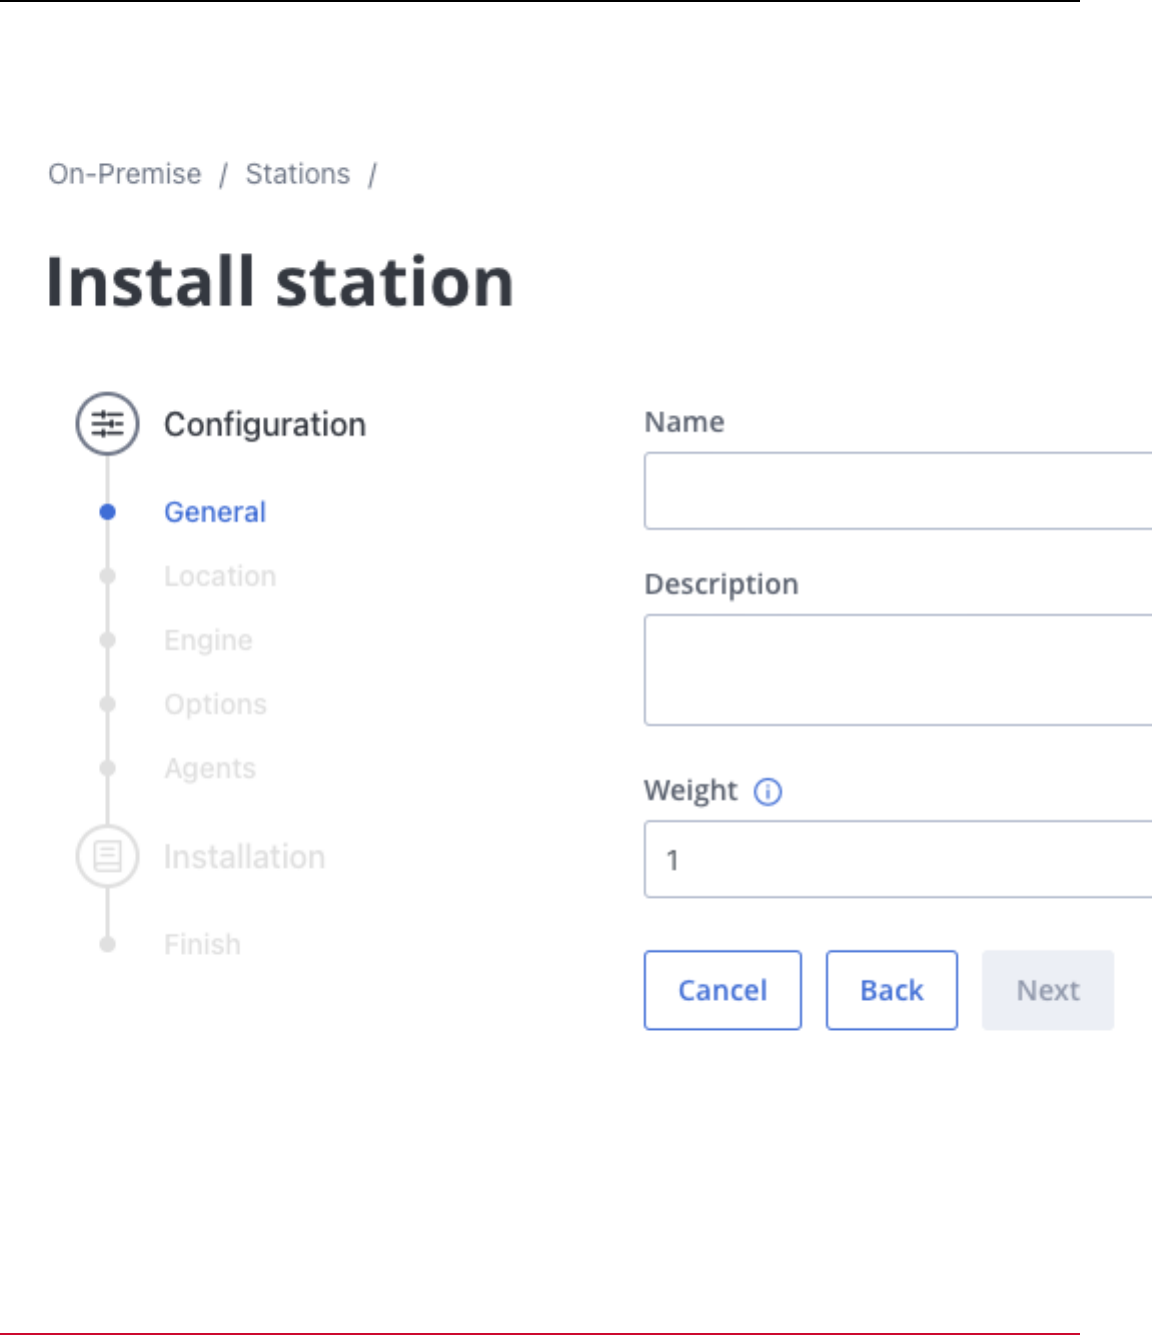
DX App Synthetic Monitor SaaS
This screen provides an overview of the installation process.
Screen 2: General
53
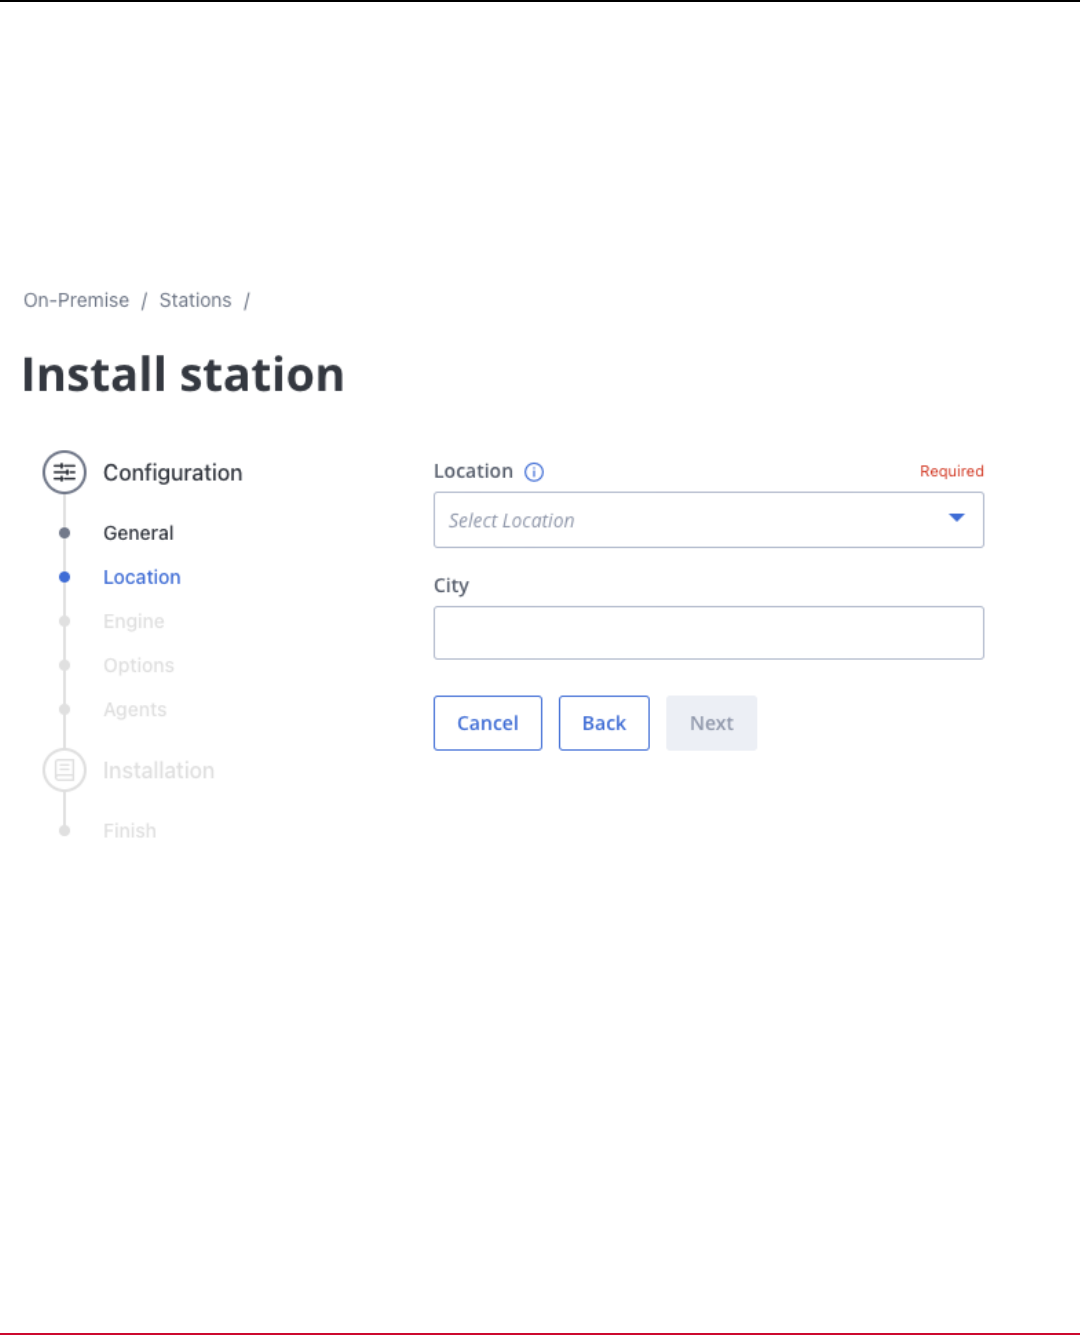
DX App Synthetic Monitor SaaS
This screen allows the user to enter information about the new monitoring station that is being created. The fields on this
screen include:
•
Name (Required): Enter a unique name for the new monitoring station
•
Description: Enter a brief description of the new monitoring station.
•
Weight: Specify the importance of the monitoring station. This value is used to choose the station from the location
pool with a higher weight indicating a higher likelihood of being chosen for monitoring checks.
Screen 3: Location
The Location screen of the OPMS Installer Wizard includes two fields for specifying the location of the new monitoring
station. The fields on this screen include:
•
A tree-select field, Location, allows the user to select the geographic location of the station from a hierarchical list.
•
The second field, City, allows the user to enter the specific city where the station will be located.
Screen 4: Engine
54
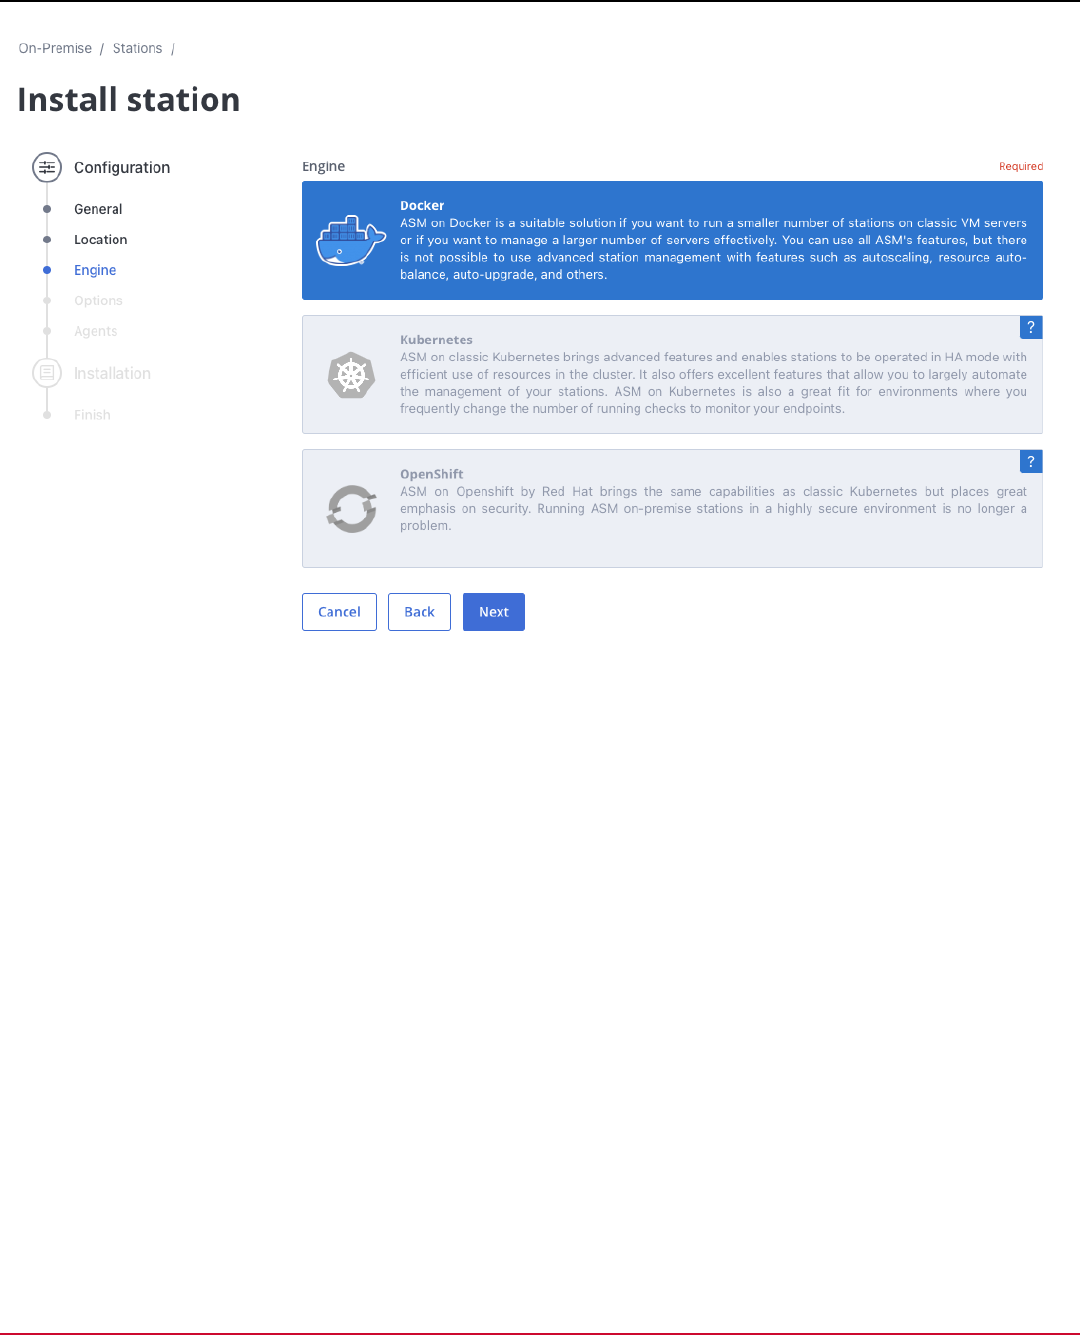
DX App Synthetic Monitor SaaS
The Engine screen allows the user to select the engine that will be used to run the monitoring station. The options
available are:
Docker: This engine allows for the deployment and management of containerized applications. It provides a lightweight
and portable environment for applications to run, making it easy to move them between different environments. The
benefits of using Docker include increased portability, scalability, and ease of deployment.
Kubernetes: This engine is a powerful orchestration system for containerized applications. It enables the management
of large-scale clusters of containers and provides features such as automatic scaling, self-healing, and rolling updates.
The benefits of using Kubernetes include improved scalability, availability, and ease of management for large-scale
deployments.
OpenShift: This engine is a platform for containerized applications built on top of Kubernetes. It provides features like
built-in security, monitoring, and developer tools. The benefits of using OpenShift include increased security, ease of
management, and improved developer productivity.
Screen 5: Options
55
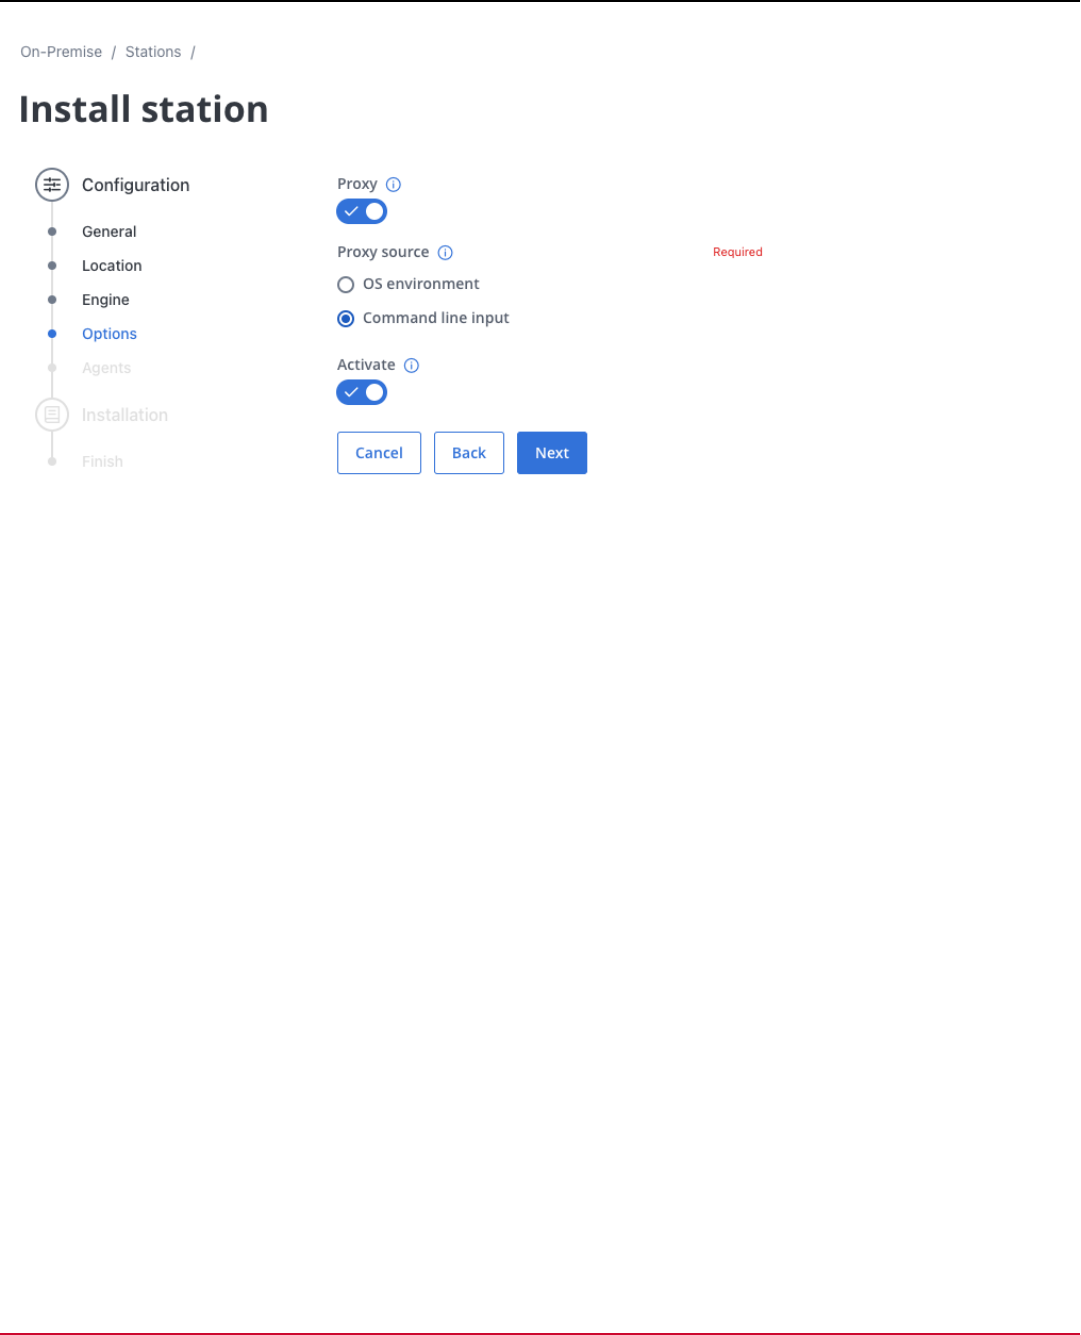
DX App Synthetic Monitor SaaS
The Options screen presents the user with fields to specify the use of a proxy or to activate the station after the
installation. If the user chooses to use a proxy, additional fields will appear. The additional fields are labeled as Proxy
Source, which has a selection with two options:
•
The "Command Line Input" option allows the user to specify the proxy settings through input entered directly into the
command line during the installation process on the server.
•
The "OS Environment" option allows the user to specify the proxy settings through environment variables on the
operating system. The OS environment option is intended for advanced users who are familiar with the configuration of
their system's environment variables.
If the Activate option is chosen: the station’s status will be automatically set as active in the ASM SASS once all the
station services are up and running after the installation.
Screen 6: Agents
56
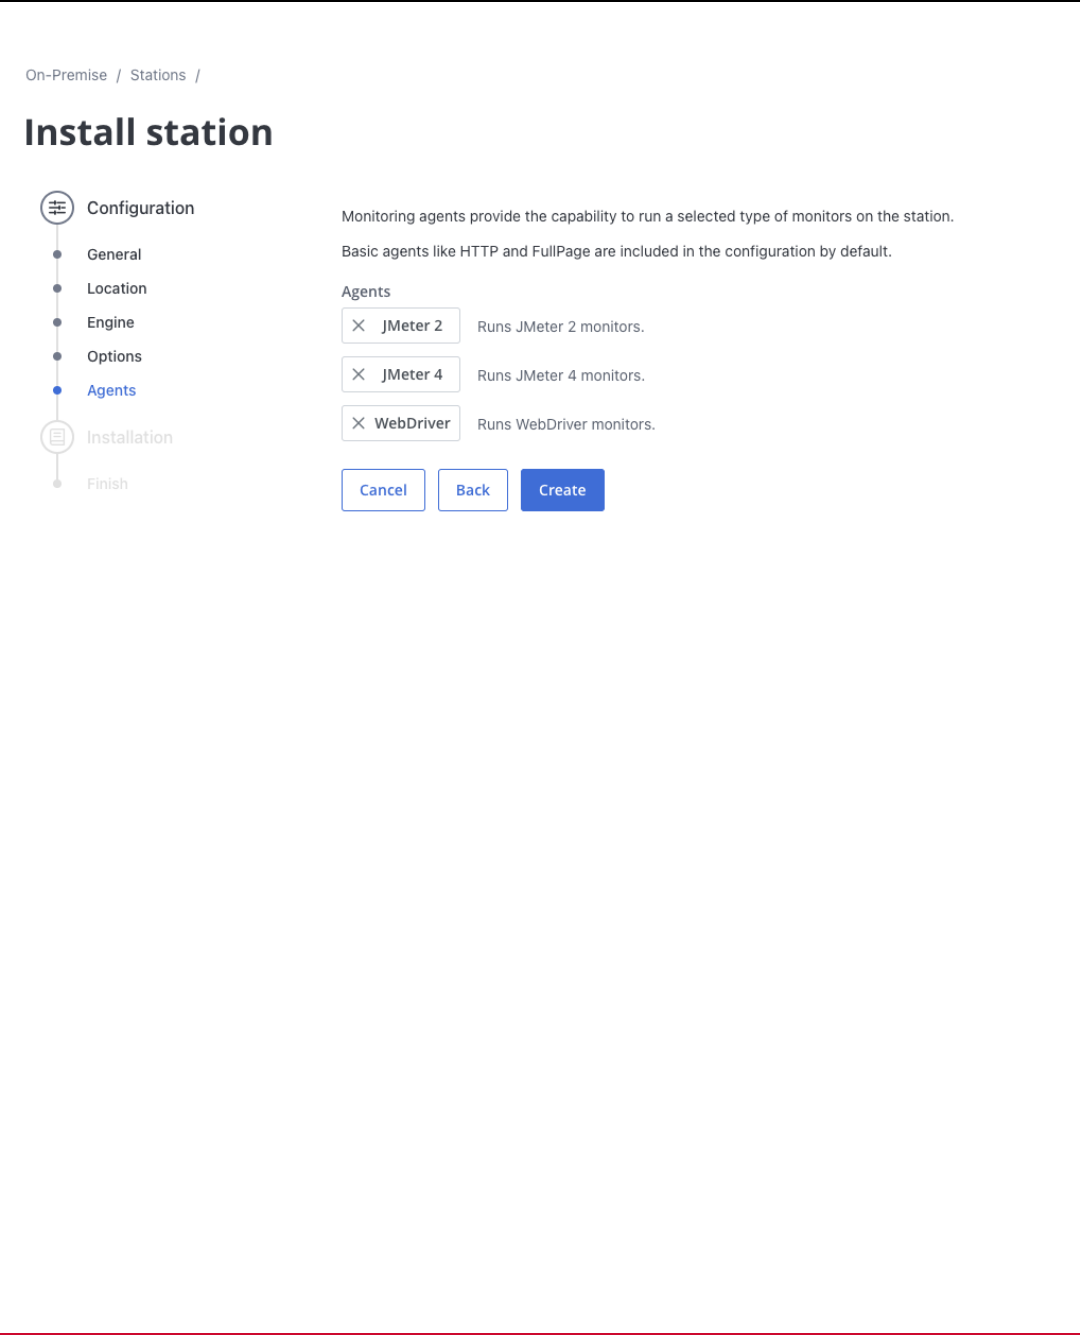
DX App Synthetic Monitor SaaS
The Agents screen allows the user to configure monitoring agents that will be used on the monitoring station. The list of
agents includes:
•
JMeter 2 agent: This agent allows the station to run JMeter 2 monitors.
•
JMeter 4 agent: This agent allows the station to run JMeter 4 monitors.
•
WebDriver agent: This agent allows the station to run WebDriver monitors.
By default, basic agents like HTTP and FullPage are included in the configuration, but additional agents can be added
by checking the corresponding checkboxes. Please, be aware that enabling additional agents may increase the system
requirements for the monitoring station.
Screen 7: Installation Instructions
57
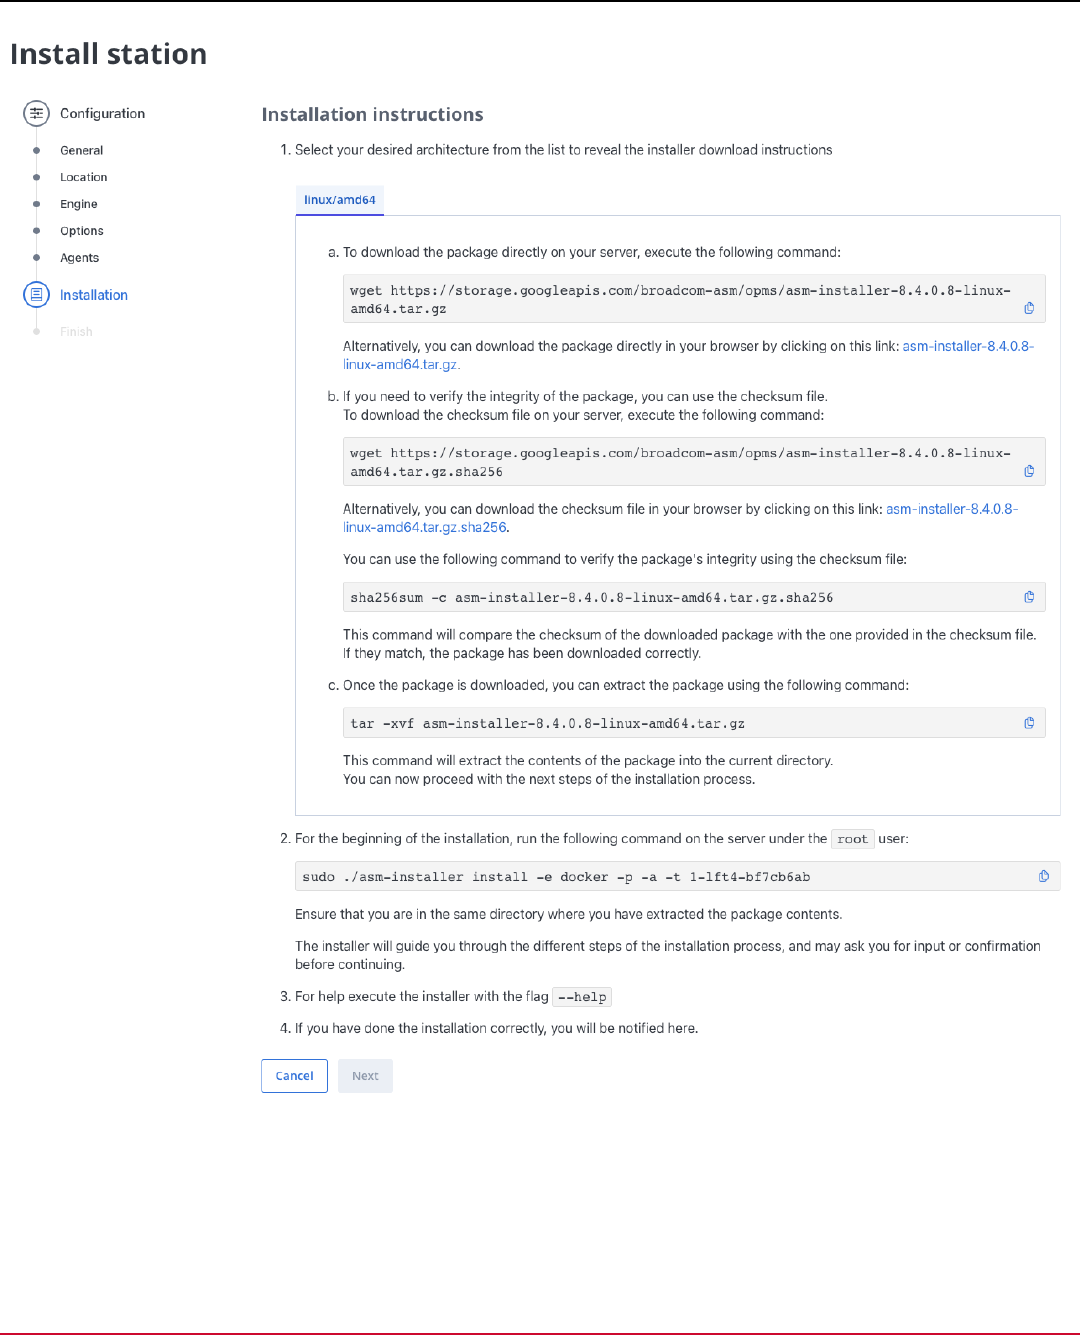
DX App Synthetic Monitor SaaS
The next screen of the installer wizard is the Installation Instructions screen. This screen provides detailed instructions on
how to download and install the OPMS package on your server. It is important to carefully read and follow the instructions
provided on this screen to ensure a successful installation.
The available architectures for download include:
58

DX App Synthetic Monitor SaaS
•
linux/amd64: This architecture is compatible with 64-bit x86-based systems. It is the most commonly used
architecture and is compatible with most modern systems.
To determine the correct architecture for your system, you can use the command 'uname -m' in the command line. This
will display the architecture of your system, which can then be matched to one of the available options. Upon successfully
completing the package download and installation, the user will be automatically directed to the final screen of the web
wizard.
Screen 8: Successful installation
This screen is shown as the final stage of the whole process of installation. In case of successful installation of the server,
the system shows this screen automatically.
Part 2: OPMS Installation on the Server
This section of the documentation provides a detailed description of the console interface for the installer. The steps
outlined here will guide you through the process of installing the monitoring software on your server. It is important
to follow these instructions carefully to ensure a successful installation. It is important to note that proper setup and
configuration of the server are required prior to running the installer package. This includes ensuring the server meets the
necessary system requirements, and that any necessary dependencies are installed. For this, please refer to the page
Pre-Installation Checklist.
NOTE
Access to the ASM API is a crucial requirement for the successful installation of the OPMS station. Ensure that
the ASM API is accessible from the server before starting the installation process.
In the event of installation issues, the ASM Installer generates a log output that can be found in the file /var/log/asm-
installer.log . This log information can be used to help diagnose and resolve any problems encountered during the
installation process. It is recommended to review the log output in case of any installation issues.
Step One: Select Locale
In this first step of the command line installation, you will be prompted to select the desired locale for the installer. The
locale determines the language and regional settings used during the installation process. To select the desired locale,
simply enter the corresponding code from the list of options and press the Enter key.
Step Two: Initialisation
The key actions performed during the initialization step of the installation process:
1. Verifying the kernel version meets the minimum requirements
2. Checking the minimum versions of dependencies
3. Verifying the presence and accessibility of the docker-compose command
4. Testing the connection to the ASM API
5. Testing the connection to the ASM Docker registry.
In this step, the installer requests acceptance of the license agreement. The license agreement will not be displayed again
upon acceptance during future installations.
Step Three: Downloading docker images
This message indicates that the installer is downloading the necessary docker images for the OPMS station to your
local environment. This process may take up some time, so it's important to wait for it to complete before ending the
installation. The installer will provide a notification once the download is finished successfully.
Step Four: Starting application components
After the start of the application components, the installer will verify the success of this step and notify if all components
have been started properly.
Step Five: Finishing installation
59

DX App Synthetic Monitor SaaS
In this final step, the installer will notify the user and ASM about successful installation.
Station management with OPMS Installer
The ASM installer serves as a versatile tool for managing checkpoint configurations in addition to its primary purpose
of installing the ASM software. With the installer, you can perform various actions, such as changing and exporting
checkpoint configurations, pruning data, and removing the checkpoint from the server. The supported commands are:
•
completion : This command generates an autocompletion script for the specified shell.
•
export : This command is used to export an ASM checkpoint.
•
help : This command provides information about any other command in the installer.
•
install : This command is used to install an ASM checkpoint.
•
update : This command is used to update an ASM checkpoint or upgrade the agent to a specified version.
•
start : This command starts ASM checkpoint components.
•
stop : This command stops ASM checkpoint components.
•
uninstall : This command is used to uninstall an ASM checkpoint.
•
license : This command displays the general license information.
•
proxy : This command is used to set up or change proxy settings.
•
version : This command returns the version of the ASM installer.
Each of these commands can be executed using the following syntax:
./asm-installer [command] [options]
For more information on the options and syntax of each command, use the help flag (./installer [command] -h ) to
access the command's usage information. There are also global flags available for each of the commands listed above.
Global Flags
-e, --engine string type of installation (kubernetes or docker) (default "docker")
-l, --lang string Select your preferred language
--acceptalllicenses You automatically agree with the license terms
completion
This command generates the autocompletion script for the specified shell, allowing you to quickly and easily use the asm-
installer command line tool with auto-completion features. The available sub-commands include bash, fish, PowerShell,
and zsh, each generating the autocompletion script for the respective shell. To use the generated script, follow the
instructions in the usage section.
Usage:
./asm-installer completion [command]
Example:
./asm-installer completion bash
Flags:
-h, --help help for bash
--no-descriptions disable completion descriptions
Available commands:
bash Generate the autocompletion script for bash
fish Generate the autocompletion script for fish
60

DX App Synthetic Monitor SaaS
powershell Generate the autocompletion script for powershell
zsh Generate the autocompletion script for zsh
bash
This generates the autocompletion script for the bash shell, enabling tab completion for the asm-installer command in
your terminal. The script depends on the 'bash-completion' package, which can be installed through your OS's package
manager if not already present.
To use the completions in your current shell session, run the command:
source <asm-installer completion bash>
For the completions to persist across new shell sessions, follow the instructions for your operating system:
For Linux systems, run the following command:
./asm-installer completion bash >
/etc/bash_completion.d/asm-installer
After executing the appropriate command, start a new shell session for the setup to take effect.
export
The export command allows you to save the current configuration of the OPMS station to a file. The exported
configuration file will contain all the necessary information to recreate the OPMS station. By default, the exported
configuration file will be saved in the /tmp directory. However, you can specify a different file path using the -o or --output
flag. The exported configuration file can then be imported on another OPMS station using the import command.
Usage:
./asm-installer export [flags]
Flags:
-h, --help help for export
-o, --output string Set output folder for exported files (default "/tmp")
help
The help command provides information about a specific command or sub-command in the asm-opms installer. It displays
usage information, available options, and a description of what the command does.
Usage:
./asm-installer [command] -h
Example:
./asm-installer help completion
This will display the help information for the completion command, including usage information and available options.
install
The install command of the asm-installer utility is a crucial component of the installation process for the ASM On-premise
station. This command can be generated automatically with all the necessary flags as part of the process using ASM On-
premise Wizard and is used to perform the final installation steps. The usage of the install command is described in detail
in the "Part 2: OPMS Installation on the Server" section of this document.
Usage:
61

DX App Synthetic Monitor SaaS
./asm-installer install [flags]
Flags:
-h, --help help for install
-p, --proxy enable or disable proxy for access to ASM services (default is disabled)
--proxy-input string Type of proxy data input. Options are env|stdin (default "stdin")
--proxy-password string Proxy password
--proxy-url string URL address of the proxy server which you want to use for connecting to ASM
services such as API or registry server. The URL format is <scheme>://<host>:<port>
--proxy-username string Proxy username
--set stringArray set values on the command line (can specify multiple or separate values with
commas: key1=val1,key2=val2)
-t, --token string One-time authorization token
-f, --values strings specify values in a YAML file or a URL (can specify multiple)
-a, --activate activate the station automatically right after the installation completes
--ipv4 create an ipv4 only network
update
The update command is used for updating the existing installation of the OPMS station to a newer version, or for changing
the station's configuration. It allows you to keep the OPMS station software up-to-date with the latest releases and
enhancements.
NOTE
This operation is dangerous as it may brake an OPMS configuration.
There are two ways to change the station’s configuration values:
•
Using Command Line key-value pairs: You can pass the key-value directly to the command line using the format
"key1=val1,key2.subitem=value2" . You can utilize this method by using the flag "--set stringArray" .
All the possible keys can be taken from the exported values.yaml file (see export command).
•
Using a YAML File: Override the configuration parts by providing a YAML file, which contains the desired configuration
values. The file can be passed to the command using the flag "-f pathToFile" . It is important to note that the
YAML file can be a part of the configuration, and only the values specified in the file will be updated.
In addition, before making any changes, it is recommended to take a backup of the current configuration using the
export command. This ensures that any unintended consequences can be easily reverted.
Usage:
./asm-installer [command] -h
Example 1: Removing agent
./asm-installer update --set jmeter4.replicas=0
Example 2: Scaling up/down an agent
./asm-installer update --set [agent].replicas=[number]
Example 3: Using the values.yaml file
./asm-installer update -f values.yaml
Flags:
-h, --help help for update
--set stringArray set values on the command line (can specify multiple or separate values with commas:
key1=val1,key2=val2)
-f, --values strings specify values in a YAML file or a URL (can specify multiple)
62

DX App Synthetic Monitor SaaS
stop
Stop all ASM checkpoint services. This command just stops all running ASM containers and then removes them.
NOTE
If you run this command on an active station without maintenance mode, the station will be disconnected and
you will see internal errors. Also, all data, such as assets or configuration, will remain with the possibility of
starting again.
Usage:
./asm-installer [command] -h
Example:
./asm-installer stop
start
Start all ASM checkpoint services again. This command just starts and runs all running ASM containers.
Usage:
./asm-installer [command] -h
Example:
./asm-installer start
uninstall
Uninstalling the station using the uninstall command will remove the station from the server and may erase all associated
data.
The --prune flag can be used to uninstall all components and erase all data completely. In this case, all the settings, such
as API token, proxy configuration, etc.
If the flag -t is specified and the one-time token is provided, the station will be also deactivated in the ASM SAAS UI. If the
token is not provided, the station will remain on the station's list after the uninstall.
Usage:
./asm-installer uninstall [flags]
Flags:
-h, --help help for uninstall
--prune uninstall all components and erase all data
-t, --token string One-time authorization token
license
The license command displays the license text for the ASM On-premise Monitoring Station. It provides information on the
terms and conditions of usage for the product.
Usage:
./asm-installer license [flags]
Flags:
-h, --help help for license
proxy
63

DX App Synthetic Monitor SaaS
The proxy command in the asm-installer allows the user to configure the station to use a proxy server. There are two
options available for proxy configuration: using the OS environment variables or using the installer command-line
arguments (stdin).
The proxy configured using environment variables allows running the installer with some automation. The format for the
proxy environment variables is:
ASM_PROXY=<scheme>://<host>:<port>
ASM_PROXY_USERNAME=username
ASM_PROXY_PASSWORD=password
To set up these environment variables in Linux, create a new file in the '/etc/environment' and insert the code with the
correct format. You can also use other methods, like adding the variables in ~/.bashrc or ~/.bash_profile file, depending on
the shell you are using. Restart the terminal or run the command 'source [file name]' for the changes to take effect. Refer
to the documentation on how to set environment variables in your specific Linux distribution.
The --rm flag in the asm-installer proxy command removes the previously set proxy configuration from the OPMS station.
IMPORTANT
This action cannot be undone.
Usage:
./asm-installer proxy [flags]
Flags:
-h, --help help for proxy
--proxy-input string Type of proxy data input. Options are env|stdin (default "stdin")
--proxy-password string Proxy password
--proxy-url string URL address of the proxy server which you want to use for connect to ASM
services such as API or registry server. The URL format is <scheme>://<host>:<port>
--proxy-username string Proxy username
--rm Clear proxy configuration
version
The version command in ASM OPMS Installer is used to display the version of the installer.
Usage:
./asm-installer version [flags]
Flags:
-h, --help help for version
--short print the version number
Set Up Monitors
After you install tunnel clients and OPMS, you can create and update monitors. A monitor uses OPMS, or monitoring
stations from the public group. Optimally, a monitor uses one or more tunnels.
Follow these steps:
1. In ASM, select Monitoring and then select Monitors.
The list of all monitors appears.
2. Select New Monitor and select a type of monitor, for example, HTTPS monitor.
3. Define the properties of your monitor. Minimally, define a monitor name and the URL to monitor. By default, the monitor
uses public checkpoints.
4. Select More Options, scroll down, and select Checkpoint Selection.
64
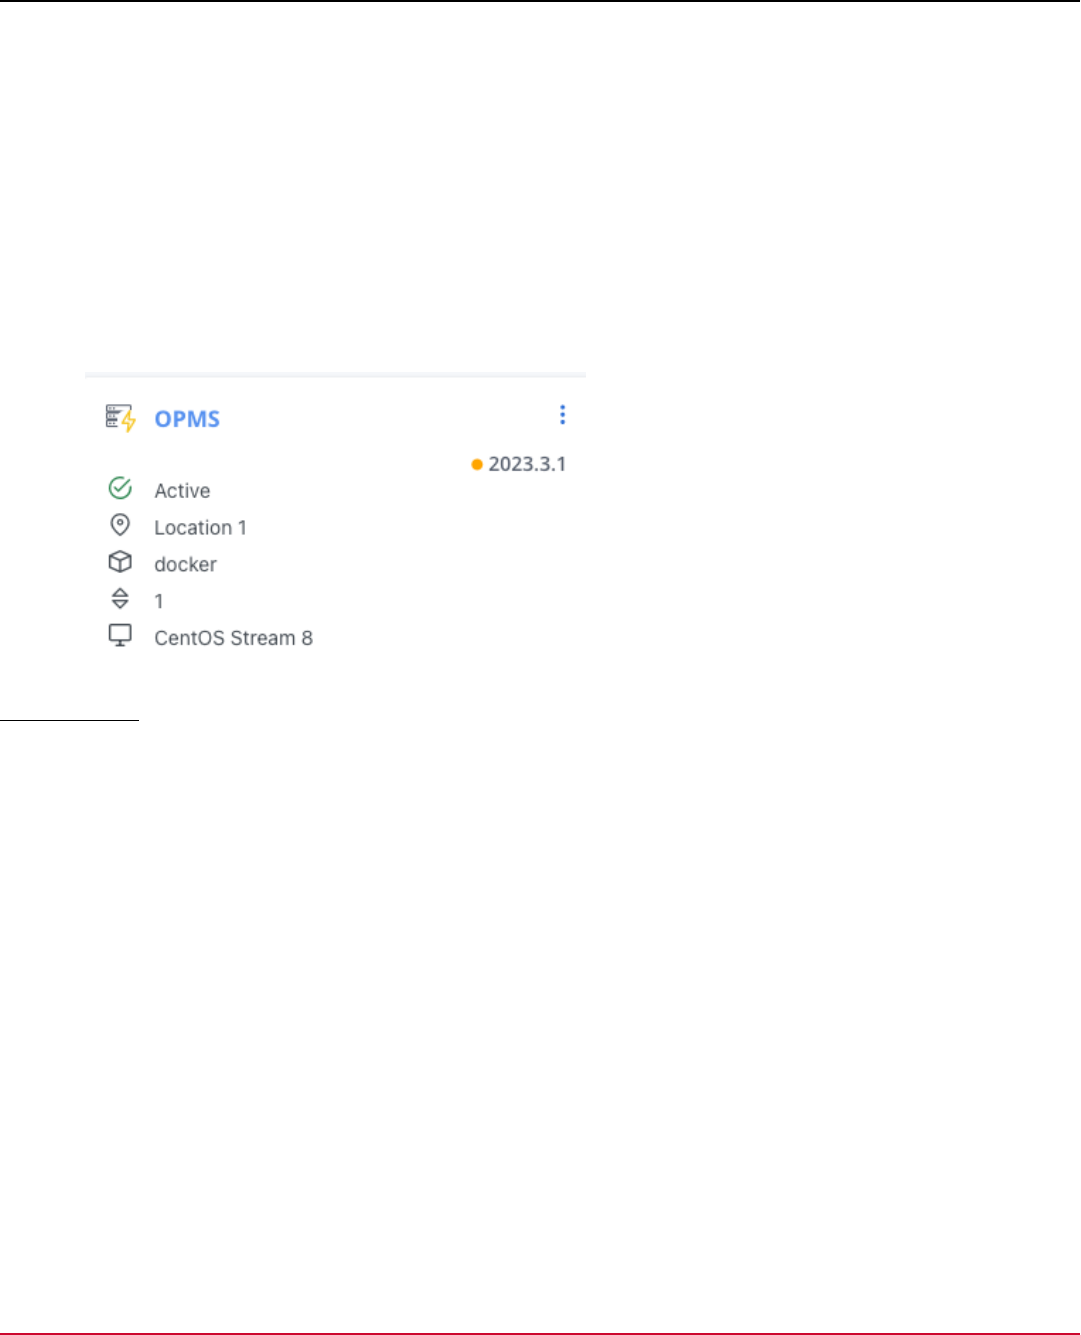
DX App Synthetic Monitor SaaS
A list of all checkpoint groups and checkpoints appears.
5. Select the checkpoints that you want the monitor to verify:
a. Select the private group that you assigned when you installed your OPMSs.
b. Select the OPMSs that you want to use for the monitor.
6. Select Save.
Update the On Premise Monitoring Station
NOTE
•
The update process does not apply to the old stations. Old stations need to be recreated from scratch using
the OPMS Installer Wizard.
•
An orange dot next to the station's version indicates that the station has an update available to install.
Update Wizard
The update process consists of the following steps:
1. Download a new installer
2. Uninstall the old version of the station
3. Install the new version of the station
NOTE
When performing the station update, switch the OPMS to the maintenance mode.
When the new version is available to install, click Update in the station context menu or on the station details page to
open the Update station wizard.
To update the station version:
1. Follow the process steps that are mentioned in the Update section and click Next.
2. In the Uninstall section, follow the mentioned uninstallation procedure. Once the old station is uninstalled, click Next.
3. In the Install section, follow the mentioned steps to install the new station.
Once the new station is installed, you will be automatically redirected to the station details page.
NOTE
In the Update station wizard:
•
Click Cancel to stop the installation process.
•
Click Back to navigate to the previous step or section.
65

DX App Synthetic Monitor SaaS
Remove an On-Premise Monitoring Station
To uninstall an On-Premise monitoring station, use the following procedure.
Assign a New Tunnel Client
Assign all OPMSs that use that tunnel client to other tunnel clients first. Then remove an OPMS that runs a tunnel client.
WARNING
Do not remove an OPMS with a tunnel client that is in use by an active OPMS. Stations that use inactive tunnels
do not work.
Follow these steps:
1. Go to the ASM Dashboard.
2. In On Premise, select Stations.
3. Select the On-Premise Monitoring Station and select the Cog icon to assign a new tunnel client.
Unregister the OPMS
Use this procedure if you want to decommission an OPMS machine permanently. Skip it, if you plan to install another
OPMS with the same hostname later.
Remove the OPMS from the On-Premise, Stations window.
Follow these steps:
1. Go to the ASM Dashboard.
2. In On Premise, select Stations.
3. Select the Cog icon to the left of the station you want to remove, and then select Delete.
Uninstall the OPMS
The installer does not support uninstalling. After decommissioning the OPMS, wipe the drive or revert a filesystem
snapshot.
OPMS Maintenance
You can place an On-Premise Monitoring Station in the maintenance state. In maintenance state ASM does not schedule
any checks on monitoring stations. The maintenance state prevents a flood of 'checking station not available' error
messages in the log. The maintenance state ensures that the maintenance of the machine does not interfere with running
checks. In the maintenance state, the software on the machine remains running, including the tunnel client. Maintenance
mode only notifies ASM that the OPMS is not available. The maintenance mode does not change the OPMS host
machine.
If you have multiple OPMS connected through one tunnel client which is stopped, then all stations that are connected
using this tunnel client are affected.
The temporary stop disconnects all OPMSs that are reached over the tunnel client running on the machine. If the
monitoring station system maintenance causes it to disconnect from the tunnel server (stopping the tunnel client,
disconnecting network) or the nginx service is stopped, or the system is shut down, all assets from that station
(waterfalls, screenshots etc.) become inaccessible.
Put the OPMS in the maintenance state to upgrade hardware or supporting software on the OPMS host machine.
66

DX App Synthetic Monitor SaaS
Follow these steps:
1. In the ASM Dashboard, go to On-Premise and select Stations.
2. In the Status drop-down, select Maintenance.
The OPMS is deactivated.
Re-activate the OPMS
OPMS does not re-activate automatically. Reactivate the OPMS when maintenance is complete.
Follow these steps:
1. In the ASM Dashboard, go to On-Premise, and then select Stations.
2. In the Status drop-down, select Active.
The OPMS is active. ASM detects the monitoring station automatically and schedules checks from that monitoring station.
Troubleshooting
Unknown Software Version
Symptom: I do not know which version of OPMS I have.
Solution: You can find the version number of the OPMS Installer in the /opt/asm/opms/version.txt file.
Versions of individual OPMS components can be obtained by running the following command:
Debian
dpkg -l | grep asm-
RHEL / CentOS
yum list installed | grep asm-
Installation Failure
Symptom: The installation did not complete successfully.
Solution: Re-run the installer. If this operation does not resolve the issue, open the installation log file from the /opt/
asm/opms/logs directory and search for errors.
Checkpoint Availability Error
Symptom: The log shows the following error message:
'Checkpoint not available'
Solution: Ensure that the tunnel client is operating correctly. Search for tunnel client errors in the /var/log/optunnel/
optunnel-client.log file. To verify that the OPMS stack components are operating correctly, execute the following
command:
monit summary
All operating components are listed as Running or Accessible. If the component status is different, view the logs in the /
var/log/smartpop directory for each component separately.
Finally, ensure that the system hardware resources such as memory and disk space are sufficient.
Alert Email Sent on Activation
Symptom: You activated the monitoring alerts feature in the installer. You receive email alerts during the installation and
after restarting the checkpoint host.
67

DX App Synthetic Monitor SaaS
Solution: You can ignore these email alerts until the checkpoint is fully up and running.
Alert Email Sent on Tunnel Client Restart
Symptom: You received an email alert from the monit service that the tunnel client service was restarted.
Solution: Browse the /var/log/optunnel/optunnel-client.log file for the root cause. Temporary connection
problems to opp.cloudmonitor.ca.com cause the restarts. When the connection is closed or broken, the tunnel client
is terminated. The Monit service then starts a new instance that reconnects to the tunnel server.
Graphical Installer Launch Issue
Symptom: The installer starts in console mode instead of graphical mode.
Solution: Run the following command before launching the installer:
export XAUTHORITY=/home/<user>/.Xauthority
Where:
<user> is the standard non-root user that you originally used to log into the computer.
68

DX App Synthetic Monitor SaaS
Reference
To specify a country name during the OPMS installation, type one of the country abbreviations from the table.
Albania
Algeria
American Samoa
Andorra
Angola
Anguilla
Antigua
Argentina
Armenia
Aruba
Australia
Austria
Azerbaijan
Bahamas
Bahrain
Bangladesh
Barbados
Belarus
Belgium
Belize
Benin
Bermuda
Bhutan
Bolivia
Botswana
Brazil
British Virgin Islands
Brunei
Bulgaria
Burkina Faso
Burundi
al
dz
as
ad
ao
ai
ag
ar
am
aw
au
at
az
bs
bh
bd
bb
by
be
bz
bj
bm
bt
bo
bw
br
vg
bn
bg
bf
bi
Cambodia
Cameroon
Canada
Cape Verde
Cayman Islands
Central African Republic
Chad
Channel Islands,
Chile
China
Colombia
Congo-Brazzaville
Congo, Democratic Republic
Cook Islands
Costa Rica
Croatia
Cyprus
Czech Republic
Denmark
Djibouti
Dominica
Dominican Republic
Ecuador
Egypt
El Salvador
Equatorial Guinea
Eritrea
Estonia
Ethiopia
Faroe Islands
Fiji
kh
cm
ca
cv
ky
cf
td
cs
cl
cn
co
cg
cd
ck
cr
hr
cy
cz
dk
dj
dm
do
ec
eg
sv
gq
er
ee
et
fo
fi
Finland
France
French Guiana
French Polynesia
Gabon
Gambia
Georgia
Germany
Ghana
Gibraltar
Greece
Greenland
Grenada
Guadeloupe
Guam
Guatemala
Guinea Bissau
Guinea,
Guyana
Haiti
Honduras
Hong Kong
Hungary
Iceland
India
Indonesia
Iran
Iraq
Ireland
Israel
Italy
Ivory Coast
Jamaica
Japan
Jordan
Kazakhstan
fj
fr
gf
pf
ga
gm
ge
de
gh
gi
gr
gl
gd
gp
gu
gt
gw
gn
gy
ht
hn
hk
hu
is
in
id
ir
iq
ie
il
it
ci
jm
jp
jo
kz
Kenya
Kuwait
Kyrgyzstan
Laos
Latvia
Lebanon
Lesotho
Liberia
Libya
Liechtenstein
Lithuania
Luxembourg
Macau
Macedonia
Madagascar
Malawi
Malaysia
Mali
Malta
Marshall Islands
Martinique
Mauritania
Mauritius
Mexico
Micronesia
Moldova
Monaco
Mongolia
Montserrat
Morocco
Mozambique
Myanmar/Burma
Namibia
Nepal
Netherlands Antilles
Netherlands
New Caledonia
ke
kw
kg
la
lv
lb
ls
lr
ly
li
lt
lu
mo
mk
mg
mw
my
ml
mt
mh
mq
mr
mu
mx
fm
md
mc
mn
ms
ma
mz
mm
na
np
an
nl
nc
69

DX App Synthetic Monitor SaaS
New Zealand
Nicaragua
Niger
Nigeria
Norway
Oman
Pakistan
Palau
Palestinian Territory
Panama
Papua New Guinea
Paraguay
Peru
Philippines
Poland
Portugal
Puerto Rico
Qatar
Reunion
Romania
Russia
Rwanda
Saipan
San Marino
Saudi Arabia
Senegal
Serbia
Seychelles
Sierra Leone
Singapore
Slovak Republic
Slovenia
Somalia
South Africa
South Korea
Spain
nz
ni
ne
ng
no
om
pk
pw
ps
pa
pg
py
pe
ph
pl
pt
pr
qa
re
ro
ru
rw
mp
sm
sa
sn
rs
sc
sl
sg
sk
si
so
za
kr
es
Sri Lanka
St. Barthelemy
St. Kitts and Nevis
St. Lucia
St. Vincent
Sudan
Suriname
Swaziland
Sweden
Switzerland
Syria
Taiwan
Tanzania
Thailand
Togo
Trinidad and Tobago
Tunisia
Turkey
Turkmenistan
Turks and Caicos Islands
U.S. Virgin Islands
U.S.A.
Uganda
Ukraine
United Arab Emirates
United Kingdom
Uruguay
Uzbekistan
Vanuatu
Vatican City
Venezuela
Vietnam
Wallis & Futuna
Yemen
Zambia
Zimbabwe
lk
gs
kn
lc
vc
sd
sr
sz
se
ch
sy
tw
tz
th
tg
tt
tn
tr
tm
tc
vi
us
ug
ua
ae
gb
uy
uz
vu
va
ve
vn
wf
ye
zm
zw
Migrate OPMS 8.2 to Later Versions
Major Changes in On-Premise Station Between Version 8.2 and Later Versions
•
The required operating system is now Debian 8, Red Hat Enterprise Linux 7, or CentOS 7
•
The installer is no longer split into two parts.
•
Installer no longer contains installation packages. The packages are downloaded during the installation with apt-get -
the Debian way of installing packages.
•
The upgrade procedure for 8.3 to later versions is improved and simplified.
•
You can run On-Premise station as a virtual machine - there are no longer problems running RBM monitors. RBM no
longer requires a physical machine. RBM no longer depends on LXC containers.
•
The bridge interface with a hard-coded IP address is no longer used.
70

DX App Synthetic Monitor SaaS
Upgrade from 8.2 to Later Versions
Upgrading an existing On-Premise station is not possible. To migrate an On-Premise station, delete the original machine,
install a clean machine, and install the latest version of OPMS. No monitor definitions or performance-related data are
lost.
Follow these steps:
1. Put the On-Premise station in maintenance mode.
2. Follow pre-installation instructions, as if installing a new machine.
a. Ensure that the installation rewrites existing partitions.
b. Ensure that the new installation has the same hostname as the old one.
3. Install the latest version of OPMS and use the same On-Premise group.
4. Disable maintenance mode.
By keeping the original hostname and using the same On-Premise station group, you need not configure the Dashboard
again. All existing monitors continue running through the upgraded station. The performance data is not lost.
71

DX App Synthetic Monitor SaaS
Using
CA App Synthetic Monitor lets you use various methods to monitor your website. To get the full benefit of ASM, we
recommend that you create a suite of monitors. Combine simple monitors with advanced monitors to verify basic
availability and improve customer experience. Concentrate your monitoring on high volume and high business value
interactions. Example: login, search, and check out activities.
•
Account Management
•
Scheduling Monitor Checks
•
Set Up a Public Status Page to Display Web Server Information
•
DX App Synthetic Monitor Plug-in
•
Use (JMeter) Scripts to Test Web Servers
•
Use Real Browser Monitors (RBM) Scripts to Test Web Servers with Script Recorder
•
Using Remote Windows Browsers with WebDriver Monitors
•
World Map Metrics
•
Use the API
•
Using Swagger API in DX ASM
•
Monitor List Search
•
Schedule Maintenance
•
Manage Users in ASM
Account Management
Accounts
CA ASM offers two types of user accounts: main accounts and sub-accounts. As an owner of the main account, you can
create and manage multiple sub-accounts, each with different access permissions. Owners of sub-accounts can log in
and can use the dashboard in the same way as main account owners.
Sub Account Management
Create a Sub Account
Follow these steps:
1. Access the Customers page from the main menu.
2. To add a new sub-account, select Add customer, then complete the required fields.
The sub-account owner receives an e-mail with a randomly generated password.
3. Log in to the new account to activate the account.
Edit Account Details
To modify accounts that are listed on the Customers page, select the account name or select the Edit Details icon. To
edit, select the items that are listed on the Details page. Changes take effect immediately.
Impersonate an Account
You can log in to a sub-account from your main account without having to enter login credentials. Use this feature to verify
that access rights for users are properly set up. To log in to a sub-account, select the key icon. To go back to your own
account, select Sign out.
72

DX App Synthetic Monitor SaaS
NOTE
The list of accounts that you can impersonate is available on your Home page (select the CA icon). The list is in
the Login Access section.
Unlock Blocked Accounts
If a user enters a password incorrectly ten times in a row, the account is blocked. A blocked sub-account can be unlocked
from the Customers page. Select the padlock icon. Blocked accounts are also unblocked automatically after 24 hours.
NOTE
API access can also be blocked after ten failures to log in. This lockout affects API calls only. Log in to the
dashboard using your account credentials to unlock API access. If you are logged in already, log out and log
back in to unlock the API.
Credits
Each account has a separate quota of credits, which are consumed when certain API actions are performed. To add
credits to a sub-account, use the Buy credits icon. Any invoices are billed to the owner of the main account.
Tokens
You can assign tokens to sub-accounts. Select the account name and then the Account Tokens tab.
Share Logs and Graphs
Any account can share the check results of its monitors with another account. To share check results, monitors, and
folders define user roles and user permissions. For more information about roles and permissions, see User Management.
Scheduling Monitor Checks
Second Opinion
DX APP Synthetic Monitor uses a system that is named the Second Opinion to double-check unsuccessful probe
results that are sent from monitoring stations. A temporary network glitch or other issues can affect probes.
DX APP Synthetic Monitor automatically double-checks an unsuccessful probe by sending more probes from
geographically similar locations. If the Second Opinion probes are also unsuccessful, DX APP Synthetic Monitor reports
the error.
Probe Scheduling
A check is executed at an interval that is specified in monitor settings.
If a monitor interval is more than 5 minutes and the monitor starts failing, the interval is reduced to 5 minutes. Once the
monitor is back OK the interval is restored to the original value. You can disable this functionality per monitor (monitor's
advanced settings) or globally (preferences).
When a monitor is in maintenance mode, the monitoring runs the scheduled checks, and the results appear as in-
maintenance. This result does not affect SLA and does not trigger alerts. Use these results to determine the actual
service outage time during the maintenance window. You can also disable monitoring per monitor (monitor's advanced
settings) or globally (preferences) during maintenance periods.
The scheduler issues up to three probes per check. Each check typically runs on a different monitoring station.
The check result is then obtained as a combination of the results of these probes. Multiple probes eliminate false
positives.
A single probe delivers one of four results:
73

DX App Synthetic Monitor SaaS
•
Pass
•
Fail
conditions mandatory for pass, as defined in the monitor, were not satisfied.
•
Unconfirmed
A special case of fail.
The system verifies the result by running a second opinion. Each monitor type has different rules on how to classify as
fail. Factors other than a failure within customer infrastructure can cause errors.
•
Inconclusive execution of the probe failed due to an internal error. For example, network failure between the
scheduler and a monitoring station.
The dashboard log displays the results of probes, except inconclusive results, which are hidden. The two most common
scenarios for a check run are:
•
The first probe returns a pass or fail. No other probes are required. The result of the check is the result of this probe.
•
The first probe returns a timeout, which is classified as an unconfirmed error. A second probe is issued. If it returns a
timeout too, the result of the check is an error. If enabled in monitor settings, an alert is sent.
Log entries for probes have different colors, which are based on status. In the two probe scenario, the first result is shown
in yellow (Unconfirmed error), the second probe in red (Error). If the result triggered an alert, the log entry also contains an
icon with the envelope symbol.
NOTE
Alerts are generated by the checks, not the probes. Therefore, a monitor set-up to send an alert immediately
generates the alert after two probes consecutively report timeout errors. If the monitor is configured to send an
alert after two errors, the monitor sends the alert after four probes have sent timeout error reports.
This table describes the rules for issuing probes on public monitoring stations, and for returning results:
Firstprobe Secondprobe Thirdprobe Check Result
pass ok
fail error
unconfirmed pass ok
unconfirmed fail error
unconfirmed confirmed error
unconfirmed inconclusive pass ok
unconfirmed inconclusive fail error
unconfirmed inconclusive confirmed error
unconfirmed inconclusive inconclusive error
inconclusive pass ok
inconclusive fail error
inconclusive unconfirmed pass ok
inconclusive unconfirmed fail error
inconclusive unconfirmed confirmed error
inconclusive unconfirmed inconclusive error
inconclusive inconclusive pass ok
inconclusive inconclusive fail error
inconclusive inconclusive unconfirmed error
inconclusive inconclusive inconclusive inconclusive
74

DX App Synthetic Monitor SaaS
For OPMS with only two monitoring stations available in a namespace, the rules are:
Firstprobe Secondprobe Check Result
pass ok
fail error
unconfirmed pass ok
unconfirmed fail error
unconfirmed confirmed error
unconfirmed inconclusive error
inconclusive pass ok
inconclusive fail error
inconclusive unconfirmed error
inconclusive inconclusive error
For a single OPMS installation:
probe Check Result
pass ok
fail error
unconfirmed error
inconclusive error
ASM selects a monitoring station for the second opinion automatically from the order algorithm you select for a given rule:
Algorithm Next Monitor Station
Master The nearest monitor station
Random A random monitor station
Sequential Next monitor station in the sequence
Sticky If the previous probe returned an error, use the same monitor
station. Otherwise pick one at random.
Classification of Probe Failures
This section lists probe failures that do not require a second opinion. Any error code that is not listed here is classified as
unconfirmed.
Simple monitors
These include HTTP, HTTPS, FTP, FTPS, CONNECT, SMTP, TELNET, LDAP, SCP, SFTP, IMAP, POP3.
•
95xx –content did not match a specified string or regular expression
DNS
•
8003 – no name servers found
•
8006 – name server error
•
8007 – invalid name server list
•
9501 – record not matched
75

DX App Synthetic Monitor SaaS
Domain
•
-12 – invalid name server list
•
8003 – no name servers found
•
8005 – inconsistent responses
•
8006 – name server error
•
8007 – UDP reply truncated
Traceroute
•
7125 – timeout inside perimeter / Number of hops exceeded
•
7100 – host unreachable
•
7101 – network unreachable
•
7102 – protocol unreachable
•
7103 – port unreachable
•
7104 – fragmentation that is needed and DF set
•
7105 – source route failed
•
7106 – destination network unknown
•
7107 – destination host unknown
•
7111 – network unreachable for Type of Service
•
7112 – host unreachable for Type of Service
•
7113 – communication administratively prohibited
•
7114 – host precedence violation
•
7115 – precedence cutoff in effect
•
7120 – fragmentation needed
•
7121 – host unreachable
Script
•
1060 – bandwidth allowance exceeded
•
1061 – unsupported bandwidth size
•
7001-7010 – assertion failed / JMeter errors
•
7016 – request limit exceeded
•
7018 – only HTTP samplers supported
•
7021 – script did not perform any requests
Full Page Monitor
•
<response code> – HTTP response code not from 200 through 399, inclusive.
•
9501 – matched string not found
•
9502 – invalid regular expression
•
7001-7010 – JavaScript errors
Set Up a Public Status Page to Display Web Server Information
As a System Administrator, you are responsible for the communication of information about your webserver to customers.
DX APP Synthetic Monitor Public Status Page (PSP) lets you display the following information:
76
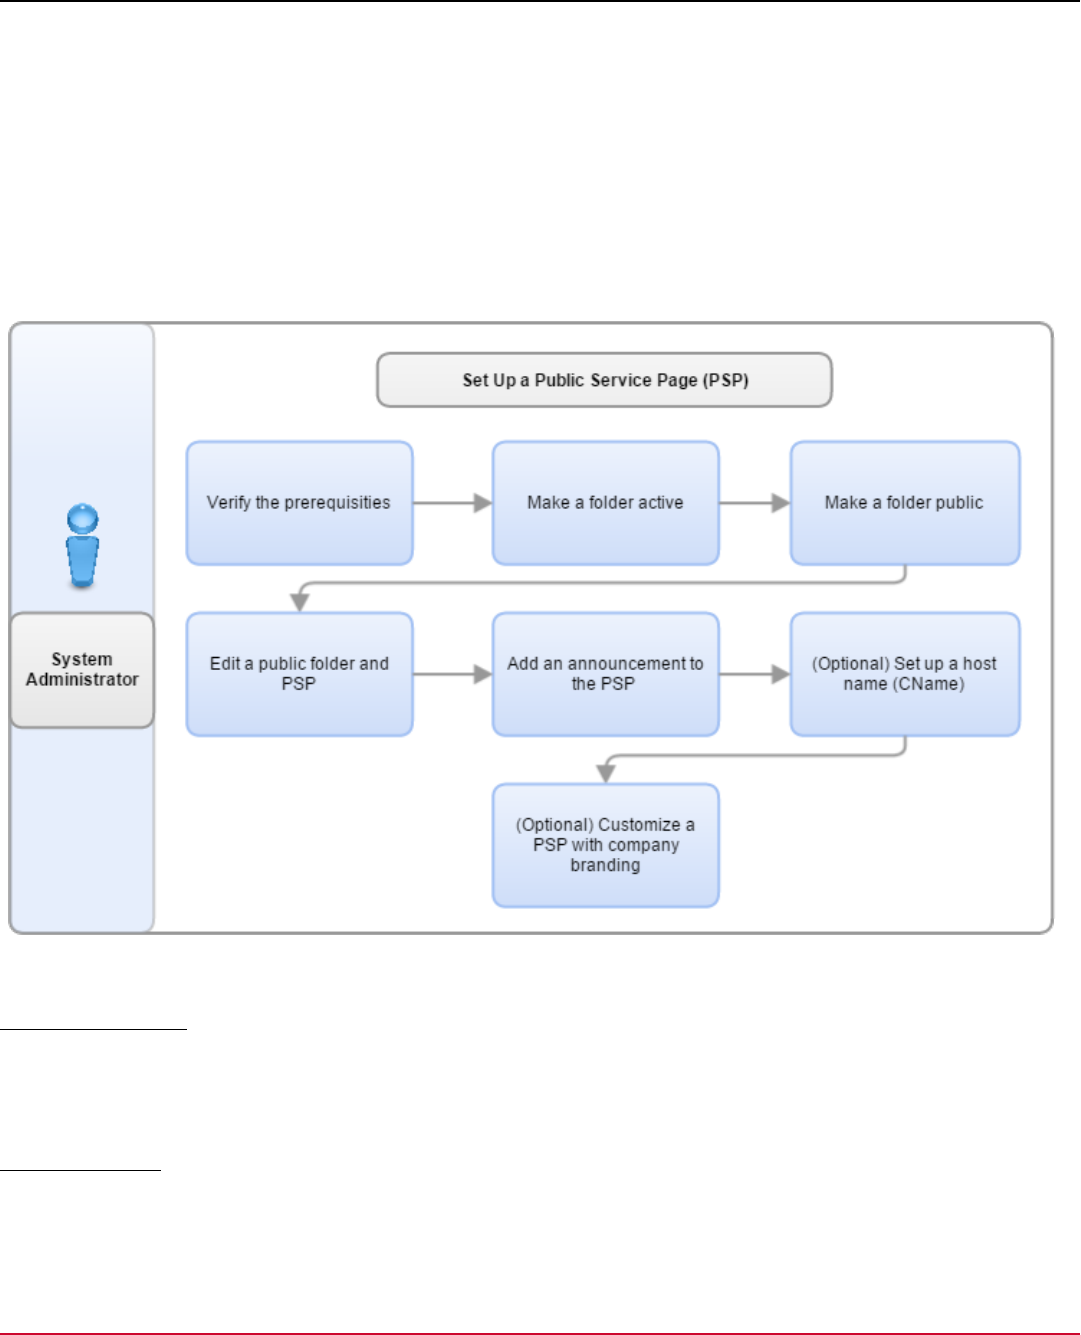
DX App Synthetic Monitor SaaS
•
Real-time website performance and availability issues
•
Website public uptime and performance history
•
Website service announcements
•
(Optional) Company branding
Examples of PSPs with company branding:
•
CA ASM Status
•
Twitter PSP
The following diagram shows the process of setting up a PSP:
Figure 11: Set up a public service page
Verify Prerequisites
•
Set up monitors.
•
(Optional) Contact your DNS/IT provider to set up a hostname ( cname ), for example,
status.yourcompanyname.com
Activate a Folder
To create a PSP with multiple monitors, create and activate a folder. An active folder must contain at least one monitor.
The number of monitors is unlimited.
77

DX App Synthetic Monitor SaaS
Follow these steps:
1. Mouseover Settings and select Monitors.
2. Select Add Folder.
A new folder appears with a default name.
3. Select the new folder to open the Folder Settings page.
4. Enter the folder Name, select Folder status Active, Alerting On, and select Create.
Make a Folder Public
Public Folders let you see monitors on the PSP. The default PSP appears when you select the preview icon in the Public
Folders PSP console.
Follow these steps:
1. Mouseover Settings and select Public Status pages.
2. Select Add Public Folder.
3. Select the folder to publish.
4. (Optional) Configure the cname setting.
See Set Up the Hostname (cname ) for configuration instructions.
5. Select More Options, complete the configuration options, and select Save. The folder is public.
Edit the Public Folder and PSP
You can update the public folder and PSP to update issues and announcements.
Follow these steps:
1. Mouseover Settings, and then select Public Status pages.
2. Select Edit Public Folder on the Actions menu.
3. Select More Options, edit the settings, or change the CNAME (hostname) and select Save.
Add an Announcement to the PSP
Import announcements from an RSS feed or add them manually in the public note console. Announcements publish
immediately unless a later date or time is scheduled. All announcements are stored on the Public Status page.
Follow these steps:
1. Mouseover Settings and select Public Status pages.
2. Select Add Announcement
The Add public note window opens.
3. Enter the announcement, select a folder, or monitor from the Regarding list, and set the Date and Time.
NOTE
The default setting is Public. Clear the Public checkbox to hide the announcement.
4. Select Save.
The public note is saved and the announcement displays on your PSP and the detailed status page. The PSP
overview page displays the monitor or folder name as the service or website.
NOTE
If you do not select a folder or monitor from the Regarding list, the published public note on the PSP overview
page displays General as the service or website name.
78

DX App Synthetic Monitor SaaS
(Optional) Set Up the Host Name
To make the status of your web sites and services appear on a domain, assign a host name (cname ) to the folders
and monitors. An example hostname is status.example.com . The cname enables the web status to appear on the
specified domain.
WARNING
Create a cname record and point at status.asm.ca.com to allow completion of this procedure.
Follow these steps:
1. Mouseover Settings, Public Status pages and select a public folder to assign a hostname.
2. Select the Edit Public Folder on the Actions menu.
3. Add your domain hostname in the cname field and select Save.
(Optional) Customize the PSP Files
To create a PSP with the company branding information, customize the HTML and CSS template files.
1. Review the supported Placeholders and Elements and select the placeholders and elements to customize.
2. Download the PSP template files, find the psp_templates_latest.zip file and select Open.
3. Edit the following files and save:
–
example_overview.html
–
example_detail.html
–
example.css
NOTE
Use Windows WordPad Application or another compatible editor to edit the files.
4. Submit a support case and attach the customized files and images for the customization.
NOTE
The support team creates the PSP within a few business days.
Reference Information
Placeholders
Overview page
Mandatory placeholders:
•
$psp[headers] : replaced by the HTML headers
•
$psp[footer] : replaced by PSP informational text
•
$psp[javascript] : replaced by the PSP JavaScript code
•
$psp[curr_status_rows] : replaced by HTML table rows (current status)
•
$psp[hist_rows] : replaced by HTML table rows (performance history)
Optional placeholders:
79

DX App Synthetic Monitor SaaS
•
$psp[home_url] : replaced by the URL of the overview page
•
$psp[right_header] : replaced by your company and folder name
•
$psp[logo_img_a] : replaced by your logo (if you have uploaded one in your account profile) or the folder name
•
$psp[comp_name] : replaced by the name of the company in your account profile
•
$psp[folder_name] : replaced by the folder name of the PSP
•
$psp[wm_cp_num] : replaced by the number of monitoring stations
•
$psp[meta_desc_body] : replaced by a general description for this page
•
$psp[show_today_uptime] : replaced by the Uptime today string if the PSP settings in the PSP console are
enabled. If the settings are not enabled, replace with a no-braking-space character. Select the mandatory element ids.
Detail page
Mandatory placeholders:
•
$psp[headers] : replaced by HTML headers
•
$psp[footer] : replaced by PSP informational text
•
$psp[javascript] : replaced by PSP JavaScript code
Optional placeholders:
•
$psp[home_url] : replaced by the URL of the overview page
•
$psp[right_header] : replaced by your company and folder name
•
$psp[logo_img_a] : replaced by your logo (if you have uploaded one) or the folder name
•
$psp[comp_name] : replaced by your company name
•
$psp[folder_name] : replaced by the folder name of the PSP
•
$psp[wm_cp_num] : replaced by the number of ASM checkpoints
•
$psp[current_status_heading] : replaced by the phrase "Current Performance and Availability Status" followed
by the name of the Monitor that corresponds to this detailed view
•
$psp[meta_desc_body] : replaced by a general description for this page
•
$psp[service_name] : replaced by the name of the ASM monitor that corresponds to the detailed view
Mandatory elements
Overview page
•
hist_date_[n] (n: 0..6)
•
psp_last_update
•
section_curr_status
•
table_ann
•
section_hist
•
section_ann
•
legend
•
page_loader
80

DX App Synthetic Monitor SaaS
Detail page:
•
hist_date_[n] (n: 0..6)
•
hist_data_[n] (n: 0..6)
•
psp_last_update
•
curr_status_icon
•
curr_status_desc
•
section_curr_status
•
section_charts
•
chart_perf_7_container
•
chart_score_map_7_container
•
caption_perf_7_chart
•
caption_score_map_7_chart
•
section_charts_avail
•
chart_avail_7_container
•
chart_avail_24_container
•
caption_avail_7_chart
•
caption_avail_24_chart
•
section_ann
•
table_ann
•
section_hist
•
legend
•
page_loader
DX App Synthetic Monitor Plug-in
In some DX APP Synthetic Monitor packages (for example, "Platinum") you can specify monitors of type 'plugin'. Using
a plug-in monitor you can extend the capabilities DX APP Synthetic Monitor to test any protocol and any server or any
process on your environment, even behind your firewall.
How do plug-ins work?
Plug-ins are dynamic web pages placed on your own web server, that execute the test on behalf of the DX APP Synthetic
Monitor server. The page (plug-in) is opened with a number of parameters (see below) and returns the result of the test.
As the dynamic page runs on your server and is under your control, it can access more systems than the external DX APP
Synthetic Monitor system.
How can I create my own plug-in?
You can create your own plugin by creating a dynamic web page on a web server that is reachable from the Internet. Any
programming language can be used to create this dynamic page (PHP, ASP, C++, Java, TCL, ...). The page is visited by
the DX APP Synthetic Monitor servers at the interval you specify in your monitor settings.
The following parameters are handed to this dynamic page using an HTTP POST command:
•
WMhost
•
WMport
•
WMpath
•
WMpar
•
WMaccount
•
WMpasswd
The value of the parameter is copied from your monitor settings using the host, port, path, parameter, account, and
password fields respectively.
81

DX App Synthetic Monitor SaaS
The parameters are posted using the HTTP 1.0 protocol. In your web server logs, you can recognize the probes from our
servers, as they are tagged with the user-agent "WatchMouse/NNN". Currently, the version NNN is 1.20.
Return values
After performing the test within the script of your dynamic page, you should return a page with content-type "text/plain"
and with one or more lines that are terminated with a newline (preferably a linefeed character). These lines should read
(no empty lines, no leading spaces):
parameter=value
The following return values are defined, other parameter names are ignored:
Name Type Optional Description
status unsigned integer N Use 0 to denote a successful result and a value of 1..9999 if an error occurred. Please use different values for different error conditions.
message char(255) Y A short piece of text (no newlines, typically 20 characters, max 255 characters). Preferably, use a specific text for each of the status values.
rtime* unsigned integer N/A Resolve time. Not logged yet, but available online.
ctime unsigned integer Y Connect time. Time in milliseconds to build the connection
dtime unsigned integer Y Download time. Time in milliseconds to download the information.
dsize unsigned integer Y Download size. The number of bytes downloaded.
ptime unsigned integer Y Processing time. Time in milliseconds for processing. Normally the time from the connect to the first byte received
user unsigned integer Y User-defined value
(*) Currently not logged
NOTE
Except for the 'status' and 'message' fields, all other fields are user-definable. Using them for the purpose
described above will, however, make it easier for other people to interpret the logs and graphs.
Timing constraints
The timeout you set in the monitor (default 8 seconds) is passed to the plug-in but is also the timeout for the plugin itself.
In the case of a timeout, the parameters (ctime, ...) are not stored.
Examples
See the following example in PHP, Java, and ASP.
PHP example
1. <?
2. // CA App Synthetic Monitor connector for MySQL database
3. // The following POST parameters are available
4. // WMhost, WMport, WMpath, WMaccount, WMpasswd, WMpar
5. // The output of the remote host shall be a MIME header,
6. // followed by:
7. // status=NNN\nmessage=XXX\n
8. // NNN is a positive number, 0 denoting okay, 1..9999 an error
10. // XXX is a message, max 255 chars, only ASCII char 32..127
11.
12. $dbhost = 'dbhost.yourdomain.com';
13. $dbname = 'yourDBname';
14. $dbuser = $WMaccount;
82
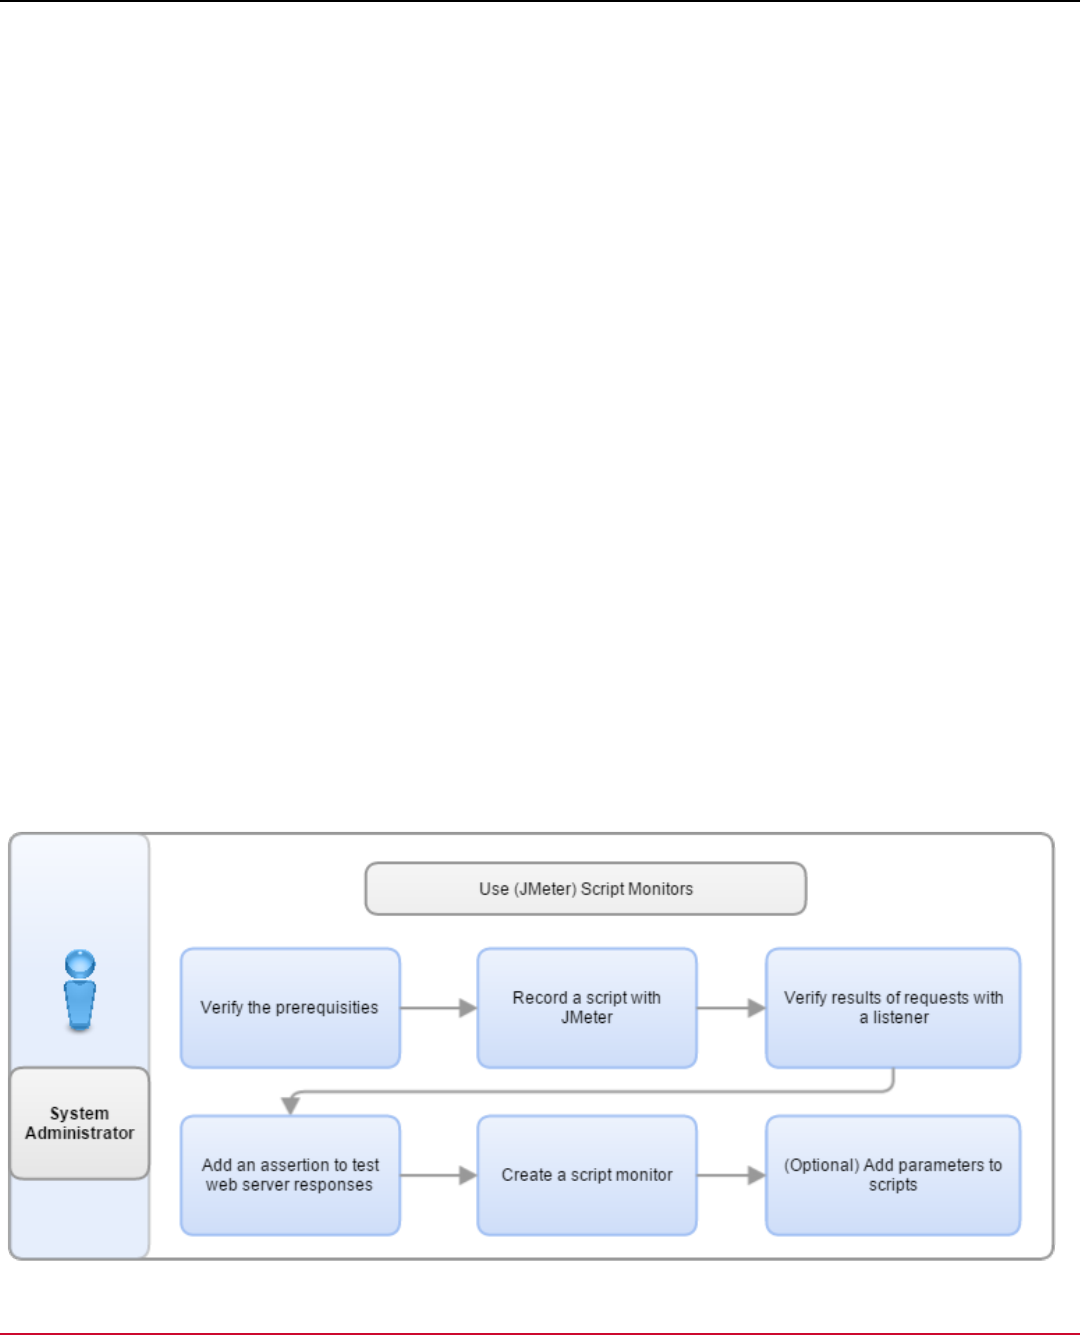
DX App Synthetic Monitor SaaS
15. $dbpass = $WMpasswd;
16.
17. $dbh = @mysql_connect($dbhost, $dbuser, $dbpass);
18.
19. $err = mysql_errno()+0;
20. $msg = mysql_error();
21. if (!$dbh && !$err) {
22. $err=1;
23. $msg = "Couldn't connect to $dbhost($dbuser))";
24. }
25. print "status=$err\n";
26. print "message=$msg\n";
27.
28. if ($dbh) @mysql_close($dbh);
29. ?>
Use (JMeter) Scripts to Test Web Servers
As a system administrator, you are responsible for the performance of your multistep web servers. With ASM (JMeter)
Script Monitors, you can simulate and measure the performance of multistep, web server transactions such as log-ins and
shopping carts.
NOTE
If you need certificate validation, consider creating another https monitor. That also comes with warnings when
your certificate is about to expire because JMeter is validating the SSL layer only.
The JMeter application is used to create the scripts for the ASM Script Monitors. JMeter is a Java-based application that
runs on many platforms including, Microsoft Windows, MacOS, and Linux.
NOTE
JMeter does not execute the client-side code. Construct your scripts to test procedures that do not require
JavaScript or any other client-side code.
The following diagram shows the steps for using a script monitor:
83

DX App Synthetic Monitor SaaS
Verify the Prerequisites
Before you start to record scripts, ensure that you have the latest supported version of JMeter, 4.0. Go to the Apache
JMeter website to download. Backward compatibility with JMeter 2.13 is also supported.
Record a JMeter/HTTP Script with JMeter
To create a script that monitors can use to test web servers, record a JMeter/HTTP test script with JMeter.
Follow these steps:
1. Open JMeter, right-click Test Plan on the left pane and then select Add, Threads (Users), Thread Group.
2. Right-click the Workbench element on the left pane, and then select Add, Non-Test Elements, HTTP(S) Test Script
Recorder.
An HTTP(S) Test Script Recorder opens on the right.
3. On JMeter, select the HTTP(S) Test Script Recorder and configure the port field.
4. Open a Web browser. Set the proxy server settings to use localhost and the port you specified in the HTTP(S) Test
Script Recorder. Save the settings.
WARNING
Close all open web pages in the Web browser before the next step.
5. In the JMeter menu, select Run then Start.
6. Enter the URL of the web page you want to monitor in the Web browser address bar. Select enter or reload.
7. After the web page loads, perform the web transaction you want to monitor. For example, log in and add items to the
shopping cart.
NOTE
If the browser displays an untrusted connection, add an exception and continue with the script recording.
JMeter collects the HTTP requests under the Thread Group on the left pane.
8. When you finish the web transaction, select the HTTP(S) Test Script Recorder, Stop.
9. Remove the proxy settings from the Web browser settings.
10. Select the icon to the left of the thread spool to expand the Thread Group.
The collected requests appear under the Thread Group.
NOTE
The first request under the Thread Group creates the script file.
11. To delete all requests except the first, select the requests, right-click the selected items, select Remove, Yes.
The selected requests are deleted.
12. To save the HTTP test script file, select File, Save Test Plan as, enter the File Name, select a file location, and then
select Save.
The script file is saved with a JMX extension.
Verify Results of Requests with a Listener
Use Listeners to verify that the target server responds to the script.
Follow these steps:
1. Open JMeter, select File, Open, browse to your HTTP test script file.
2. Right-click Thread Group on the left pane and go to Add, Listener, View Results Tree.
A View Results Tree is added to the Thread Group.
3. On the menu, select Run, Start.
The target server responds to the script request and a red or green request icon appears.
84

DX App Synthetic Monitor SaaS
NOTE
A green request icon result is correct. If the request icon result is red an HTTP error occurred. Select the
request icon next to the exclamation mark to see the error. To fix the error, repeat Record a Script with
JMeter.
4. Select File, Save.
The Listener is added to the HTTP test script.
Add an Assertion to Test Web Server Responses
Assertions test if your web server returns the expected response properties. Assertions can verify the following response
properties:
•
Response Time: use duration assertion
•
Response Size: use size assertion
•
Response Content: use response assertion
•
HTTP Response code: use response assertion
NOTE
Monitors without assertions only report errors if there is a transaction timeout or a standard HTTP error. Content
and performance errors are not reported. The number of assertions in a script are unlimited.
Follow these steps:
1. Open JMeter, select File, Open, browse to your JMX File, and select Open.
2. Select the icon next to the Thread Group.
3. Right-click the request that you want to verify. Go to Add, Assertions, and select Response Assertion.
4. On the Response Assertion page, select Add
5. Under Patterns to Test, enter a string or regular expression you want to verify. Select File, Save.
The assertion is added to the JMeter.
Create a Script Monitor
To use a test script file to monitor web servers, create a script monitor and upload the test script to the monitor.
Follow these steps:
1. Log in and mouseover Settings, select Monitors, New Monitor.
2. From the Advanced Synthetic Monitors tab, select SCRIPT monitor.
3. Enter the monitor name in the Name field and select Upload File. Browse to the HTTP test script file and select
upload.
NOTE
The maximum size of a JMeter script is 1 MB.
4. Select Continue.
The Script Check and Modification page opens, verifies the script, and then provides a script If report.
5. Review the script details and select Continue to test the script monitor.
NOTE
If an error occurs, read the message at the top of the screen and follow directions.
6. Select Continue, use the slider to select the Check Frequency, select Finish.
The monitor is saved, activated, and begins to monitor.
(Optional) Add Parameters to Scripts
To use the same script for multiple script monitors, replace the fixed values in the test script with variable JMeter
parameters.
85

DX App Synthetic Monitor SaaS
NOTE
The following procedure modifies the host property. Other properties follow the same procedure.
Follow these steps:
1. Open the HTTP test script file in JMeter.
2. Select the drop-down icon to expand the Thread Group.
The Thread Group file opens.
3. Below the Thread Group, select the request that you want to modify.
4. Type ${__property(WMhost)} in the Server Name or IP field and save.
5. Log in and mouseover Settings, select Monitors, then select the script monitor that you want to update.
6. Go to Script File, select the upload arrow icon, and upload the script.
7. Select More Options and go to Host and type the hostname.
8. Select Save.
The Script Check and Modification dialog opens and verifies the script file.
9. Select Continue.
The Delete logs dialog opens.
10. Select an option, and then select Proceed.
Standard Monitor Parameter JMeter Property
Host ${__property(WMhost)}
Port ${__property(WMport)}
Path ${__property(WMpath)}
User Name ${__property(WMaccount)}
Password ${__property(WMpasswd)}
Script Parameters JMeter Property
foo1=bar1&foo2=bar2&foo3=bar3
${__property(foo1)}
${__property(foo2)}
${__property(foo3)}
The monitor is tested and creates a report.
NOTE
If you receive an error message, reconfigure the monitor or Continue Anyways.
11. Use the slider to select the optimal check frequency and select Finish.
The monitor is saved, activated, and begins to monitor.
JMeter samplers blacklisted on ASM
For security reasons, the following samplers are disabled. JMeter scripts containing these samplers are not permitted to
upload to ASM.
Listed by human readable name (internal JMeter class name).
86

DX App Synthetic Monitor SaaS
•
Access Log Sampler (AccessLogSampler)
•
AJP/1.3 Sampler (AjpSampler)
•
BeanShell Sampler (BeanShellSampler)
•
BSF Sampler (BSFSampler)
•
Debug Sampler (DebugSampler)
•
FTP Request (FTPSampler)
•
Java Request (JavaSampler)
•
JDBC Request (JDBCSampler)
•
JMS Point-to-Point (JMSSampler)
•
JMS Publisher (PublisherSampler)
•
JMS Subscriber (SubscriberSampler)
•
JSR223 Sampler (JSR223Sampler)
•
JUnit Request (JUnitSampler)
•
LDAP Request (LDAPSampler)
•
LDAP Extended Request (LDAPExtSampler)
•
Mail Reader Sampler (MailReaderSampler)
•
MongoDB Script (MongoScriptSampler)
•
OS Process Sampler (SystemSampler)
•
SMTP Sampler (SmtpSampler)
•
TCP Sampler (TCPSampler)
•
Test Action (TestAction)
•
WebService(SOAP) Request (WebServiceSampler)
JMeter Timeouts
Determining the right timeout for your script can be tricky. The best practice is to use a time that when reached, your
service or scenario under testing is to be considered fatally underperforming. For example, it is taking so long that the
average user would give up trying.
Elements Delaying the Script
Some elements of the script make the script run longer, and likely to hit the timeout. You can remove these elements from
the script without making any functional difference. Recording the script using the JMeter HTTP(s) Test Script Recording
feature tends to be adding some of these elements automatically. If your script keeps hitting timeouts and includes these
elements, remove or disable them unless they are important for your functional test scenario.
All of the "Timer" group of elements affect the script. The following is the list of JMeter 4.0 elements:
•
Constant Timer
•
Uniform Random Timer
•
Precise Throughput Timer
•
Constant Throughput Timer
•
Gaussian Random Timer
•
JSR223 Timer
•
Poisson Random Timer
•
Synchronizing Timer
•
BeanShell Timer
87

DX App Synthetic Monitor SaaS
Timeouts and Metrics
Unfortunately, all timeouts can result in incomplete or skewed metrics. ASM JMeter agent starts running the test script and
two “wall-clock” timers at the same time. Once the first timer hits the timeout, the agent asks to stop running the script.
This is called graceful timeout. If it still does not stop when the second timer expires, the script is aborted forcefully.
The graceful shutdown initiated by the expiration of the first-timer gives JMeter some chance to finish requests in-
process and finish writing the JTL file used for metric analysis. The forceful abort usually results in stopping all requests
immediately and can lead to incomplete or even corrupt JTL files. This happens because some requests that completed
before the timeout was hit are not flushed to the JTL file entirely and correctly. As the JTL file is incomplete or even
corrupted, no precise metrics can then be extracted from it.
ASM JMeter agents try to minimize these chances but this is largely dependent on the JMeter itself and also on the script
structure.
Types of Timeouts
The timeouts are categorized as follows:
•
7011 Script Run Timed-Out (total time metrics)
This type of timeout will occur when the JMeter would close the running script gracefully by the first timer and the
metrics inside the JTL file indicate that it was running a bit longer than the timeout specified. JTL file is usually not
corrupt and metrics are not skewed much - they show a sum of what was executed and flushed to the JTL file even
though it was only a part of the script.
•
1042 Script Run Timed-Out (measured actual run time)
This type of timeout happens when the graceful-stop does not work and the script run had to be killed abruptly. Hence
the metrics should not be trusted JTL file might be corrupted.
•
Connection Timeouts
This is not an error you see in the monitor log but they can be seen inside the JTL and also in the check details JTL
overview in ASM UI. The error will be manifested as having a “Non HTTP response message: Connection timed out”.
This signals that the connection was not even established because of some network problem getting in its way, most
probably it’s being firewalled out somewhere. Why is this important? ASM JMeter agent can control this timeout only
in limited ways, some aspects of it are mandated by the underlying OS. A script’s run can be pushed into constant
timeout by just one step having this issue. If you’re seeing this constantly, the offending script step should be reviewed
and made working or removed if possible.
Failing Assertions on Script (JMeter) Monitor Timeouts
When your JMeter contains assertions of any kind and the script times out before reaching a step evaluated with
assertion, we now try to find and fail the assertion (artificial assertion failure) because it was not evaluated at all. The
feature is particularly useful for customers who have APM integration alerts set up based on JMeter monitor assertion
names.
ASM uses the following algorithm:
1. Finds the corresponding step in JMX (source script) file.
2. Finds the first assertion that comes after this step.
3. Fails it.
4. If there is no such assertion, inserts artificial assertion result for the last step where timeout occurred.
NOTE
Timeout messages or error codes were not changed.
ASM cannot match JTL output (partial script results on timeout) to JMX request for all occasions with 100 percent
correctness due to limitations imposed by JMeter. This feature might not fail the exception that you expected.
If you think we failed an incorrect assertion, create a support ticket with the following information:
88

DX App Synthetic Monitor SaaS
•
Original JMX script
•
Partial JTL output from the script run
•
Indicate the assertion that you expected to fail instead
Supported JMeter Plugins
BlazeMeter Remote Terminal Emulator
You can use the BlazeMeter RTE plugin to record remote terminal emulator (RTE) scripts. For instructions to record a
script, and get the list of supported protocols, see BlazeMeter RTE plugin. When using a monitor with an RTE script, the
following errors may produce a check failure in DX ASM:
•
Check timeout
•
Connection error to the terminal server
•
Any assertion failure
Only the Processing Time metric is measured and counts towards the check timeout and Performance Status.
Use Real Browser Monitors (RBM) Scripts to Test Web Servers with
Script Recorder
As a System Administrator, you are responsible for the availability and performance of your online web services. With
ASM Real Browser Monitors (RBM), you can test the availability and can measure the performance of your online web
services. Scripts that are recorded with the Script Recorder simulate a user transaction with a single web page load that
uses a real browser engine.
NOTE
This monitor type is deprecated and support will be removed. We recommend you to use the WebDriver
Monitor.
Use this scenario to guide you through the process:
89
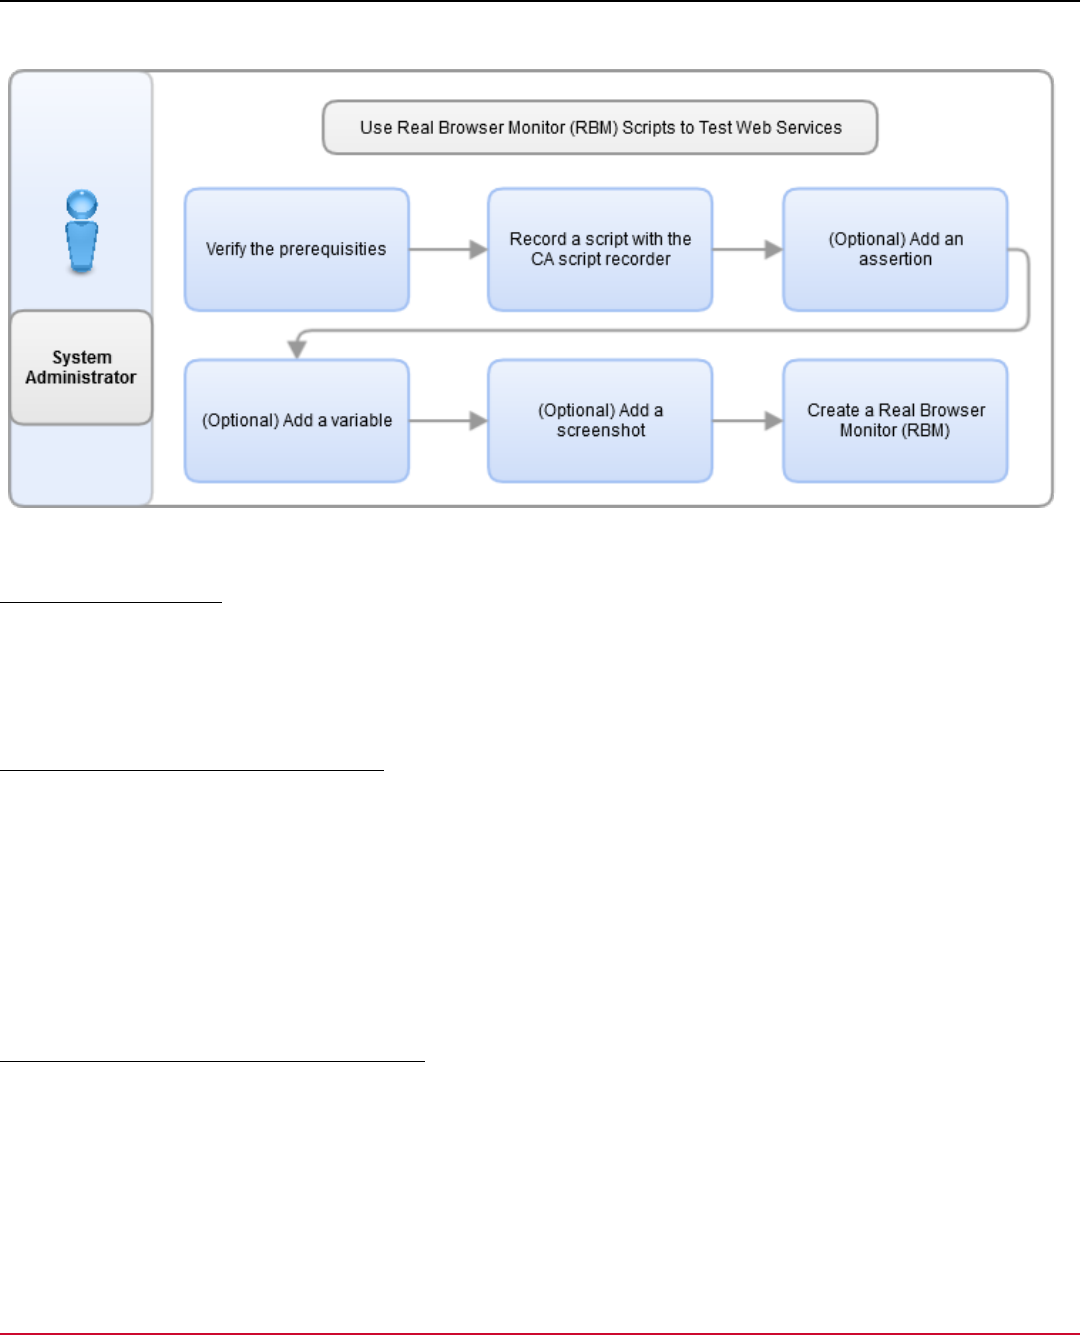
DX App Synthetic Monitor SaaS
Figure 12: Use RBM scripts
Verify the Prerequisites
•
Ensure that your ASM subscription includes RBMs.
•
Before you start to record scripts, download and install the ASM Script Recorder from Badboy. The link to the recorder
installer is also available on the ASM portal.
•
Ensure that you have the latest version of Internet Explorer because it is used as the browser engine by the recorder.
Record a Script with the Script Recorder
To create a script that monitors can use to test web servers, record a script with DX APP Synthetic Monitor Recorder.
Follow these steps:
1. Open the DX APP Synthetic Monitor Recorder, enter the URL of the website in the web browser address field, and
select the square, green button on the menu.
A script displays in the script window under the testSuite 1 tree.
2. Select Stop, File, Save As, New DX APP Synthetic Monitor Recorder Script, enter the file name and select Save.
3. A Save Response Content? dialog opens, select Save without Responses.
4. A Screen Shots dialog opens, select Cancel.
(Optional) Add an Assertion (Content Check)
Assertions test if your web server returns the expected response properties.
Follow these steps:
1. From the Tools window, drag Content Check to Script.
2. Type the expression in the box and select Contain or Not contain. Select OK.
3. Right-click on Test Suite 1 and select Play Whole Suite.
90

DX App Synthetic Monitor SaaS
(Optional) Add a Variable (Variable Setter)
To use the same script for RBM monitors, replace the fixed values in the test script with variable parameters.
Follow these steps:
1. From the Tools window drag, the Variable Setter from the Tool window to Script.
2. Type the Variable to Set, fill in the other fields, select Apply, and then select OK.
(Optional) Add a Screen Shot
To take a screenshot when an assertion fails, add a ScreenShot. A screenshot allows you to document the error and
share the error to ensure a fix.
Follow these steps:
1. From the Tools window, drag Screen Shot to the Script pane.
2. In the dialog window that opens, type the label of the Screen Shot, and then select OK.
3. Right-click the Screen Shot icon and select Play.
Create a Real Browser Monitor (RBM) Script Monitor
Follow these steps:
1. Log in and mouseover Settings, select Monitors, New Monitor.
2. From the menu tab, select Real Browser Monitor, and then select Firefox.
3. Type the monitor Name, select upload icon browse to the script and select Upload.
4. Select Continue, the monitor is tested. If the test is OK, select Continue.
5. Select the check interval and select Finish.
WebDriver Monitor
Use the WebDriver Monitor to record and run performance scripts for a specific browser and platform. You can record or
upload your own XML scripts, which are translated to WebDriver commands and passed to a Selenium server. Selenium
runs the scripts in a real browser and operating environment. The collected results sent are then sent back to the ASM
Dashboard
To know more about OPMS, see the video on How to Get Started with Real Browser Monitoring in DX App Synthetic
Monitor:
Supported Browsers and Platforms
The Webdriver agent browser versions are preserved/upgraded/removed as follows:
Browser:
•
Firefox:
–
The versions 110 and 119 are preserved.
–
The version 122 is newly added and is used as the default version.
–
The version 91 is now removed.
•
Chrome:
–
The versions 110 and 117 are preserved.
–
The version 121 is newly added and is used as the default version.
–
The version 91 is now removed.
Platform:
91

DX App Synthetic Monitor SaaS
•
Linux
NOTE
•
Active Webdriver monitors running explicitly (see the browser option in monitor setting) on removed browser
versions (version 91) are migrated to the oldest supported version (version 110) for Firefox and Chrome.
•
Active Webdriver monitors running explicitly on the oldest supported version (version 110) will remain on the
same version.
•
The current latest version (version 119) will be renamed to Firefox 119 after ASM 24.4 release.
•
The browsers are not automatically upgraded from the current latest version (119) to the new browser
version (122) to ensure that the monitors should not fail upon upgrade. Users are expected to upgrade to the
latest browser manually following the steps mentioned in the 'Upgrading Browser' section.
NOTE
These browser versions are for ASM 24.4 release specific. The same pattern as described above will be
followed for all future ASM releases.
Upgrading Browser
To keep the system secure, it is needed to upgrade the browser and remove the obsolete versions.
To switch monitors to the latest browser version in bulk:
1. In the left navigation under Monitoring, click Monitors.
2. In the Monitors page displayed, enter "browser:old" in the search box to filter out monitors configured to explicitly use
the old browser version.
NOTE
browser:old, browser:latest, browser:firefox, and browser:chrome are the other search filters you may use in
the search box.
3. Click the checkbox to select the monitors.
4. In the Choose… drop-down, click Switch to the latest browser.
5. Click Save.
The selected monitors are now switched to the latest browser.
Configure WebDriver Monitor
WebDriver monitors have the following configuration options:
•
General:
–
Name: Enter the monitor name
–
Upload a valid WebDriver script: Use this field to create a functional test by uploading a WebDriver script into this
monitor. Select Browse and select the script file (.xml). For more information about WebDriver scripts, see Build
WebDriver Scripts. Important: A script is limited to a 2.00-MB file size.
–
Browser: Defines the browser that is used to playback the check.
–
Time-out in seconds: If the monitor does not get a response before the time-out, an alert (error) is generated. The
maximum time-out value that is allowed is 90. The time-out that is specified is the total time-out of the following
parameters:
•
resolve time
•
connect time
•
read time
–
Alert Contact: Specifies the alert address for the monitor. You can add and modify addresses by clicking Edit.
Important! If you select Edit, changes in this screen disappear.
92

DX App Synthetic Monitor SaaS
NOTE
The Main e-mail address is the e-mail address that is entered in the Account details under
Subscription.
Your login name is also available there. Select none to record errors only in the log file (for reporting)
without sending any alert message.
•
Advanced
–
Tags: Tags are text labels that can be assigned to any monitor. A monitor can have any number of tags. The
same tags can be used for multiple monitors. Use tags to organize your monitors regardless of the folders that the
monitors are in. Use tags to define log reports or graphs. Enter any number of tags that are separated by spaces.
NOTE
You cannot use spaces in a tag name. Spaces in the tag names are converted to underscores. For
example, a tag with a "New Tag" name is saved as "New_Tag".
–
Notes: The Notes field does not affect the monitoring. You can use this field as a personal notepad, a reminder, or a
notice for your colleagues.
–
First limit: Defines the first boundary in milliseconds. Performance measure:
•
Good - total time is below this limit, the server is performing well
•
Poor - total time between the first and second limit
•
Bad - above the second limit
Note: This boundary affects the graphs and charts, not the alarms.
–
Second limit: Defines the second boundary in milliseconds. This boundary affects the graphs and charts, not the
alarms. Performance measure total time:
•
Poor - above the first limit and below the second limit
•
Bad - above the second limit
–
User name (Optional): (Optional) If the monitored host requires authentication, fill out the user name. If this field is
used, also fill out the Password field.
–
Password: (Optional) If the monitored host requires authentication, fill out this field. If this field is used, also fill out
the user name field.
–
Authentication type: (Optional) If the monitored host requires authentication, select authentication.
Default: None
Supported Authentication types:
•
None: No authentication
•
Basic: Uses HTTP basic access authentication
•
Digest: Uses Digest access authentication
•
Kerberos: Uses SPNEGO/Kerberos authentication
–
Host: Enter the host name, for example: www.mysite.co.uk .
–
Use Proxy (OPMS version 8.7+) (Optional): If the monitored host requires authentication, fill out the user name. If
this field is used, also fill out the Password field.
Available Options:
•
Don't use Proxy
•
Use system Proxy
•
Use custom Proxy
–
Alert on embedded elements errors: Tick to receive alerts when embedded elements, for example, JavaScript
files, CSS files, and images, fail to load. Such errors occur frequently.
–
Allow browser to make requests to: Select to where the browser can make requests. Use this option to avoid
phony hits to your website visitor statistics. By default, the browser only makes requests to the site domain. If
93

DX App Synthetic Monitor SaaS
you do not have visitor trackers on the page, you can select to allow requests everywhere. You can allow loading
external page assets from a selected list of domains, while still guarding hits to analytics trackers.
–
Deny requests to selected URIs : Comma-separated list of domains to deny requests to, or a regular expression
delimited by slashes. Any request with URI matching the regular expression is blocked.
–
Disable HTML5 media: Tick to reduce monitor bandwidth use and to prevent download of HTML5 media elements,
for example, audio, video, and source.
–
User agent: Defines the user agent announced by the monitoring stations at each visit of the monitored web server.
Select from the following options:
•
Native: Uses the agent that is defined in the browser.
•
Custom: Lets you specify a custom user agent.
Note: The user agent does not impact the browser version that the monitor uses.
–
Transaction Tag header: Sends custom values as HTTP headers to the tested service. This option can be used to
track each test for any other logging purposes.
Locations
Monitor order algorithm: ASM selects a monitoring station for the second opinion automatically from the order
algorithm you select for a given rule. Select from the following options:
–
Master - Next Monitor Station is the nearest monitor station.
–
Random - Next Monitor Station is a random monitor station.
–
Sequential - Next Monitor Station is the next one in the sequence.
–
Sticky - If the previous probe returned an error, the algorithm uses the same monitor station. Otherwise, it picks a
random one.
Check Periods
–
Delay between checks: Specifies the delay between the subsequent checks of the monitor. The package that you
are subscribed to determines the minimum delay.
–
Check period: Specifies the time period of monitor checks. To activate, a start time, and duration. Optionally you
can set the repetition period and the date field is updated automatically every period.
–
Maintenance: Used to plan maintenance for the monitor. Monitors continue to perform checks during maintenance.
The errors that occur during maintenance do not count as errors in reports and do not trigger message alerts.
–
Check on these days only: Check a monitor only on specific days of the week. Useful for a monitor that is used to
check an item in a Service Level Agreement.
Alerting
–
Warn me: Specify when CA App Synthetic Monitor sends alerts to you.
–
Notify me when up again: Tick the box to receive a notification when the monitor is not in alert state.
–
Remind me again after an alert in: Select the interval between the subsequent reminders. To deactivate, select
'Never'.
Workflow
The following diagram shows the WebDriver Monitor workflow.
Figure 13: WebDriver Workflow
Build WebDriver Scripts
WebDriver Monitors run selenium XML scripts and collect results for real browser monitoring. You can manually create
custom scripts or use the following tools:
94

DX App Synthetic Monitor SaaS
Use Katalon Recorder to Create Scripts
The Katalon Recorder is a free browser extension that records browser activity in the selenium XML format. After you
record, edit and test the script, you export the XML file and import the file into a WebDriver Monitor.
Follow these steps:
1. Download and install the Katalon Recorder extension in either Chrome or Firefox.
2. In the Katalon Recorder, select New to create a test case within a test suite.
3. Select Record to start recording the script. The Katalon Recorder disappears and starts recording your steps in the
browser.
4. Select Stop to stop recording the script. The test steps appear in an ordered list.
5. To edit the test steps, select the Add, Delete, Copy, or Paste icons. You can also edit the command, target, and value
of an individual test step.
6. To test the script, select Play. Katalon runs the script in the browser window.
NOTE
To prevent browser data from interfering with the script, run the script in incognito (private) mode. WebDriver
Monitor runs the XML scripts in incognito (private) mode.
7. Select Export to save the final script to a human-readable XML format.
NOTE
You cannot re-import the XML file back to the Katalon Recorder. Instead, save the Test Suite as an HTML file
for future editing.
8. To upload the XML file to a WebDriver Monitor, open the WebDriver Monitor and select the General tab select. Select
Browse on the Upload a valid WebDriver script field to find the XML file.
You recorded a script and uploaded an XML file to a WebDriver Monitor. For more information, see WebDriver Monitor.
Edit Selenium XML
You can manually edit Selenium-based XML. Selenium Syntax contains three parameters:
•
Command Indicates the action, such as click, double click, open, and refresh.
•
Target Represents the target element in the UI, for example, a field, link, or menu.
•
Value Specifies the value being selected or entered.
NOTE
Do not add Command's target or value inside quotes. This may prevent the script from running.
For example:
<target><![CDATA['']]></target>
Example: Open Gmail Account
<selenese>
<command>open</command>
<target><![CDATA[https://mail.google.com/mail/u/0/#inbox]]></target>
<value><![CDATA[]]></value></selenese>
</selenese>
Supported Selenium Commands
For the list of supported Selenium commands for WebDriver Monitor, see Supported Selenium Commands.
For more information about Selenium command parameters, see Selenese (Selenium IDE) Commands Reference.
95
DX App Synthetic Monitor SaaS
Troubleshoot RBM Scripts
The RBM Script Runs Successfully in Katalon but Fails in WebDriver Monitor
Symptom: The RBM script runs in Katalon Recorder without errors. After importing the XML file of the script to the
WebDriver Monitor, the script fails due to elements not loading.
Solution: By default, the Katalon Recorder runs the recorded scripts in one cycle and does not pause for elements to
load. Use WaitFor<element> commands in the script to pause for the necessary elements.
Also, see WebDriver CLI.
Testing a Script in Katalon Fails
Symptom: An RBM script fails in Katalon.
SolutionBrowser data can affect the: initial test in the Katalon Recorder. Use the incognito (private) mode to test the
script in Katalon.
Error Message in WebDriver Monitor
Symptom: The following message appears after a WebDriver Monitor runs a script: 'Command not specified'.
Solution: The WebDriver Monitor may not support a Selenium command in the script. For more information about
supported Selenium commands, see Supported Selenium Commands.
Best Practices and Examples to Build WebDriver Scripts
To run the WebDriver monitor, you must have a scenario that is written in the form of an XML script. The easiest way to
produce this script is to use a Katalon recorder or Selenium IDE for recording the base of the script.
96
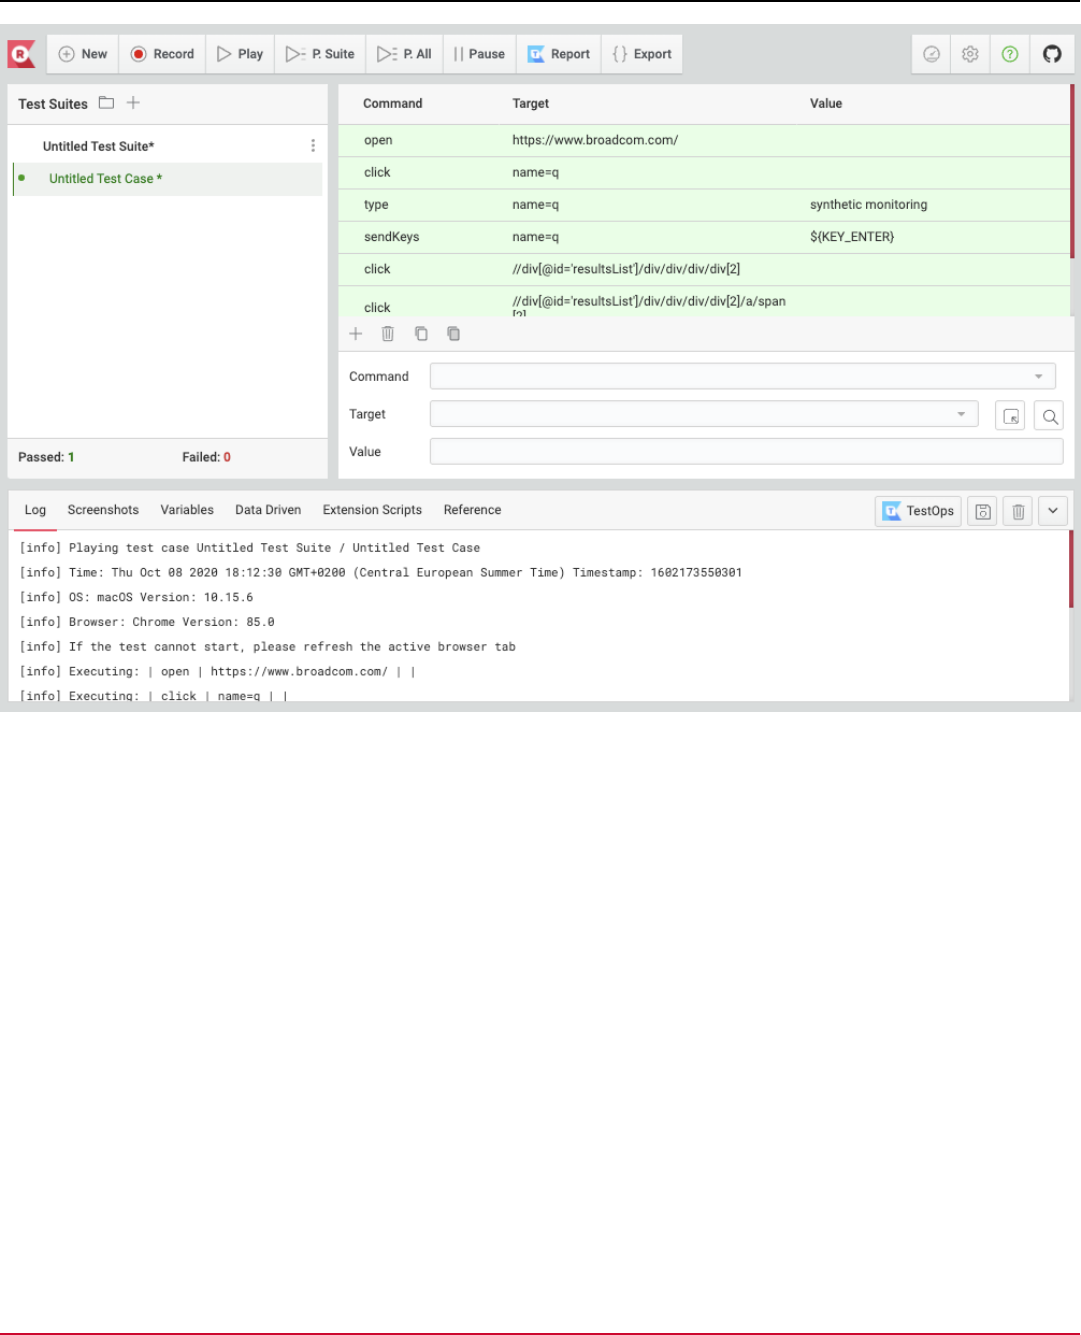
DX App Synthetic Monitor SaaS
After the recording, the script must be exported to XML format. See the following example of the script output produced by
the Katalon Recorder.
<?xml version="1.0" encoding="UTF-8"?>
<TestCase>
<selenese>
<command>open</command>
<target><![CDATA[https://www.broadcom.com/]]></target>
<value><![CDATA[]]></value>
</selenese>
<selenese>
<command>click</command>
<target><![CDATA[name=q]]></target>
<value><![CDATA[]]></value>
</selenese>
<selenese>
<command>type</command>
<target><![CDATA[name=q]]></target>
<value><![CDATA[app synthetic]]></value>
</selenese>
<selenese>
97
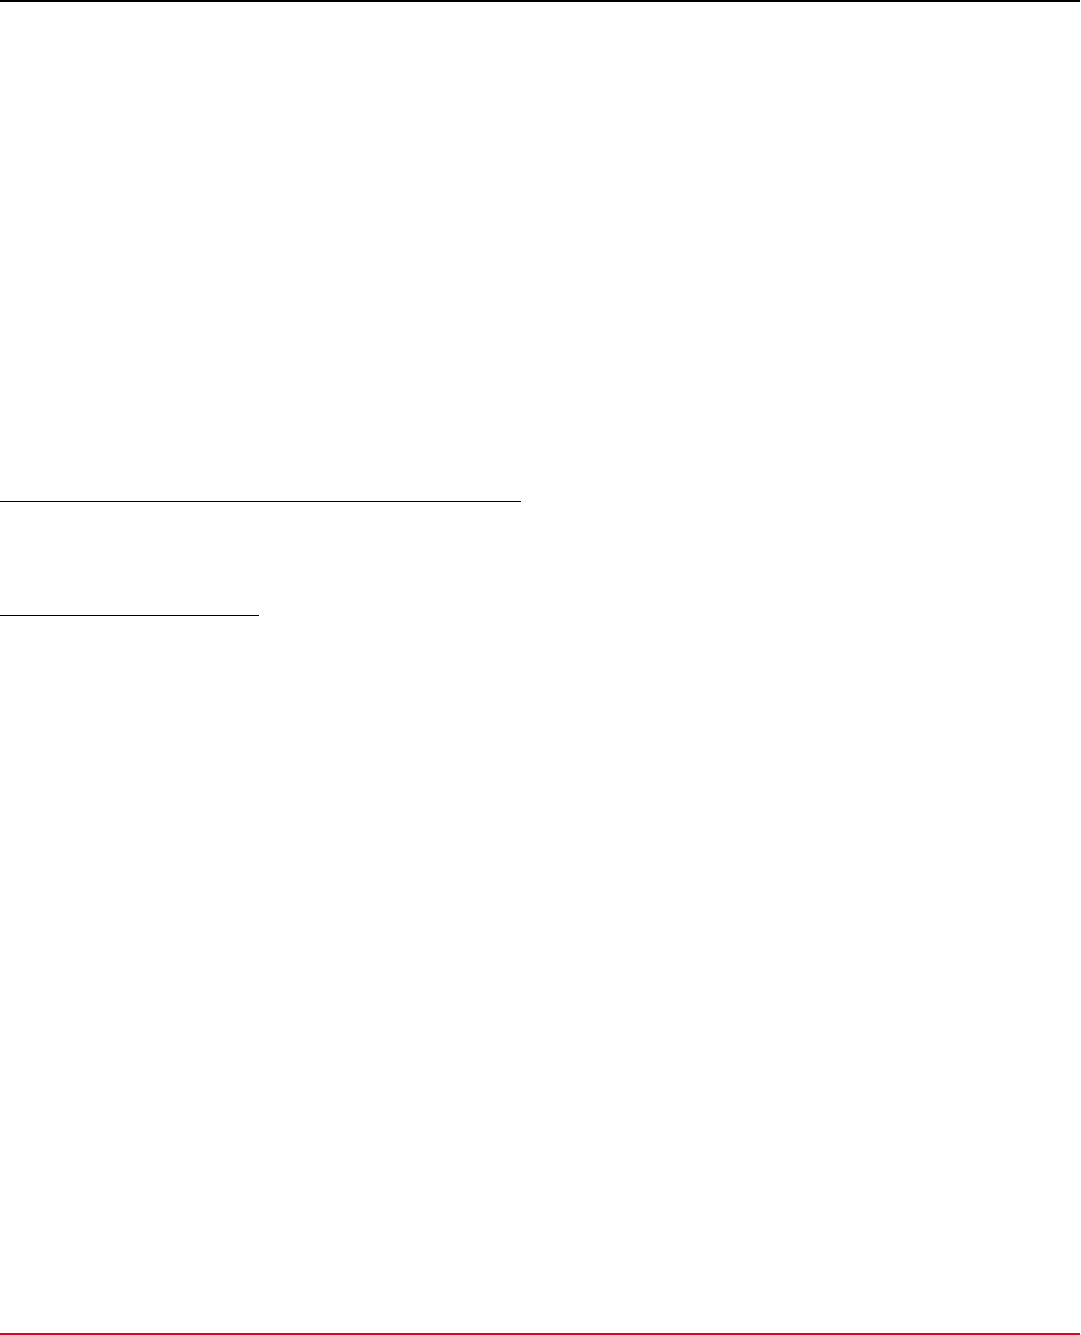
DX App Synthetic Monitor SaaS
<command>sendKeys</command>
<target><![CDATA[name=q]]></target>
<value><![CDATA[${KEY_ENTER}]]></value>
</selenese>
<selenese>
<command>click</command>
<target><![CDATA[//div[@id='resultsList']/div/div/div/div[2]/a/span[2]]]></target>
<value><![CDATA[]]></value>
</selenese>
</TestCase>
This scenario runs smoothly in a Katalon Recorder as Katalon uses vendor-specific additions to Selenium WebDriver.
On the other side ASM WebDriver monitor incorporates the Selenium specification only, without Katalon additions. The
Selenium scripts may run with errors in the ASM environment though the scripts run without errors in Katalon
environment.
Usually, a script that is produced by the automated recording toll must be adjusted manually.
Basic Principles to Adjust the Selenium Script for ASM
You can use some basic principles to adjust the scripts to run smoothly on ASM. See the following principles that can be
applied before running the scripts.
Principle 1: Use Assertions
Assertion is the command that fails the step when the condition is not met. Assertions help to ensure the script to execute
in a correct way. After login, you can verify that you are not on the login page by executing the following commands:
•
verifyTextPresent
•
verifyTextNotPresent
•
verifyElementPresent
•
verifyElementNotPresent, and others
As an example, perform a login operation and click submit:
<selenese>
<command>click</command>
<target><![CDATA[//button[@type='submit']]]></target>
<value><![CDATA[]]></value>
</selenese>
After login, make sure to leave the login page:
<selenese>
<command>verifyTextNotPresent</command>
<target><![CDATA[Log In]]></target>
<value><![CDATA[]]></value>
</selenese>
You can modify the first step as the following example:
<selenese>
<command>open</command>
98

DX App Synthetic Monitor SaaS
<target><![CDATA[https://www.broadcom.com/]]></target>
<value><![CDATA[]]></value>
</selenese>
<selenese>
<command>verifyTextPresent</command>
<target><![CDATA[Broadcom]]></target>
<value><![CDATA[]]></value>
</selenese>
Sometimes you may encounter the issue of text assertion failing during step execution but text presents on the screen. A
possible reason for this behavior may be the step with assertion is executed just before the text appears on the page. This
issue can be eliminated using the next principle.
Principle 2: Use Wait* Commands
Wait commands evaluate an assertion until it is true or timeout is reached. These commands wait for text or an element to
appear and then only execute the next step. See the following list for few wait commands:
•
waitForPageToLoad
•
waitForTextPresent
•
waitForElement
•
clickAndWait and others
In the following example, you can see the command waitForTextPresent in the place of verifyTextPresent. Also instead of
click command, clickAndWait command is used.
<selenese>
<command>open</command>
<target><![CDATA[https://www.broadcom.com/]]></target>
<value><![CDATA[]]></value>
</selenese>
<selenese>
<command>waitForTextPresent</command>
<target><![CDATA[Broadcom]]></target>
<value><![CDATA[]]></value>
</selenese>
<selenese>
<command>clickAndWait</command>
<target><![CDATA[name=q]]></target>
<value><![CDATA[]]></value>
</selenese>
NOTE
waitForPageToLoad command works only if the browser triggers an entire page reload like opening a new url.
For example, clicking a button on the page may not cause a page reload even if all the information on the
page has changed. Page load depends on the technology that the website is written. While execution of the
waitForPageToReload command, if the page does not reload then waitForPageToLoad step is evaluated
immediately.
99
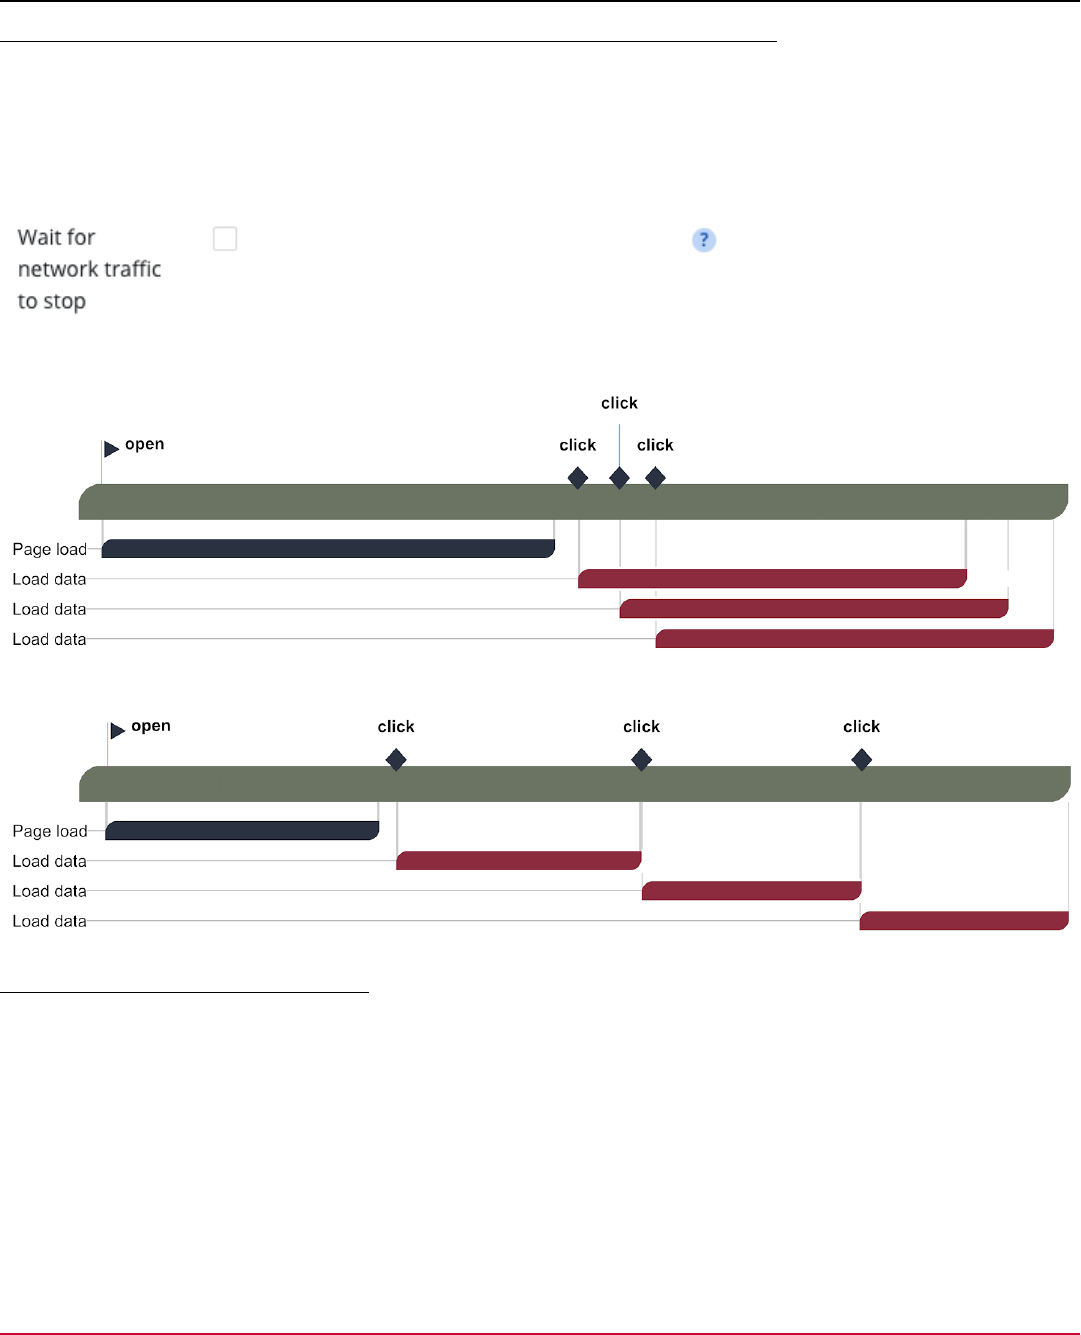
DX App Synthetic Monitor SaaS
Principle 3: Use Wait for the Network Traffic to Stop Option in the Monitor Options
This option resolves many issues with early command execution. Early command execution happens when a command
evaluates for the information before appearing on the screen.
NOTE
Enabling this feature may cause some scripts to fail because of hanging requests.
The following picture is an example of execution flow with the ‘Wait for network traffic to stop‘ option being turned off.
The following picture is an example of execution flow with the ‘Wait for network traffic to stop‘ option being turned on.
Principle 4: Use wait* on the Final Step
Using the last assertion on the final step is important.
When the WebDriver executes the last step, it stops the engine and it interrupts the internet connection. If there is an
ongoing HTTP request on the last step, the internet connection is interrupted right after step evaluation and the request
fails. This causes an error on the last step.
After making the changes according to the recommendations in the previous steps, the script look like the following code
snippet:
<?xml version="1.0" encoding="UTF-8"?>
<TestCase>
<selenese>
100

DX App Synthetic Monitor SaaS
<command>open</command>
<target><![CDATA[https://www.broadcom.com/]]></target>
<value><![CDATA[]]></value>
</selenese>
<selenese>
<command>clickAndWait</command>
<target><![CDATA[name=q]]></target>
<value><![CDATA[]]></value>
</selenese>
<selenese>
<command>typeAndWait</command>
<target><![CDATA[name=q]]></target>
<value><![CDATA[app synthetic]]></value>
</selenese>
<selenese>
<command>sendKeys</command>
<target><![CDATA[name=q]]></target>
<value><![CDATA[${KEY_ENTER}]]></value>
</selenese>
<selenese>
<command>clickAndWait</command>
<target><![CDATA[//div[@id='resultsList']/div/div/div/div[2]/a/span[2]]]></target>
<value><![CDATA[]]></value>
</selenese>
<selenese>
<command>waitForTextPresent</command>
<target><![CDATA[An overview of features and basic use of the product.]]></target>
<value><![CDATA[]]></value>
</selenese>
</TestCase>
After these manipulations, the script executes seamlessly in the ASM WebDriver.
Supported Selenium Commands
The commands in bold are added in the current release. The following Selenium commands are supported in DX ASM:
assertAlert
assertAlertAndWait
assertAlertNotPresent
assertAlertPresent
assertAttribute
assertBodyText
assertChecked
assertConfirmation
assertConfirmationAndWait
assertConfirmationNotPresent
101

DX App Synthetic Monitor SaaS
assertConfirmationPresent
assertCookie
assertCookieByName
assertCookieNotPresent
assertCookiePresent
assertEditable
assertElementHeight
assertElementNotPresent
assertElementPositionLeft
assertElementPositionTop
assertElementPresent
assertElementWidth
assertEval
assertLocation
assertNotAlert
assertNotAttribute
assertNotBodyText
assertNotChecked
assertNotConfirmation
assertNotEditable
assertNotElementHeight
assertNotElementPositionLeft
assertNotElementPositionTop
assertNotElementWidth
assertNotEval
assertNotLocation
assertNotSelectedId
assertNotSelectedIds
assertNotSelectedIndex
assertNotSelectedIndexes
assertNotSelectedLabel
assertNotSelectedLabels
assertNotSelectedValue
assertNotSelectedValues
assertNotSelectOptions
assertNotSomethingSelected
assertNotText
assertNotTitle
assertNotValue
assertNotVisible
assertSelectedId
assertSelectedIds
assertSelectedIndex
assertSelectedIndexes
assertSelectedLabel
102

DX App Synthetic Monitor SaaS
assertSelectedLabels
assertSelectedValue
assertSelectedValues
assertSelectOptions
assertSomethingSelected
assertText
assertTextAndWait
assertTextNotPresent
assertTextPresent
assertTitle
assertTitleAndWait
assertValue
assertVisible
check
checkAndWait
click
clickAndWait
clickAt
clickAtAndWait
close
createCookie
createCookieAndWait
deleteAllVisibleCookies
deleteAllVisibleCookiesAndWait
deleteCookie
deleteCookieAndWait
doubleClick
doubleClickAndWait
doubleClickAt
doubleClickAtAndWait
dragAndDrop
dragAndDropAndWait
dragAndDropToObject
dragAndDropToObjectAndWait
echo
echoAndWait
fireEvent
fireEventAndWait
focus
focusAndWait
goBack
goBackAndWait
mouseMove
mouseMoveAndWait
mouseMoveAt
103

DX App Synthetic Monitor SaaS
mouseMoveAtAndWait
mouseOver
mouseOverAndWait
open
pause
refresh
refreshAndWait
runScript
runScriptAndWait
select
selectAndWait
selectFrame
selectWindow
sendKeys
sendKeysAndWait
store
storeAlert
storeAlertPresent
storeAllButtons
storeAllFields
storeAllLinks
storeAndWait
storeAttribute
storeBodyText
storeChecked
storeConfirmation
storeConfirmationPresent
storeCookie
storeCookieByName
storeCookiePresent
storeCssCount
storeEditable
storeElementHeight
storeElementPositionLeft
storeElementPositionTop
storeElementPresent
storeElementWidth
storeEval
storeHtmlSource
storeLocation
storeSelectedId
storeSelectedIds
storeSelectedLabel
storeSelectedLabels
storeSelectedValue
104

DX App Synthetic Monitor SaaS
storeSelectedValues
storeSelectOptions
storeSomethingSelected
storeText
storeTextAndWait
storeTextPresent
storeTitle
storeTitleAndWait
storeValue
storeVisible
storeXpathCount
submit
submitAndWait
type
typeAndWait
uncheck
uncheckAndWait
verifyAlert
verifyAlertNotPresent
verifyAlertPresent
verifyAttribute
verifyBodyText
verifyChecked
verifyConfirmation
verifyConfirmationNotPresent
verifyConfirmationPresent
verifyCookie
verifyCookieByName
verifyCookieNotPresent
verifyCookiePresent
verifyEditable
verifyElementHeight
verifyElementNotPresent
verifyElementPositionLeft
verifyElementPositionTop
verifyElementPresent
verifyElementWidth
verifyEval
verifyLocation
verifyNotAlert
verifyNotAttribute
verifyNotBodyText
verifyNotChecked
verifyNotConfirmation
verifyNotEditable
105

DX App Synthetic Monitor SaaS
verifyNotElementHeight
verifyNotElementPositionLeft
verifyNotElementPositionTop
verifyNotElementWidth
verifyNotEval
verifyNotLocation
verifyNotSelectedId
verifyNotSelectedIds
verifyNotSelectedIndex
verifyNotSelectedIndexes
verifyNotSelectedLabel
verifyNotSelectedLabels
verifyNotSelectedValue
verifyNotSelectedValues
verifyNotSelectOptions
verifyNotSomethingSelected
verifyNotText
verifyNotTitle
verifyNotValue
verifyNotVisible
verifySelectedId
verifySelectedIds
verifySelectedIndex
verifySelectedIndexes
verifySelectedLabel
verifySelectedLabels
verifySelectedValue
verifySelectedValues
verifySelectOptions
verifySomethingSelected
verifyText
verifyTextAndWait
verifyTextNotPresent
verifyTextPresent
verifyTitle
verifyTitleAndWait
verifyValue
verifyVisible
waitForAlert
waitForAlertNotPresent
waitForAlertPresent
waitForAttribute
waitForBodyText
waitForChecked
waitForConfirmation
106

DX App Synthetic Monitor SaaS
waitForConfirmationNotPresent
waitForConfirmationPresent
waitForCookie
waitForCookieByName
waitForCookieNotPresent
waitForCookiePresent
waitForEditable
waitForElementNotPresent
waitForElementPresent
waitForEval
waitForLocation
waitForNotAlert
waitForNotAttribute
waitForNotBodyText
waitForNotChecked
waitForNotConfirmation
waitForNotEditable
waitForNotEval
waitForNotLocation
waitForNotSelectedId
waitForNotSelectedIds
waitForNotSelectedIndex
waitForNotSelectedIndexes
waitForNotSelectedLabel
waitForNotSelectedLabels
waitForNotSelectedValue
waitForNotSelectedValues
waitForNotSelectOptions
waitForNotSomethingSelected
waitForNotText
waitForNotTitle
waitForNotValue
waitForNotVisible
waitForPageToLoad
waitForSelectedId
waitForSelectedIds
waitForSelectedIndex
waitForSelectedIndexes
waitForSelectedLabel
waitForSelectedLabels
waitForSelectedValue
waitForSelectedValues
waitForSelectOptions
waitForSomethingSelected
waitForText
107

DX App Synthetic Monitor SaaS
waitForTextNotPresent
waitForTextPresent
waitForTitle
waitForValue
waitForVisible
Webdriver Script Editor
The Webdriver Script Editor is an extension of the ASM Webdiver monitor UI designed to edit Selenium XML scripts
directly on the ASM dashboard. It offers users the flexibility of the following two editing modes:
•
Text Mode: This mode provides a traditional text-based interface with enhanced features such as script validation and
autocomplete functionalities.
•
Visual Mode: The visual mode lets users manipulate scripts through drag-and-drop and button-clicking actions.
Layout
Primary Interface
In the Webdriver monitor settings, click on Script to access the editor interface.
The layout of the Webdriver Script Editor is as follows:
108

DX App Synthetic Monitor SaaS
•
Controls Bar: Positioned at the top and has controls to manipulate the script or script representation.
•
Editing Area: Situated below the Controls Bar. Based on your preference, you can toggle between the Visual or Text
modes.
Controls Bar
The Controls Bar is equipped with the following buttons:
•
Add Command: Appends the script with the next command.
•
Undo: Allows users to revert their last action.
•
Upload: Uploading of scripts from local storage into the ASM Webdriver monitor and particularly in the editor.
•
Test: Runs the test probe while remaining on the editor page.
•
Download: Downloads the script on the state as it is in the editor.
•
Visual/Text Toggle: Switches between the Visual and Text editing modes.
Visual Mode - Display Area
The visual editing area contains a list of commands. The list can be modified, or reordered. Each entry can be edited
separately and appended, duplicated, or removed from the list. Apart from the command editing, the visual area also
supports comments viewing, ordering, and editing. One of the features is the visual representation of the script stages
when commands are grouped visually within the stage.
Text Mode - Display Area
This mode transforms the editing area into a text space, leveraging the next capabilities:
•
Syntax Highlighting: The editor automatically highlights XML scripts and embedded JavaScript.
•
Validation: It supports simultaneous validation for both XML scripts and embedded JavaScript.
•
Autocomplete: The editor offers autocomplete suggestions.
Text Edit View
Introduction & Purpose
The Text Edit View allows users to edit XML scripts with syntax highlighting, providing real-time validation for both XML
and embedded JavaScript content.
Accessing the Text Edit View
Users can toggle between editing modes using a radio button located at the top of the interface. This radio button
presents two labels: Text and Visual. By selecting Text, users enable the Text Edit View.
NOTE
If the script becomes corrupted, the system will automatically toggle to the default Text View, and the option to
switch modes will be temporarily disabled until the issue is resolved.
Layout & Key Components
109
DX App Synthetic Monitor SaaS
110

DX App Synthetic Monitor SaaS
•
Text Area: The primary space is where code or text is written and edited. It supports syntax highlighting, which visually
differentiates elements of the code (like variables, functions, and keywords) using colors.
•
Line Numbers: On the left-hand side, you see a column that shows the line numbers for easy reference.
•
Minimap: On the right-hand side, there is a minimap that provides a bird's eye view of your code. You can click and
drag on this minimap to quickly navigate to different sections of your code.
•
Scroll Bars: These are located on the right hand and at the bottom of the layout, allowing users to scroll through the
code vertically and horizontally.
•
Contextual Menus: Right-clicking in the editor will typically provide a contextual menu with various options that are
related to the editor's functionalities, like formatting, navigation, etc.
•
Errors and Warnings: The Monaco editor provides real-time feedback, showing errors and warnings. These are
underlined in the text.
•
Intellisense: As you type, the editor offers suggestions (autocomplete) based on the context. This is especially useful
for coding, as it suggests relevant methods, properties, and more.
Visual Edit View
Introduction & Purpose
The Visual Edit View offers a more interactive way to edit Webdriver scripts.
Accessing the Visual Edit View
To enter the Visual Edit View, users can toggle the radio button located at the top of the toolbar, switching from Text mode
to Visual mode.
Layout & Key Components
General view:
111
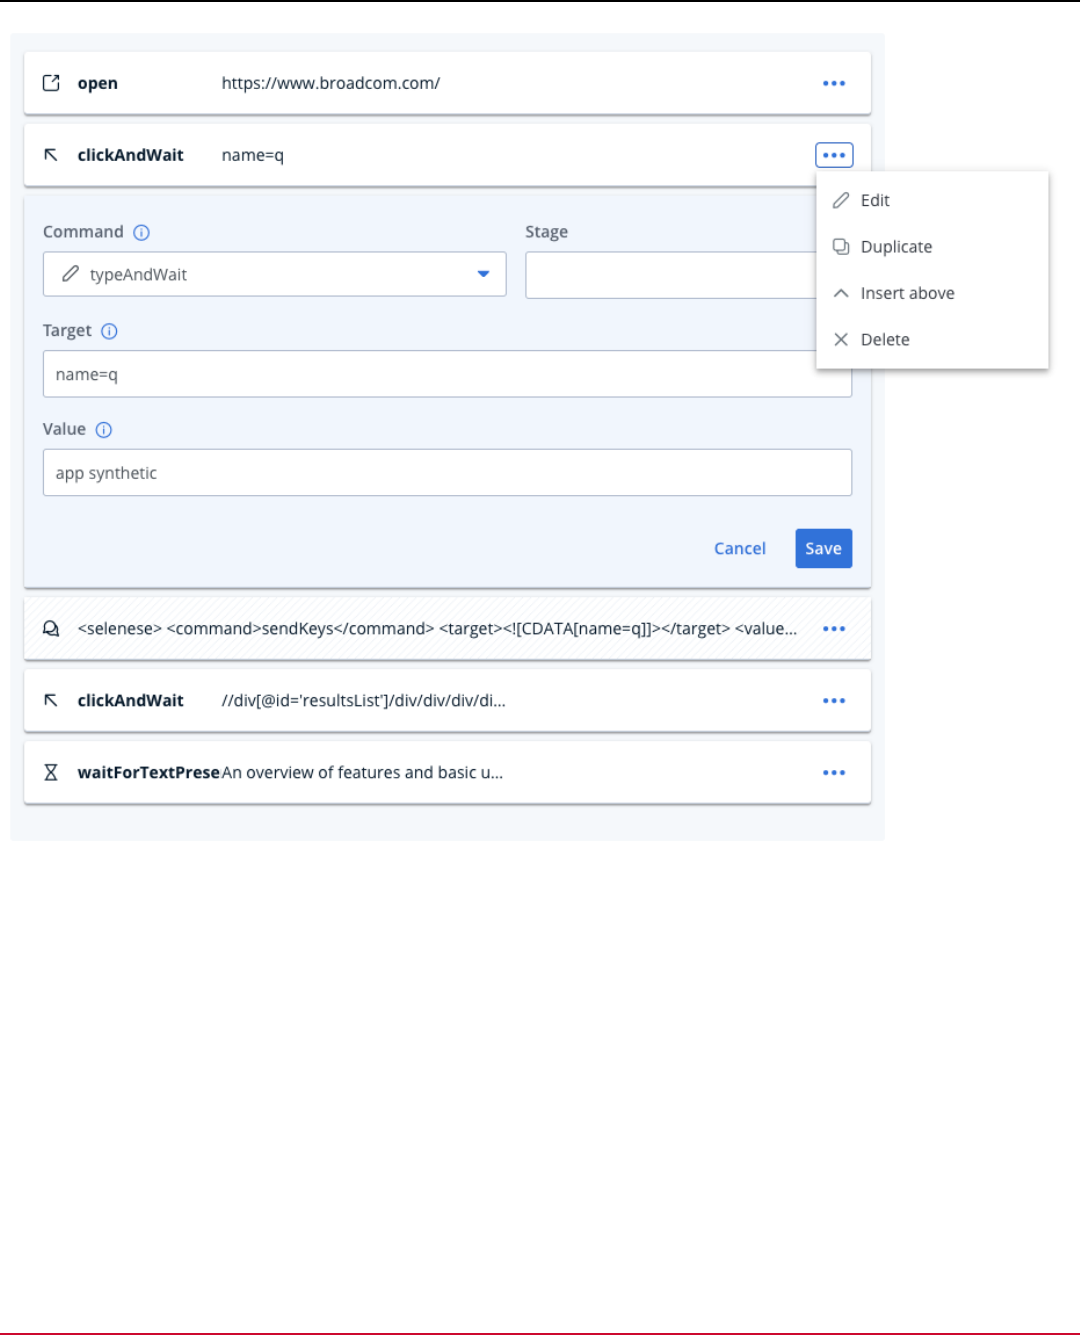
DX App Synthetic Monitor SaaS
View with stages:
112
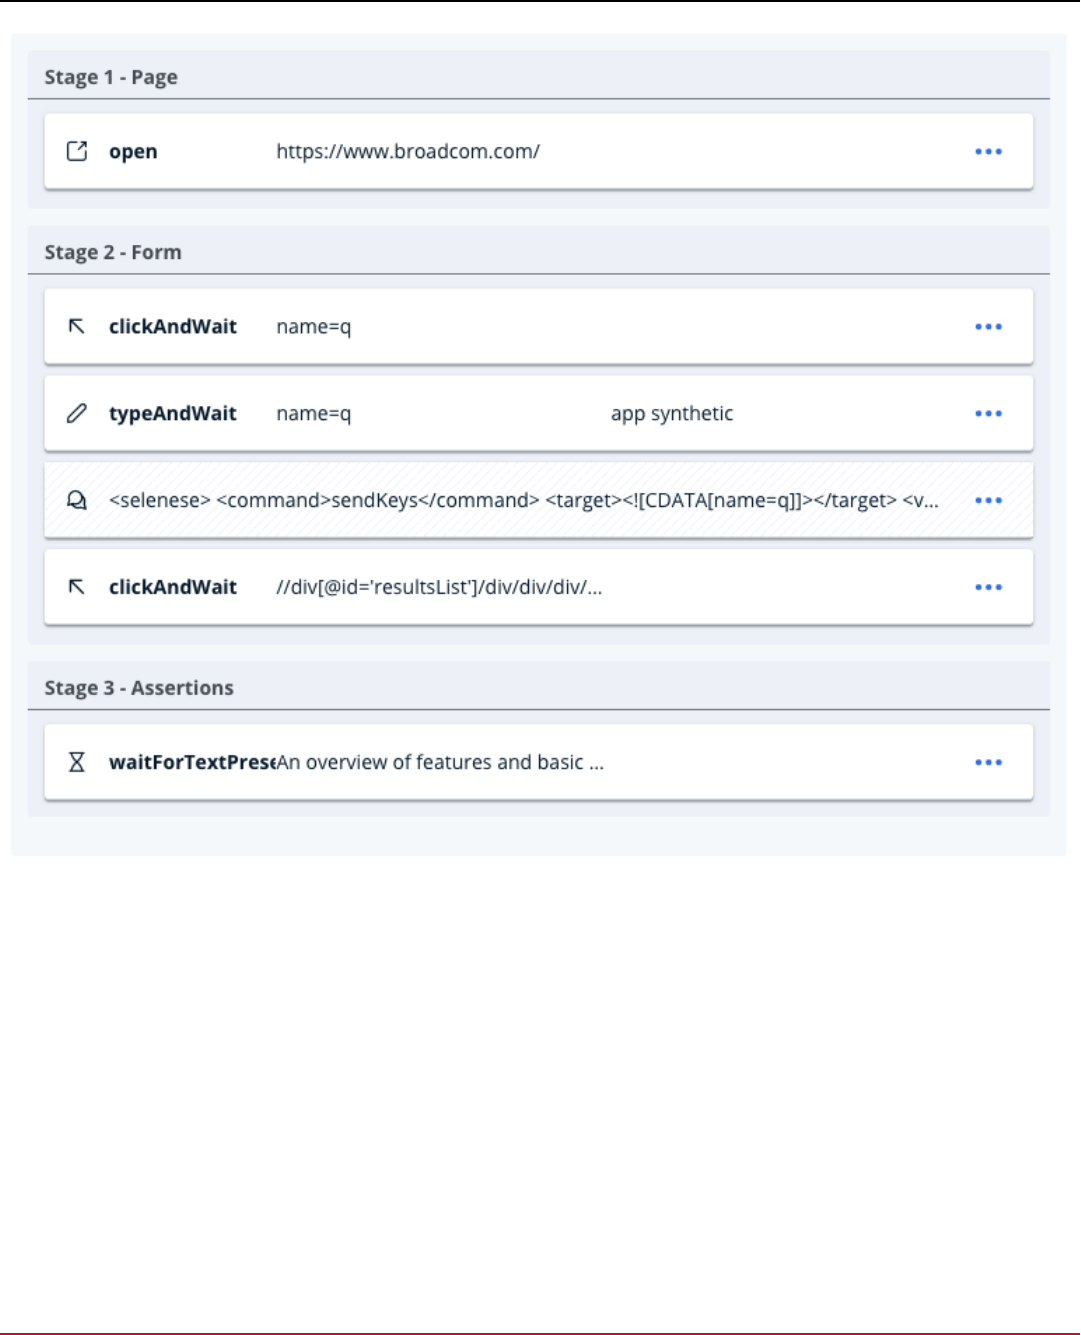
DX App Synthetic Monitor SaaS
The visual editing space consists of a list of entries. These entries can be easily reorganized using drag-and-drop
functionality. Each entry is divided into three columns: command, target, and value.
•
Entries: Entries can be moved up or down in the list. When an entry is clicked in the center, it expands to reveal the
following editable fields: command, target, value, and stage.
–
Command: This is a dropdown selection, which is populated with a list of available commands. Each option has a
brief description and a corresponding icon.
–
Target and Value: Depending on the content, these fields can either be standard text fields or larger text areas.
–
Stage: This text field allows users to group sets of commands under a specific label. Visually, if a stage field is
populated, the following entries (including the initial one) are grouped under that stage label until another command
with a filled stage field is encountered. This entry can also be moved up and down with the corresponding stage
label.
•
Editing Actions: Upon expanding an entry, two buttons appear at the bottom: Save and Cancel. Also, each entry
comes with a context menu offering the options to: Edit (expand the entry), Insert Below (add a new entry below the
current one), Duplicate, or Remove.
113
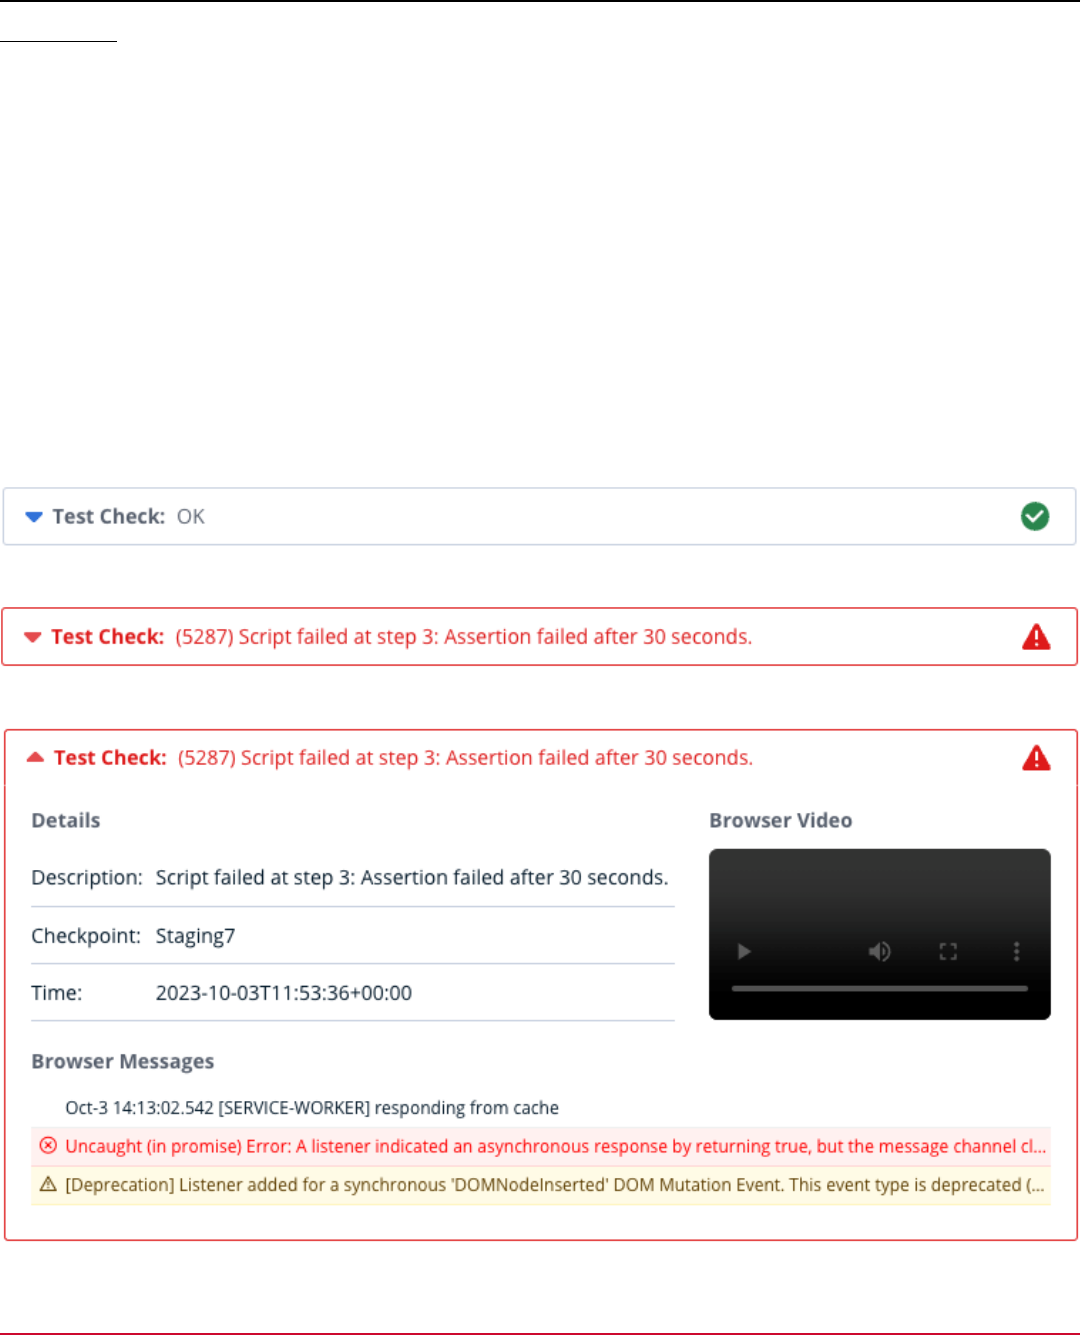
DX App Synthetic Monitor SaaS
Test Section
Introduction & Purpose
The test section serves the purpose of showing test results within the editor page.
Accessing the Test Section
The section appears when a user initiates the test by pressing a button with the name Test.
Layout & Key Components
The layout of the section is responsive to the screen width and can be integrated above the editing area or next to it on
the right side of the screen. The section is collapsible and can be minified.
The test result section consists of the following elements:
•
Check details: Basic information about the check. It contains the response from the station, the name of the station,
and execution time.
•
Browser Video: recorded video of scenario execution.
•
Browser Messages: Expandable set of messages returned by the browser console.
OK state:
Collapsed view:
Expanded view:
114
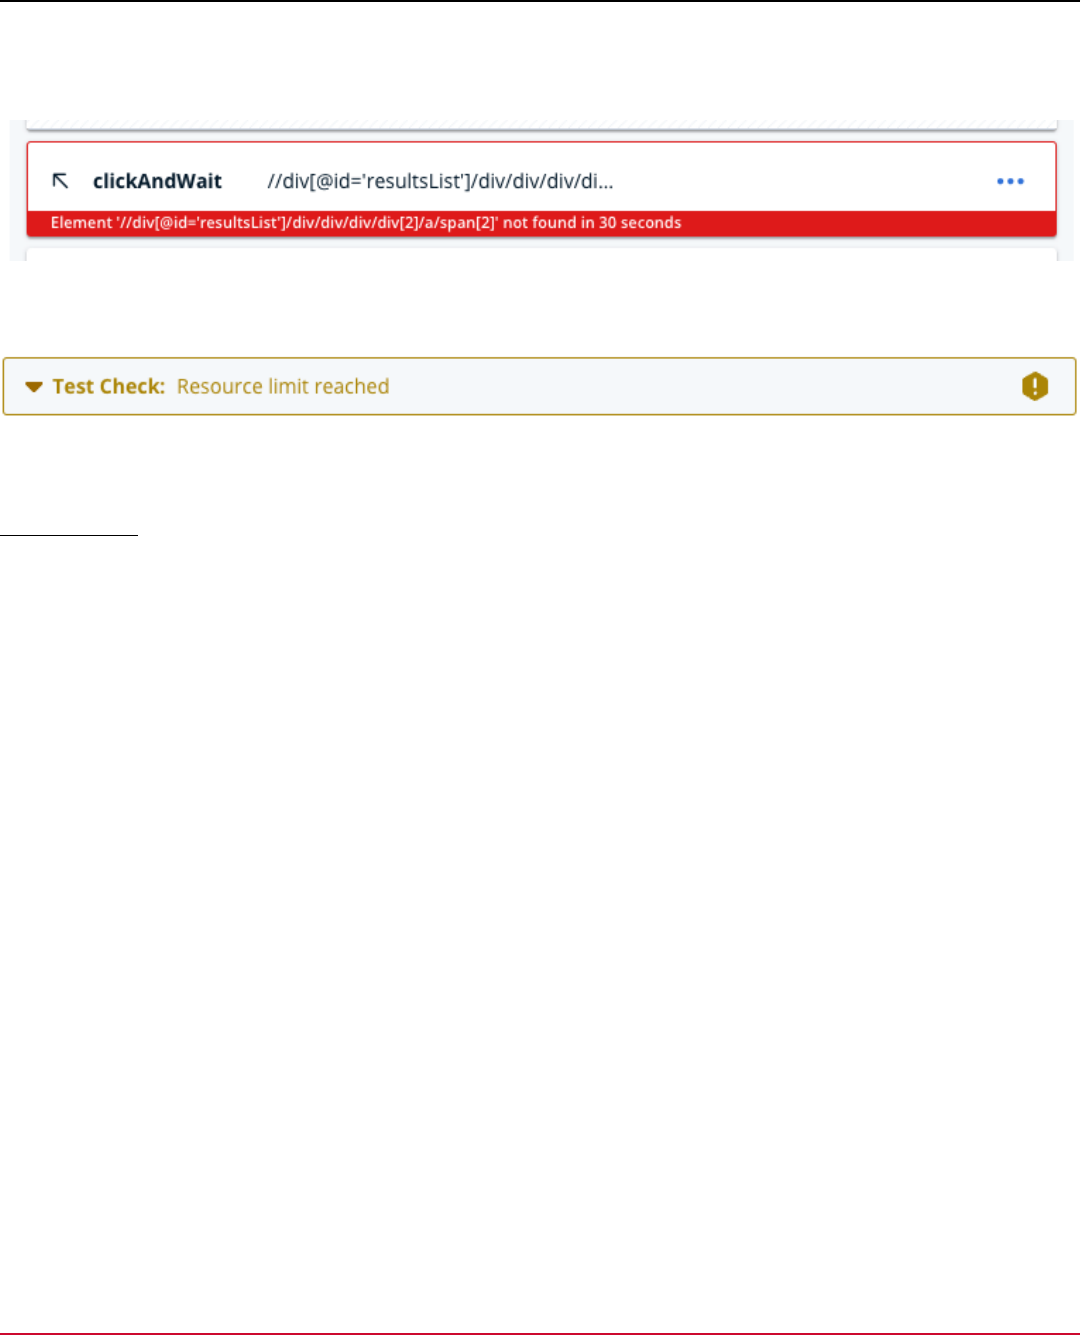
DX App Synthetic Monitor SaaS
NOTE
The Browser Messages entries are clickable and expandable.
Failed step highlight:
The failed step highlight with a description is taken from the check result.
Resource limit reached:
NOTE
Due to the limitation of the API, the test check cannot be executed more than once per 5 minutes.
Best Practices
Text Edit View
Utilize Autocomplete Effectively:
•
Inside a TestCase block: 'Ctrl + Space' will suggest pasting a selenese block.
•
Inside a selenese block: 'Ctrl + Space' will suggest pasting command, target, or value tags.
•
Within the command tag: 'Ctrl + Space' offers a list of commands, each with descriptions. For a detailed view of the
descriptions, press 'Ctrl + Space' again. Typing the command name narrows down the suggestions.
•
After the selenese tag name: 'Ctrl + Space' suggests inserting the stage attribute.
Visual Edit View
•
The 'stage' field assists in organizing commands under specific labels, improving script readability.
•
Utilize the context menu options, such as Edit, Insert Below, Duplicate, and Remove, to make changes to script
entries.
WebDriver Selectors
Some commands require a target DOM element to operate on, specified in the target argument element of the command
element. Such targets can be links to click, div to hover over and windows or tabs to switch to and so on. In cases when
selectors find more elements, only the first one found will be used. Be advised to use selectors as specific as possible
to make sure they match only one element, being the one you want. If the command requires the target but it’s empty in
your script, it’s equal to tag=body, the page body element is used. If target contents start with a double slash (//), the
XPath selector is assumed.
ASM Webdriver supports the following selectors to find the target:
•
id=elementId
ID selector: This selector will match DOM element having id=”elementId” in the DOM page structure.
•
css=div.someClass p
115

DX App Synthetic Monitor SaaS
CSS selector: This example selector will mach <p> element inside <div> element with class=”someClass” .
Every expression supported by Selenium ByCssSelector method works in ASM Webdriver monitor.
•
xpath=//img[@title=’Nice image’]
XPath selector: This example will match an <img> element with the “Nice image” string in its title attribute. For more
information, see the XPath specification.
•
name=password
Name selector: This example finds an element having a name attribute set to ”password” . Useful for locating form
elements that usually have the name attribute set.
•
link=Home
Link text selector. This example will match <a> element that has Home text inside, such as <a href=”/”>Home</a>
.
•
partialLink=click
Partial link text selector works similar to the link but you need not specify the whole text, but only a substring is
required. For example, <a href=”/”>click here to go to Home page</a> .
•
tag=img
Tag name selector selects by tag name. This selector is particularly prone to find more elements but only the first one
will be operated on so use with caution.
•
class=wrapper
Class name selector, selects by class attribute. Again, this selector will probably find more elements so use with
caution. This example is equal to the css=.wrapper selector.
•
script=return document.getElementById(‘main-content’)
Script selector. You can use Javascript to locate and return your element if it is not convenient to use any
other supported selector.
•
identifier=someId
Works the same as id selector. Included for compatibility reasons.
•
title=windowTitle
Title selector. Only useful for switching windows (selectWindow command)
•
index=1
Index selector. Only works when switching frames. (selectFrame command)
•
relative=parent
The relative selector to switch back to the parent frame. The only value allowed after the equals sign is “parent” , as
shown. Only for selectFrame command.
WebDriver Placeholders
Placeholders are a way to parametrize your WebDriver scripts that allows you to use the same script (scenario) to test
different services or with different credentials or testing various search results.
NOTE
Placeholders are case sensitive. URL placeholder is not the same as url.
Using Placeholders in Script
Placeholders are replaced with their actual values in any place in the script - you can use them in the command
arguments. Placeholders cannot be used in command names. There is a set of basic placeholders that are always
present for any script but you can also add your own custom parameters. To employ a placeholder as the command
argument, use curly braces around the placeholder name, like in this example:
<selenese>
<command>open</command>
<target><![CDATA[{url}]]></target>
<value><![CDATA[]]></value>
116

DX App Synthetic Monitor SaaS
</selenese>
Here the {url} is a placeholder, that is replaced by the actual value (see below) on every run. This command will then
open a page specified in the {url} parameter.
NOTE
When you use a custom placeholder with the same name as a basic placeholder, then the custom placeholder
value overrides the basic value.
Basic Placeholders
As described above, these are set for all WebDriver scripts even if you don’t specify any custom placeholders.
•
account or username - User name-value specified in the monitor settings (can be empty, either of these
placeholders can be used - both have the same value)
•
passwd or password - Password value specified in the monitor settings (can be empty, either of these placeholders
can be used - both have the same value)
•
uid - the account id owning the monitor (integer number, always set)
•
rid - the monitor id (integer number, always set, unique for each monitor)
•
host - Host value specified in monitor settings (can be empty)
•
port - Legacy (always “0” value)
•
path - Legacy (always empty)
Custom Placeholders
You can specify your own key/value pairs to use as placeholders in the “Script Parameters” monitor setting. This is useful
when you need more than basic parameters or you need to override any of their values. Any values can be specified
using the parameters field in the monitor settings.
The parameters field value needs to be constructed as parameters in URL, for example, foo=bar&url=http%3A%2F
%2Fwww.broadcom.com%2F results in two placeholders available, foo having the value bar and url having the value
http://www.broadcom.com/ . Notice the values need to be url-encoded.
NOTE
Custom placeholders are stored unencrypted, so using sensitive values (passwords) is discouraged.
WebDriver Authentication
Authentication in WebDriver Monitor is implemented differently than in a regular desktop web browser. A browser
connects to an endpoint that requires authentication through a username/ password or through the domain credentials
from Integrated Windows Authentication without prompting the user inputs. With a WebDriver Monitor, neither of the two
options is available. Instead, enter the login credentials in the monitor settings, and enable the expected authentication
method. The monitor then performs the authentication on an internal HTTP proxy.
The application supports the following authentication methods:
HTTP Basic
Every request to the target server includes an Authorization: Basic header with the user credentials. The username and
password are transmitted as plain text. Ensure you disable this method if the target server is untrusted.
Digest
If a request to the target server results in a 401 response with a WWW-Authenticate: Digest header, the WebDriver
agent resends the request with an added ‘Authorization: Digest’ header containing a cryptographic hash of the user
credentials
SPNEGO/Kerberos
117

DX App Synthetic Monitor SaaS
If a request to the target server results in a 401 response with a WWW-Authenticate: Negotiate header, the WebDriver
agent authenticates the user against a KDC configured in krb5.conf file with the credentials that are defined in monitor
settings. The WebDriver agent resends the request with an added Authorization: Negotiate header containing an
SPNEGO response. The SPNEGO/Kerberos method is available only on the on-premise monitoring stations and requires
a valid Kerberos configuration file, krb5.conf, in the /etc directory. For more information about Kerberos configuration,
see krb5 configuration page.
NOTE
•
A single krb5.conf file is shared by all the monitors running on the on-premise station. If necessary, multiple
realms can be defined in this file.
•
A krb5.conf configuration item kdc_timeout is specified in milliseconds. Other Kerberos implementations
specify it in seconds.
•
WebDriver Monitor expects a Service Principal Name in the form of HTTP/<hostname>@<realm>. Ensure
that the SPN is registered at your server. The monitor does not perform a canonicalization (conversion from
the short-form hostname to a fully qualified domain name by a reverse DNS lookup).
WebDriver CLI
WebDriver CLI is a command-line tool to execute Selenese XML scripts on a desktop PC, using a locally installed web
browser. The WebDriver agent allows you to test and fine-tune the scripts before uploading them to DX APP Synthetic
Monitor.
Prerequisites
Ensure that you have one of the following applications as minimum requirements from each category:
Operating System Java 8 JRE Web Browser Automation interface Import SSL Certificate
1
•
Linux
•
Windows
•
Mac
•
Oracle
•
OpenJDK
•
Zulu
•
Chrome 72.0+
•
Firefox 65.0+
•
Internet Explorer 11.x
•
ChromeDriver
•
geckodriver
•
Internet Explorer
Driver Server
•
Chrome
•
Firefox
•
Internet Explorer
NOTE
1. The WebDriver agent decrypts SSL communication with the tested website. To do that, it presents the
browser with a certificate signed by an untrusted certificate authority. To prevent errors, import the SSL
Certificate to your browser.
Install the WebDriver Agent
This section lists the installation steps for the WebDriver agent.
1. Install one of the following Java 8 JRE:
–
Oracle Java
–
OpenJDK
–
Zulu
2. Install your desired web browser and the automation interface.
a. Perform the following steps to run scripts on Chrome:
•
Chrome installation
•
ChromeDriver installation
b. Perform the following steps to run scripts on Firefox:
118

DX App Synthetic Monitor SaaS
•
Firefox installation
•
geckodriver installation
c. Run the InternetExplorerDriver to start the driver on Internet Explorer.
3. Download the web driver agent xx.x.x JAR to a temporary directory to run it from the command line.
Using the WebDriver Agent
Use the following command syntax to run the WebDriver Agent.
java -jar webdriver-agent-xx.x.x.jar -b (chrome|firefox|ie) [-s] input.xml [custom.properties]
•
-b : select browser to use for the test run
•
-s : enable step-over mode
•
input.xml : path to a Selenese XML script
•
custom.properties : specify the path to a file with configuration properties
•
(Optional) Step-over mode
If the -s option is specified, the tool pauses the script at each command. The script prompts you to press any key to
continue executing the command.
Output
After the script executes, the tool creates the following files in the working directory:
•
result.json - Detailed result of the test run.
•
output.0.har - Log of HTTP transactions in HAR format. Use the viewer service to view the output as a waterfall chart
Configure the WebDriver Agent
The WebDriver agent has the following configuration options
•
implicitWait: Default 30; time in seconds to wait for an element to appear in DOM. For more information, see Implicit
Wait.
•
waitTimeout : Default 30; time in seconds to wait on Selenese wait* commands
•
logLevel : Default FINEST; verbosity of log output. One of SEVERE, WARNING, INFO, CONFIG, FINE, FINER,
FINEST.
•
quiescenceTime : Disabled by default. Experimental; Keep the test running until there are no active HTTP
transactions for a given period of time. In milliseconds.
•
monitorTimeout : Disabled by default. Ignored in step-over mode. The maximum amount of time in seconds the test is
allowed to run for.
•
monitorDenyRequests : regex or comma-separated list of domains to block.
•
monitorAllowRequests : regex or comma-separated list of domains to allow.
•
monitorUser : Username for basic authentication or script {username} placeholder.
•
monitorPassword : Password for basic authentication or script {password} placeholder.
•
monitorUserAgent : Override browser user agent header.
•
monitorParameters : Script parameters. Format is
parameter_1=value_1¶meter_2=value_2&...parameter_n=value_n
•
monitorUseProxy : Linux only. If set to true, use proxy server configured in /etc/apt/apt.conf or /etc/yum.conf
Using Remote Windows Browsers with WebDriver Monitors
From 10.3, you can connect a Windows machine to your Linux OPMS machine to enable remote Internet Explorer
monitoring. From 10.7.7, you can connect a Windows machine with a Chrome browser. Installing, configuring, and
connecting the Windows machine has to be done manually.
119

DX App Synthetic Monitor SaaS
The Windows machine acts as a remote WebDriver worker for the Linux OPMS machine. Check requests that arrive at
Linux OPMS which triggers the Windows machine to perform the check, depending on the configuration of your monitor.
If the monitor is not configured to run on Windows using a local WebDriver client, Linux OPMS performs all other checks
locally.
You must ensure that you meet the following prerequisites before installing the browsers:
Ensure that Linux OPMS Server is Working
Ensure that the Linux OPMS server is installed on the supported remote WebDriver and is running smoothly.
Follow these steps to test the OPMS is running:
1. In ASM UI, navigate to On-Premis, Stations, and select a station.
2. Select the Run All button.
All tests should pass, particularly the WebDriver monitor.
3. On your Linux OPMS console, run the following command:
sudo monit summary
The status of all the components must display OK.
Dedicated Linux OPMS for Different Browsers
If you want to use both Internet Explorer and Chrome on Windows, then install two Linux OPMS machines. Connect
the Internet Explorer on one Windows machine and Chrome on the other.
How the Linux OPMS Executes Windows Monitors
Check request is sent to the Linux OPMS machine. When the check is configured to be run on Windows, it is forwarded
to the Windows machine to perform the check. The selenium server must run and be properly configured on the Windows
machine.
Networking Requirements
The Linux OPMS serves the Windows client. Linux OPMS uses the TCP port 4444 to initiate the browser run. The
Windows machine must be able to connect back to TCP port range 9592-9999 on a Linux OPMS machine. All network
connections from the browser on Windows are then routed to the Linux OPMS acting as a proxy. The actual network
communication happens with the Linux OPMS as a proxy. This proxy intercepts the HTTPS traffic, acting as a Man-In-
The-Middle to gather network traffic information for the check result HAR file. For this to work properly, the Windows
browser has to be set up to trust the MITM Root certificate.
NOTE
More Information:
•
Install Internet Explorer
•
Install Google Chrome
Install Internet Explorer
WARNING
This section contains Selenium Grid 3 version commands. You must download and install Selenium Grid 3, the
newest Grid 4 does not work. We are working to upgrade this section for Grid 4.
120

DX App Synthetic Monitor SaaS
Installation Prerequisites
Perform the following tasks on the primary Windows machine and all the Windows machines from which you intend to
use WebDriver Monitor with Internet Explorer concurrently.
Follow these steps:
1. Install InternetExplorerDriver.
2. Download Internet Explorer Driver Server.
3. In Windows, perform the following steps:
a. Extract the IEDriverServer.exe file to the %USERPROFILE%\ASM\ directory.
b. Navigate to Settings, About, System Info, Advanced system settings, Advanced, Environment Variables... / User
variables for <user>.
a. Set the %USERPROFILE%\ASM as value for select Path, Edit... / New.
c. Navigate to Setting, System, Display.
a. Set the Change the size of text, apps, and other items to 100%.
4. In Internet Explorer, perform the following steps:
a. Select the Tools, Internet Options, Security tab, and select the Enhanced Protected Mode option.
b. Select the Advanced tab, ensure Enable Enhanced Protected is unchecked.
c. Select OK.
d. Import Proxy Certificate: Select Content, Certificates, Trusted Root Certification Authorities, Import...
e. When prompted, select mitm_cer.pem and close the dialog.
NOTE
Download the mitm_cer.pem certificate.
f. Select View, and set Zoom to 100%.
5. In Command Prompt, perform the following steps:
a. Run Regedit
•
On 32-bit Windows, open HKEY_LOCAL_MACHINE/SOFTWARE/Microsoft/InternetExplorer/Main/
FeatureControl
•
On 64-bit Windows, open HKEY_LOCAL_MACHINE/SOFTWARE/WOW6432Node/Microsoft/Internet
Explorer/Main/FeatureControl
b. If key FEATURE_BFCACHE is not present, right-click FeatureControl, New, Key, FEATURE_BFCACHE to add it.
c. Right-click FEATURE_BFCACHE, New, DWORD, iexplore.exe.
d. Double-click iexplore.exe, and set Value to 0.
e. Open HKEY_CURRENT_USER/Software/Microsoft/Internet Explorer/Main.
f. if Name TabProcGrowth is not present. right-click Main, New, DWORD, and enter TabProcGrowth.
g. Double-click TabProcGrowth, and set Value to 0.
6. Install one of the following Java JRE:
–
Oracle Java
–
OpenJDK
–
Zulu
7. Download the Selenium server.
Set up Primary Windows Machine
This section describes the steps to enable the Internet Explorer browser for WebDriver Monitor on the primary Windows
machine.
Follow these steps:
1. Copy the downloaded Selenium jar file to the %USERPROFILE%\ASM directory.
2. Run the following commands in the command prompt:
121

DX App Synthetic Monitor SaaS
cd %USERPROFILE%\ASM
java -jar selenium-server-standalone-<version>.jar -role hub -port 4444 -browserTimeout 3600 -timeout 3600
-newSessionWaitTimeout 300
cd %USERPROFILE%\ASM
java -jar selenium-server-standalone-<version>.jar -role node -hub http://localhost:4444/grid/register -
browser browserName="internet explorer"
3. Configure the firewall to allow incoming connections on TCP port 4444.
4. Verify connectivity between Windows and OPMS:
a. Get the hostname of the OPMS using the hostname command.
b. Open http://<OPMS_hostname>/api/status/system in a browser.
The web page must show the JSON data, if it does not, then do the following steps:
a. Open the C:\Windows\System32\drivers\etc\hosts file in Notepad as an Administrator.
b. Add <IP address of OPMS>:<hostname of OPMS> and save.
c. Open http://<OPMS_hostname>/api/status/system to verify again.
5. Set up the connectivity between OPMS and Windows:
a. Log in to OPMS.
b. To verify the connection, run curl -v http://<IP or hostname of Windows machine>:4444 command.
c. Open the /etc/asm/webdriver-agent.properties file.
d. Set the value of the webDriverRemoteUrl attribute to the following URL:
http://<ip-of-windows-machine>:4444/wd/hub
NOTE
The value of the webDriverRemoteUrl parameter is reset after you upgrade OPMS. You must
manually set the value again after the upgrade.
e. Run the monit restart webdriver-agent command.
f. Configure the firewall to allow incoming connections on TCP ports 9592-9999.
Add more Windows machines for concurrent monitoring
If a concurrent monitor execution is required, add more Windows machines with a Selenium Grid node and connect them
to the primary Windows machine.
Follow these steps:
1. Ensure that you meet the Installation Prerequisites.
2. Copy the downloaded Selenium jar file to the %USERPROFILE%\ASM directory.
3. Run the following commands in the command prompt:
java -jar selenium-server-standalone-<version>.jar -role node -hub http://<IP or hostname of Windows
machine>:4444/grid/register -browser browserName="internet explorer"
Install Google Chrome
Perform the following tasks on the primary Windows machine and all the Windows machines from which you intend to use
WebDriver Monitor with Google Chrome concurrently.
Prerequisites for Chrome
Ensure that you meet the following prerequisites:
122

DX App Synthetic Monitor SaaS
•
Installed ASM 10.7.7 OPMS or at least the webdriver-agent package in the 10.7.7 version.
•
Working Windows installation on another machine.
•
Install the supported Chrome version.
•
Networking between Linux OPMS and Windows machine (inbound port TCP/4444 on Windows machine, inbound
ports TCP/9592-9999 on Linux OPMS must be accessible from each other).
Install Google Chrome
Perform the following steps to install chrome.
Follow these steps:
1. Install the desired version of Google Chrome.
2. Install Java 1.8 on Windows machine.
3. Create the ASM directory in your %USERPROFILE% using the following command:
mkdir %USERPROFILE%\ASM
4. Download Selenium Server (Grid) v.4+ to the %USERPROFILE%\ASM directory.
5. Download ChromeDriver into %USERPROFILE%\ASM .
NOTE
Ensure that the Chrome driver version matches your Chrome version.
6. Add %USERPROFILE%\ASM to your system path.
7. Add <opms-ip> <opms-host> line to your C:\Windows\System32\drivers\etc\hosts file. (needs
Administrator privileges).
8. In the Network Proxy settings, turn off "Automatically detect settings" in "Automatic proxy set".
9. Download MITM certificate to the %USERPROFILE%\ASM directory.
10. Launch Google Chrome and go to Settings, Security and privacy, Security, Advanced, Manage certificates,
Import, Browse, then select the mitm_cer.crt file.
11. Click Next.
12. Click Browse, on the prompt to select the import location.
13. Select Trusted Root Certificate Authorities, click OK, Next, Finish.
14. Click Yes to confirm the Security Warning.
15. Launch Command Prompt (cmd.exe ) and perform the following actions:
a. Change the directory to %USERPROFILE%\ASM
b. Execute the following command:
java -jar selenium-server-<version>.jar standalone --session-request-timeout 300 --session-timeout 3600
NOTE
In the results, look for the following lines:
INFO [NodeOptions.report] - Adding Chrome for {"browserName":"chrome"}
INFO [Standalone.execute] - Started Selenium Standalone <version> http://<ip-of-windows-
machine>:4444
NOTE
Note down the IP address to configure Chrome on the Linux OPMS machine.
Configure Linux OPMS Machine
Follow these steps:
1. Edit the /etc/asm/webdriver-agent.properties file.
2. Set the value of the webDriverRemoteUrl attribute to the following URL:
http://<ip-of-windows-machine>:4444/wd/hub
123

DX App Synthetic Monitor SaaS
NOTE
Use the IP address of the windows machine that you noted earlier.
3. Save the file.
4. Execute the following command:
sudo monit restart webdriver-agent
NOTE
The value of the webDriverRemoteUrl parameter is reset after you upgrade OPMS. You must manually set the
value again after the upgrade.
WebDriver if-else Branching and JavaScript
There is no step branching available for WebDriver monitor. This means that you cannot execute the Selenium commands
conditionally. You need to employ runScript command to make loops or if-else branching possible. Since the
JavaScript snippets in runScript command is running in the context of the page they’re executed on, you can take
advantage of all and any JavaScript libraries loaded within the page.
Do not let your runScript code throw uncaught exceptions as that would interrupt the WebDriver script run with
“Javascript thrown an exception” error message. A best practice is to wrap your code with try/catch block, possibly
using console.log function to log the exception. This way the monitor run would not be interrupted, and you’d see the
console messages in the check details view.
Let's implement a scenario, where we conditional check the website using branching in JavaScript. In the first step, we
open the page:
<selenese>
<command>open</command>
<target><![CDATA[https://software.broadcom.com/]]></target>
<value><![CDATA[]]></value>
</selenese>
In the next command, make a decision based on a random number and store the variable for use in the later steps. One
of the ways to keep the state between the step’s execution is to use sessionStorage . The sessionStorage object
lets you store the key/value pairs in the browser session mechanism:
<selenese>
<command>runScript</command>
<target>
<![CDATA[
try {
const generatedNumber = Math.floor(Math.random() * 10);
const isContinueEvaluation = generatedNumber > 5;
console.log("isContinueEvaluation: " + isContinueEvaluation);
// Saving variable for later use. For objects use JSON.stringify()
sessionStorage.setItem('isContinueEvaluation', isContinueEvaluation);
} catch (ex) {
console.log(ex.message);
throw new Error(ex.message);
}
]]>
</target>
<value><![CDATA[]]></value>
</selenese>
124

DX App Synthetic Monitor SaaS
In this step, get the state variable from the sessionStorage and make an assertion done by JavaScript. Please note
that the sessionStorage values are serialized in a string:
<selenese>
<command>runScript</command>
<target>
<![CDATA[
try {
// Getting the variable from the sessionStorage
const isContinueEvaluation = sessionStorage.getItem('isContinueEvaluation');
// JavaScript assertion
if (isContinueEvaluation !== 'true') {
throw new Error("Evaluation stopped due to scenario.");
}
} catch (ex) {
console.log(ex.message);
throw new Error(ex.message);
}
]]>
</target>
<value><![CDATA[]]></value>
</selenese>
Here we make one more assertion but in a different way as an example using the command assertEval . The result of
the JavaScript expression is compared with the command value.
<selenese>
<command>assertEval</command>
<target>
<![CDATA[
try {
// Checking the page content to continue
// The return value will be used in the assertion
return document.documentElement.textContent.indexOf('Who is Broadcom Software?') > -1;
} catch (ex) {
console.log(ex.message);
throw new Error(ex.message);
}
]]>
</target>
<value><![CDATA[true]]></value>s
</selenese>
Here we make one more store operation, this time using not browser sessionStorage , but WebDriver variable. The
result of the javascript expression is stored in the runtime under the name from the command value field.
<selenese>
<command>storeEval</command>
<target>
<
DX App Synthetic Monitor SaaS
throw new Error(ex.message);
}
]]>
</target>
<value><![CDATA[isSecondScenario]]></value>
</selenese>
In this step, we continue our scenario in two possible branches. Make note of how the variable is called using
${variableName}: the placeholder will be replaced with a string, and we need to wrap it in quotes:
<selenese>
<command>runScript</command>
<target>
<![CDATA[
try {
// Taking the variable from WebDriver scenario
if (‘${isSecondScenario}’ === 'true') {
const link = new XPathEvaluator()
.createExpression("//a[contains(text(),'Solutions')]")
.evaluate(document, XPathResult.FIRST_ORDERED_NODE_TYPE)
.singleNodeValue;
link.click();
} else {
const link = new XPathEvaluator()
.createExpression("//a[contains(text(),'Resource Library')]")
.evaluate(document, XPathResult.FIRST_ORDERED_NODE_TYPE)
.singleNodeValue;
link.click();
}
} catch (ex) {
console.log(ex.message);
throw new Error(ex.message);
}
]]>
</target>
<value><![CDATA[]]></value>
</selenese>
In the last step, we make an assertion in the desired branch using the assertEval command:
<selenese>
<command>assertEval</command>
<target>
<![CDATA[
try {
const isSecondScenario = '${isSecondScenario}' === 'true';
const text = isSecondScenario ? 'Learn More About Our Products' : 'Broadcom Software Industry
Analyst Reports';
return document.documentElement.textContent.indexOf(text) > -1;
} catch (ex) {
console.log(ex.message);
throw new Error(ex.message);
}
]]>
</target>
126

DX App Synthetic Monitor SaaS
<value><![CDATA[true]]></value>
</selenese>
As you can see, this script shows a combination of various approaches to how the execution can be controlled throughout
the steps. The script can be much more complicated with more branches and complex state, this has only limitations of
the JavaScript engine. The entire script looks like this:
<?xml version="1.0" encoding="UTF-8"?>
<TestCase>
<selenese>
<command>open</command>
<target><![CDATA[https://software.broadcom.com/]]></target>
<value><![CDATA[]]></value>
</selenese>
<selenese>
<command>runScript</command>
<target>
<![CDATA[
try {
const generatedNumber = Math.floor(Math.random() * 10);
const isContinueEvaluation = generatedNumber > 5;
console.log("isContinueEvaluation: " + isContinueEvaluation);
// Saving variable for later use. For objects use JSON.stringify()
sessionStorage.setItem('isContinueEvaluation', isContinueEvaluation);
} catch (ex) {
console.log(ex.message);
throw new Error(ex.message);
}
]]>
</target>
<value><![CDATA[]]></value>
</selenese>
<selenese>
<command>runScript</command>
<target>
<![CDATA[
try {
// Getting the variable from the sessionStorage
const isContinueEvaluation = sessionStorage.getItem('isContinueEvaluation');
// JavaScript assertion
if (isContinueEvaluation !== 'true') {
throw new Error("Evaluation stopped due to scenario.");
}
} catch (ex) {
console.log(ex.message);
throw new Error(ex.message);
}
]]>
</target>
<value><![CDATA[]]></value>
</selenese>
<selenese>
<command>assertEval</command>
<target>
127

DX App Synthetic Monitor SaaS
<![CDATA[
try {
// Checking the page content to continue
// The return value will be used in the assertion
return document.documentElement.textContent.indexOf('Who is Broadcom Software?') > -1;
} catch (ex) {
console.log(ex.message);
throw new Error(ex.message);
}
]]>
</target>
<value><![CDATA[true]]></value>s
</selenese>
<selenese>
<command>storeEval</command>
<target>
<![CDATA[
try {
const generatedNumber = Math.floor(Math.random() * 10);
const isSecondScenario = generatedNumber > 5;
console.log("isSecondScenario: " + isSecondScenario);
return isSecondScenario;
} catch (ex) {
console.log(ex.message);
throw new Error(ex.message);
}
]]>
</target>
<value><![CDATA[isSecondScenario]]></value>
</selenese>
<selenese>
<command>runScript</command>
<target>
<![CDATA[
try {
// Getting the variable from WebDriver environment
if ('${isSecondScenario}' === 'true') {
const link = new XPathEvaluator()
.createExpression("//a[contains(text(),'Solutions')]")
.evaluate(document, XPathResult.FIRST_ORDERED_NODE_TYPE)
.singleNodeValue;
link.click();
} else {
const link = new XPathEvaluator()
.createExpression("//a[contains(text(),'Resource Library')]")
.evaluate(document, XPathResult.FIRST_ORDERED_NODE_TYPE)
.singleNodeValue;
link.click();
}
} catch (ex) {
console.log(ex.message);
throw new Error(ex.message);
}
128

DX App Synthetic Monitor SaaS
]]>
</target>
<value><![CDATA[]]></value>
</selenese>
<selenese>
<command>assertEval</command>
<target>
<![CDATA[
try {
const isSecondScenario = '${isSecondScenario}' === 'true';
const text = isSecondScenario ? 'Learn More About Our Products' : 'Broadcom Software Industry
Analyst Reports';
return document.documentElement.textContent.indexOf(text) > -1;
} catch (ex) {
console.log(ex.message);
throw new Error(ex.message);
}
]]>
</target>
<value><![CDATA[true]]></value>
</selenese>
</TestCase>
World Map Metrics
The performance level of a web service appears on the Current Performance and Availability Status world map with
scores that are indicated by color codes. The following metrics determine the current performance:
•
The exponential moving average during the most recent checks
•
The timeout, first, and, second performance level limits for each monitor set by the system administrator
NOTE
To set the timeout, and the first, and second performance limits go to How To Configure DX APP Synthetic
Monitor.
A performance score from 0 to 100 is generated with a higher number indicating better performance. The web service
performance level of a country appears with the following color codes and corresponding score in brackets:
•
Red (0-32): if an error occurs or the check does not finish before the configured timeout
•
Orange (33-52): if no error occurs and the check finishes between the second performance limit and the timeout
•
Green (53-95): if no error occurs and the check finishes between the first and second performance limit
•
Dark green (96-100): without error and the check finishes before the first performance limit
NOTE
To create a default message to inform users about performance issues that appear in APM Cloud Monitor PSP
and RSS feeds go to Set Up a PSP.
Use the API
With the DX APP Synthetic Monitor API, you can access data, edit settings, create and modify monitors, and automate
tasks without the ASM Dashboard. The ASM API is a REST-like API that accepts GET and POST request parameters and
returns XML structured data.
Endpoints (operations) provide access to the functions of DX APP Synthetic Monitor. Documentation of each endpoint is
provided in the API documentation. Endpoints can be accessed with HTTPS (recommended) or plain HTTP.See also:
129

DX App Synthetic Monitor SaaS
•
API Access
•
Call Syntax
•
Parameters
•
Use of Cookies
•
API Use Examples
API Password
To use the API, create an API password. This password is not the same as your ASM login password.
Follow these steps:
1. Log in to your ASM account at DX ASM Portal.
2. Select Change Password in your profile settings.
3. In the Change API password section, enter your current account password, enter a new account password, confirm
the new password, and then select Change.
API Password Blocked
If there is a problem with the API password, the account is blocked. This block means that the account is blocked to
further API transactions only. When you log in to ASM with your user password, the API block is removed.
API Access
Access to the API information is controlled in the following ways. API calls are charged to the account holder.
API Calls and Credits
Each API call has a credit price (API credits). The credit amount per day depends on your subscription. To see the price
for each call, go to the API and click the orange operations. The price of each call is above the fill-in box.
The types of credits are :
•
API credits: Use for API calls
•
SMS credits: Use with the ch_send SMS operation
•
Check credits: Use to test ASM monitoring stations (checkpoints), for example, rule_check, and cp_check
Anonymous Access
Several calls support Anonymous Access with limited resources:
•
Session keys (nkeys) are created per-IP
•
Anonymous sessions are limited to 50 API credits per day
Authenticated Access
Authenticated access calls can manipulate your data and settings. The number of access calls available depends on your
subscription.
•
To access with authentication, call the acct_login with your credentials and obtain an account nkey
•
Use the nkey for future calls
•
Call acct_logout to destroy the session and invalidate the key
130

DX App Synthetic Monitor SaaS
Session Bounds and Lifetime
•
A session is 15 minutes long. You can extend the session lifetime by calling acct_noop
•
An nkey is connected to an IP address
•
An nkey parameter value can be sent in a GET, POST or a COOKIE
Browser API Access
You can use your browser to test and debug API calls. To make browser calls, go to the API endpoint URL and perform
the calls from the forms.
•
You can make browser account mode access calls
•
nkeys are stored in browser cookies and picked up by the calls automatically
Access Data from Other Accounts
DX APP Synthetic Monitor supports sub-accounts (children accounts of a master account). Master accounts have
privileges to access and manipulate data belonging to their sub-accounts:
•
Account owners have access to all sub-accounts
•
Reseller accounts have access to all client accounts
•
Account owners can authorize access for sub-accounts to monitors in a specific folder
•
Account owners can authorize read-only access for sub-accounts to monitors in a specific folder
To access or edit monitors, contacts, and, folders, a minimum of one of the following conditions must apply:
•
You are the owner of the account that created the monitors
•
You are the parent or reseller of the sub-account that created the monitors
•
Your parent account gives you read-only or write access to a folder with monitors
Call Syntax
The DX APP Synthetic Monitor API is a REST-type API however, operations are implemented with either GET or POST
HTTP requests.
The type of operation is indicated by the suffix of the operation name for example:
•
_add: rule_add to create a new rule
•
_get: rule_get to retrieve rules
•
_mod: rule_mod to update a rule
•
_del: rule_del to remove a rule
Request Syntax Calls
•
All parameters are in the UTF8 character set and URL-encoded
•
For POST requests, use x-www-form-urlencoded for the Content-Type of request
•
All the parameters in the request body that use the UTF8 character set
•
The value of the parameter session key (nkey) is in a cookie or a parameter
The syntax of a GET call:
For Example:
https://api.asm.saas.broadcom.com/<version>/<operation>?<par1>=<val1>&...&<parN>=valN
The placeholders in this example are:
131

DX App Synthetic Monitor SaaS
•
<version> for the API version
•
<operation> for the name of the requested operation
•
<par1><parN> for parameter names
•
<val1><valN> for the respective values
The syntax of a secure HTTPS call is:
https://api.asm.saas.broadcom.com/<version>/<operation>?<par1>=<val1>&...&<parN>=valN
The syntax of a info_ip call is:
https://api.asm.saas.broadcom.com/1.6/info_ip?host=google.com
In this example:
•
The operation info_ip calls with a single parameter
•
The parameter is named host and has the value of google.com
Result Syntax
The default result format of a DX APP Synthetic Monitor API call is an XML document. Other formats are available. The
following are example responses:
NOTE
User responses depend on current network configuration, user data and other factors.
https://api.asm.saas.broadcom.com/1.6/info_ip?host=google.com can return the following response:
<?xml version="1.0" encoding="UTF-8"?>
<CA Cloud Monitor version="1.6.19">
<code>0</code>
<info>IP info found</info>
<tz>GMT</tz>
<gmtoffset>0</gmtoffset>
<elapsed>70.7510</elapsed>
<result>
<ip>74.125.67.100</ip>
<country>us</country>
<company>Google Inc</company>
<city>Mountain View</city>
<lat>37.395599</lat>
<lng>-122.075996</lng>
<languages>
<language>en</language>
<language>es</language>
</languages>
</result>
</CA Cloud Monitor>
Parameters
The following parameters apply to the CA ASM API.
132
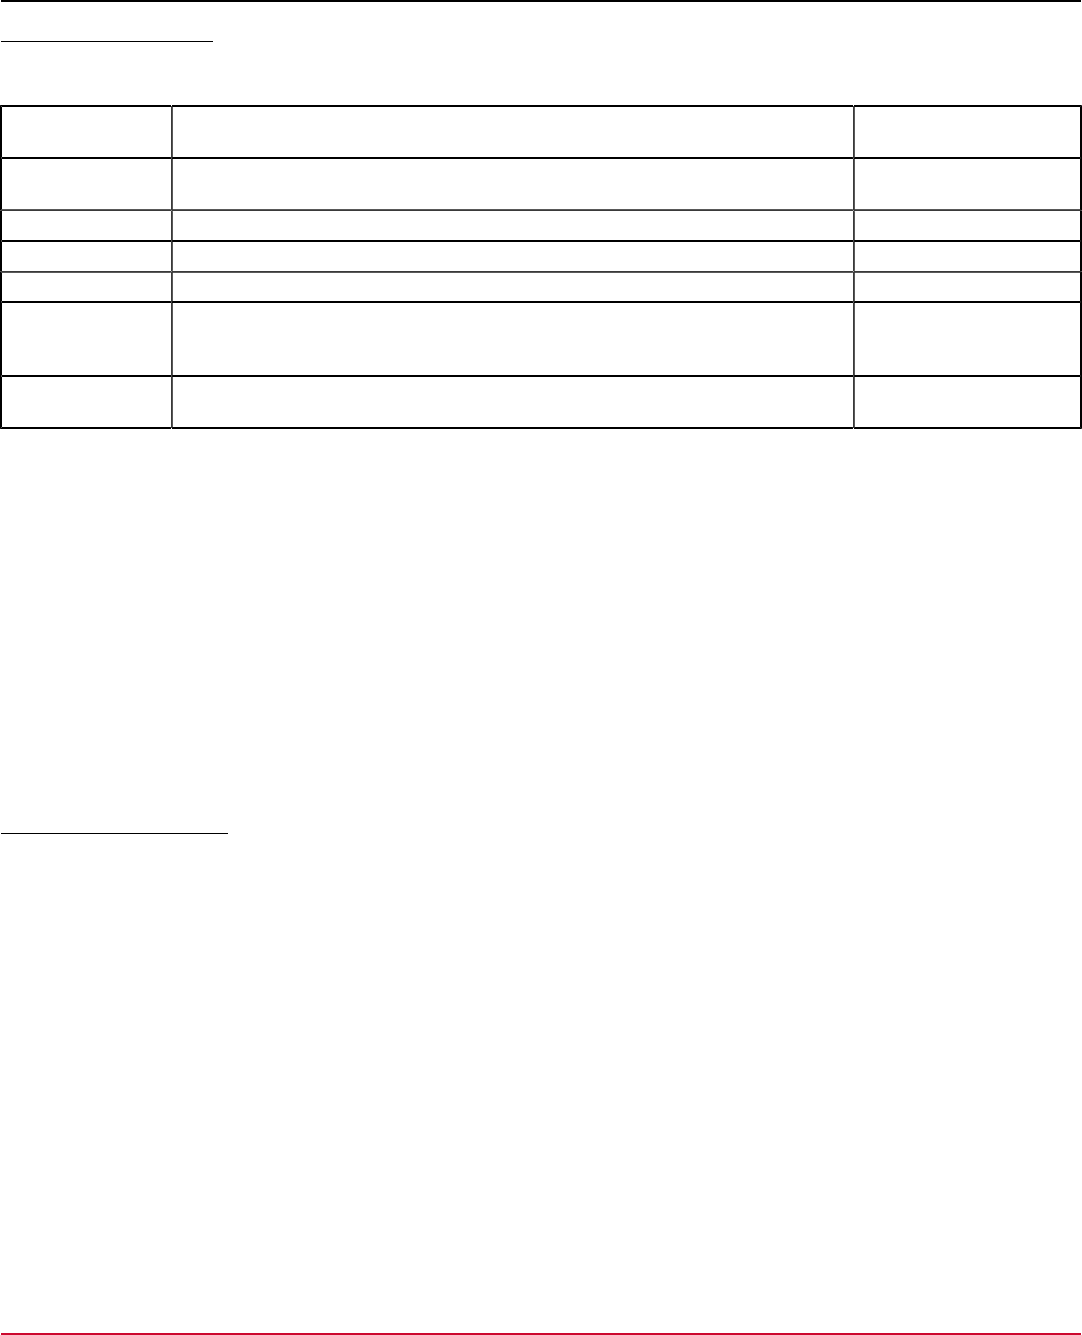
DX App Synthetic Monitor SaaS
The Format Parameter
To request a different response format, the format parameter is available for any of the following calls:
Call Description Supported Output
Format
ch_log Retrieves messages from one account. Apply a filter by specifying a type or date
range.
XML, CSV, XLS, TAB
cp_list Retrieves checkpoint information. XML, CSV, XLS, TAB
cp_trace Performs a Traceroute. XML, CSV, XLS, TAB
rule_chart Displays the requested graph. LIST, HTML
rule_don Checks an existing rule, maximum num times , and return results. Cache if
needed. The rule_don call does not trigger notifications and does not perform a
second opinion check.
XML, CSV, XLS, TAB
rule_log Retrieves probes from one account. Apply a filter by specifying a rule, folder, tags,
date range, and name.
XML, CSV, XLS, TAB,
JSON
NOTE
The following output formats are recognized:
•
XML
Generates an XML document
•
CSV
Generates a comma-separated value file
•
TAB
Generates a TAB-delimited value file
•
XLS
Generates a TAB-delimited value file with another MIME type so that the preferred spreadsheet editor opens
the document.
•
JSON
Generates a JSON file.
The Callback Parameter
You can define a callback parameter for all calls in the CA ASM API. If the callback parameter is available, the response is
displayed in a JSON object. The name is specified as the value of the callback parameter.
NOTE
The callback parameter is only valid for the JSON response format.
Example: Callback Request
The following example shows a callback request:
https://api.asm.saas.broadcom.com/latest/info_ip?host=google.com&callback=callme
Example: Callback Response
The following example shows a callback response:
callme({"version":"1.6.19","code":0,"info":"IP info found","tz":"GMT","gmtoffset":"0","elapsed":"164.5501",
"result":{"ip":"74.125.45.100","country":"us","company":"Google Inc","city":"Mountain
View","lat":"37.395599","lng":"-122.075996", "languages":["en","es"]}})
133

DX App Synthetic Monitor SaaS
Parameter Errors
The DX APP Synthetic Monitor API error operation process does not follow the strict definitions of a REST API.
•
The DX APP Synthetic Monitor API HTTP status code is always 200 (correct), including response errors.
•
The error information identification is in the XML or JSON response document.
Errors return an XML or JSON result.
•
If a call is successful, the value of the code attribute is 0 (zero)
•
If there is an error, a non-zero value of code returns with an explanation in the information field
•
If the error is a call parameter, a parameter field with the name of the error is included
Example: Error in the XML
The following example shows an error response in the XML format:
<watchmouse>
<code>1000</code>
<error>authentication error</error>
<info>wrong credentials</info>
<elapsed>106.1909</elapsed>
</watchmouse>
An error response in the JSON format:
re1({"version":"1.6.77","code":1000,"error":"authentication error","info":"wrong
credentials","elapsed":"9.5592"})
NOTE
The value of the callback parameter in the request was re1 so the response begins with re1 .
Parameter Encoding
•
All request and response parameters use UTF8 encoding
•
Some input and output parameters are compressed with the zlib library
•
Parameters are encoded with the Base64 algorithm and appear as a b64encoded data type in the documentation
Time zone Parameters
•
When you are signed in to your account, all date and time values are in the time zone <tz> that was selected when
the account was set up
•
When you are signed out, the date and time values are in GMT <gmtoffset>
Use of Cookies
The API sends the value of a nkey in a cookie back to the client (browser) upon authentication after a successful call to
acct_login.
•
The value of a nkey is also sent back when accessed anonymously
•
After successful access, the nkey value is sent to the API by the client in all subsequent calls either in a cookie or as a
parameter of the HTTP request
WARNING
The nkey parameter value in the GET request is part of the URL. The nkey parameter value is observable on the
intermediate nodes of communication. For security, use the POST request that contains the parameters in the
request body.
134

DX App Synthetic Monitor SaaS
API Use Examples
Use the following examples of ASM API calls and their responses.
Three-step demo session:
To use the curl utility and locate stations that are IPv6 Capable, copy and paste the following lines into your terminal:
curl --cookie /tmp/cookies --cookie-jar /tmp/cookies --data "user=[email]&password=[pass]" https://
api.asm.saas.broadcom.com/latest/acct_login
curl --cookie /tmp/cookies --cookie-jar /tmp/cookies --data "cap=ipv6" https://api.asm.saas.broadcom.com/
latest/cp_list
curl --cookie /tmp/cookies --cookie-jar /tmp/cookies https://api.asm.saas.broadcom.com/latest/acct_logout
Follow these steps:
1. Create a Session
2. Send the following request:
https://api.asm.saas.broadcom.com/1.6/acct_login?
[email protected]&password=somesecret
Response:
<?xml version="1.0" encoding="UTF-8"?>
<watchmouse version="1.6.19">
<code>0</code>
<info>new session</info>
<elapsed>78.2831</elapsed>
<result>
<nkey>WMS4ACDE058A43ED</nkey>
<country>nl</country>
<lang>en</lang>
</result>
</watchmouse>
Get the Statistics of All Monitors in My Account
Send the following request:
https://api.asm.saas.broadcom.com/1.6/rule_stats?
nkey=WMS4ACDE058A43ED&start_date=2009-10-01
Response:
<?xml version="1.0" encoding="UTF-8"?>
<watchmouse version="1.6.19">
<code>0</code>
<info>new session</info>
<elapsed>78.2831</elapsed>
135

DX App Synthetic Monitor SaaS
<result>
<nkey>WMS4ACDE058A43ED</nkey>
<country>nl</country>
<lang>en</lang>
</result>
</watchmouse>
Find Two Monitoring Stations that Support HTTPS Country Names in French
Send the following request:
https://api.asm.saas.broadcom.com/1.6/cp_list?type=https&lang=fr&cap=ipv6&limit=2
Response:
<?xml version="1.0" encoding="UTF-8"?>
<watchmouse version="1.6.19">
<code>0</code>
<info>stats found</info>
<tz>Europe/Amsterdam</tz>
<gmtoffset>2</gmtoffset>
<elapsed>1116.9441</elapsed>
<result>
<stats>
<stat>
<name></name>
<rid></rid>
<active></active>
<consecutive_errors></consecutive_errors>
<timewarn></timewarn>
<timepoor></timepoor>
<probes>28552</probes>
<probe_errors>3434</probe_errors>
<checks>27478</checks>
<check_errors>2437</check_errors>
<uptime>90.5230</uptime>
<ttime>370.2864</ttime>
<ctime>67.8472</ctime>
<ptime>137.8235</ptime>
<dtime>320.5942</dtime>
<dsize>30536</dsize>
<sla_warn></sla_warn>
<sla_poor></sla_poor>
</stat>
</stats>
</result>
</watchmouse>
136

DX App Synthetic Monitor SaaS
Check www.google.com from Denmark
Send the following request:
https://api.asm.saas.broadcom.com/1.6/cp_check?
nkey=WMS4ACDE058A43ED&checkloc=dk&type=http&host=www.google.com&timeout=5
Response:
<?xml version="1.0" encoding="UTF-8"?>
<watchmouse version="1.6.19">
<code>0</code>
<info>http check</info>
<elapsed>447.1421</elapsed>
<result>
<status>0</status>
<loc>dk</loc>
<message>OK</message>
<final>0</final>
<cp_city>Copenhagen</cp_city>
<cp_country>dk</cp_country>
<cp_lat>55.667000</cp_lat>
<cp_lng>12.583000</cp_lng>
<rtime>1</rtime>
<ctime>33</ctime>
<ptime>40</ptime>
<dtime>58</dtime>
<ttime>92</ttime>
<dsize>7502</dsize>
<dsizex>7502</dsizex>
<redir>1</redir>
<ip>74.125.79.99</ip>
<url>http://www.google.dk/</url>
<version>15465</version>
<lat>34.045200</lat>
<lng>-118.283997</lng>
</result>
</watchmouse>
Tell me about Denmark
Send the following request:
https://api.asm.saas.broadcom.com/1.6/info_country?
nkey=WMS4ACDE058A43ED&isocode=dk&lang=es
Response:
<?xml version="1.0" encoding="UTF-8"?>
<watchmouse version="1.6.19">
<code>0</code>
137

DX App Synthetic Monitor SaaS
<info>country info found</info>
<elapsed>43.3350</elapsed>
<result>
<name>Dinamacara</name>
<isocode>dk</isocode>
<dialcode>45</dialcode>
<currency>EUR</currency>
<languages>
<language>da</language>
<language>de</language>
</languages>
</result>
</watchmouse>
Logout
Send the following request:
https://api.asm.saas.broadcom.com/1.6/acct_logout?nkey=WMS4ACDE058A43ED
Response:
<?xml version="1.0" encoding="UTF-8"?>
<watchmouse version="1.6.19">
<code>0</code>
<info>end of session</info>
<elapsed>43.9551</elapsed>
</watchmouse>
Using Swagger API in DX ASM
From the current release, you can access DX ASM API documentation using Swagger. The Swagger UI lets you visualize
and interact with DX ASM REST API by providing visual documentation.
You now have Swagger documentation and endpoints to work with DX ASM RESTful web services. The REST API
endpoints are provided within a self-documenting framework that lets you try the methods and see the generated
responses. All methods are grouped by resource type and can be displayed in a single window. Use the Show/Hide, List
Operations, and Expand Operations options to expand and collapse the resources and methods.
The methods are color-coded to make it easier to distinguish between the different methods. To the right of each method
is a brief description of the action that is performed by the method. Documentation is provided for request parameters.
Sample model schema is available for methods requiring payload in the request. Use the provided model schema to
populate the body field, and then replace the default values with desired settings. Use the Try it out! Button to send the
request and see the generated response in real-time.
The Response Messages section for each method provides a documented list of response codes. Use this information
to help you determine a corrective action if an error condition was encountered. The response that is returned for each
request appears in the method drop-down window.
Accessing the API Documentation
Type the URL https://api.asm.saas.broadcom.com/v3 in your browser's address bar and press Enter.
138
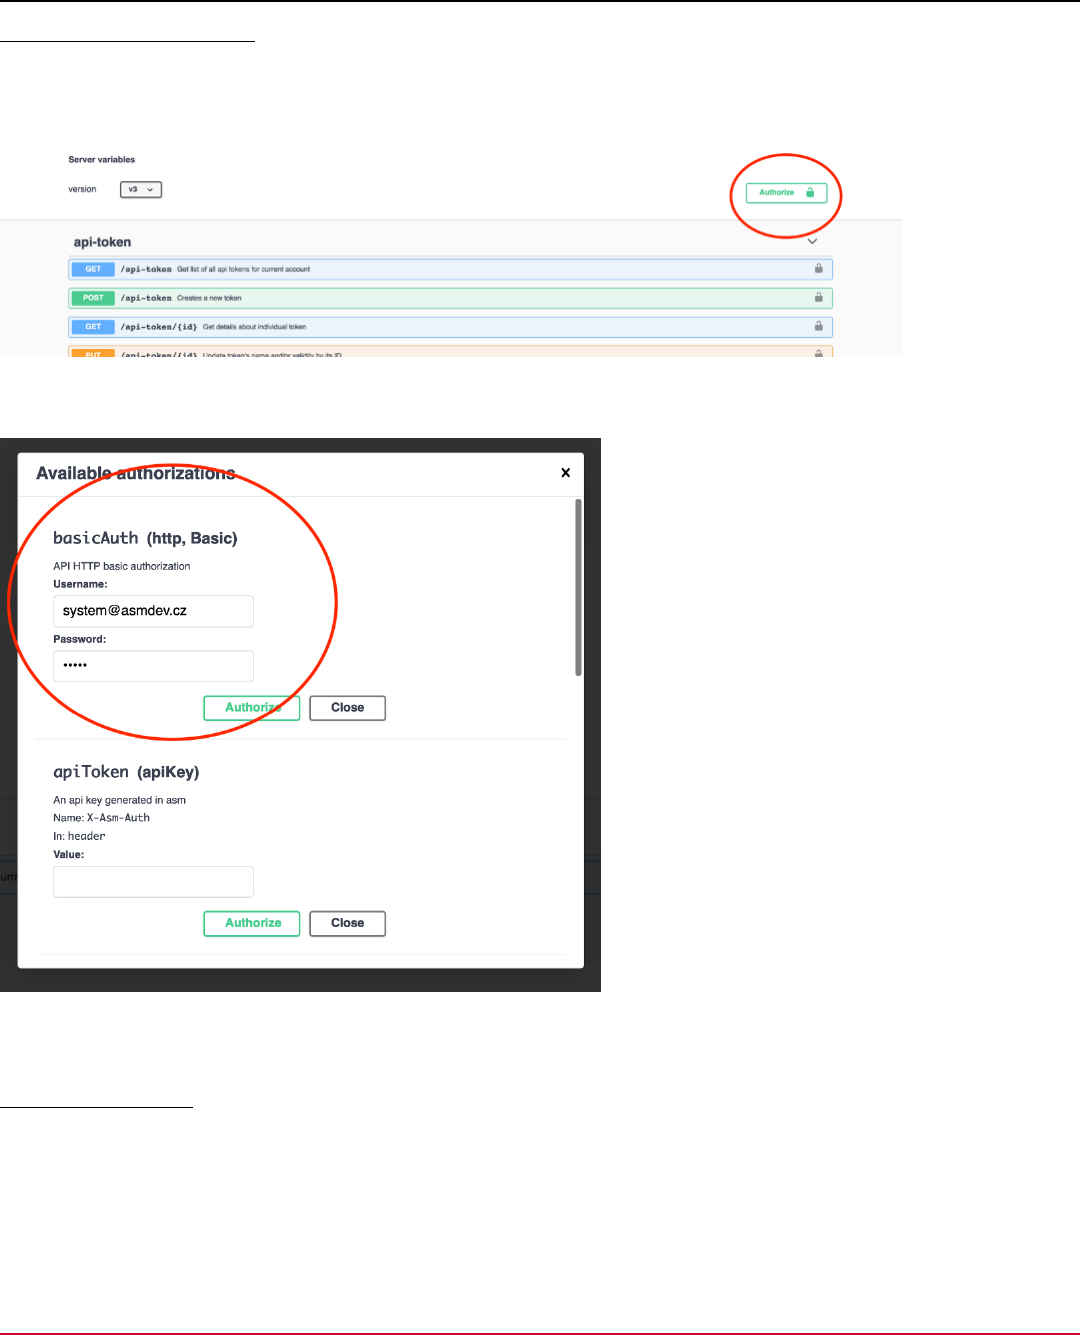
DX App Synthetic Monitor SaaS
Authorize Using basicAuth
Most of the API needs authorization. You can use the API token to access the API endpoints. If you do not have the API
token, you can create the API token using your API credentials (username and API password). The API credentials are
used only to create API token.
When you log in using the AP credentials, enter your API username and password in the respective fields in the
bascAuth section and click Authorize. Once authorization is successful, click Close. You can see the Swagger UI.
NOTE
Swagger does not check the validity of the credentials. Credentials are validated when you make the API calls.
Create an API Token
In the Swagger UI, select the Create a new token. Click Try it out. Change the value for the parameter valid_until to a
required value or null to set the parameter to not expire. Change the value and select Execute. Note down the auth token
displayed in the response for future use.
{
"name": "Symantec ASM client",
"valid_until": "null"
139

DX App Synthetic Monitor SaaS
}
Response
{
"status": "Created",
"data": {
"id": 3,
"name": "Symantec ASM client",
"token": "5KmMD+yp32MFeOl3JgtmN7jEXKYzhVxch4ShA7Niv+0=",
"valid_until": null
}
}
NOTE
A 403 error indicates that the previous authentication using the AP credentials failed. Contact your administrator
to get the correct credentials.
Authorize Using AP Token
Log out of the basicAuth, type the access token generated using the AP credentials and click Authorize.
140

DX App Synthetic Monitor SaaS
Once you are logged in, you can click Close to close the Available Authorization window.
Using the Swagger UI
On the Swagger UI, you can see the list of supported API endpoints grouped logically.
141
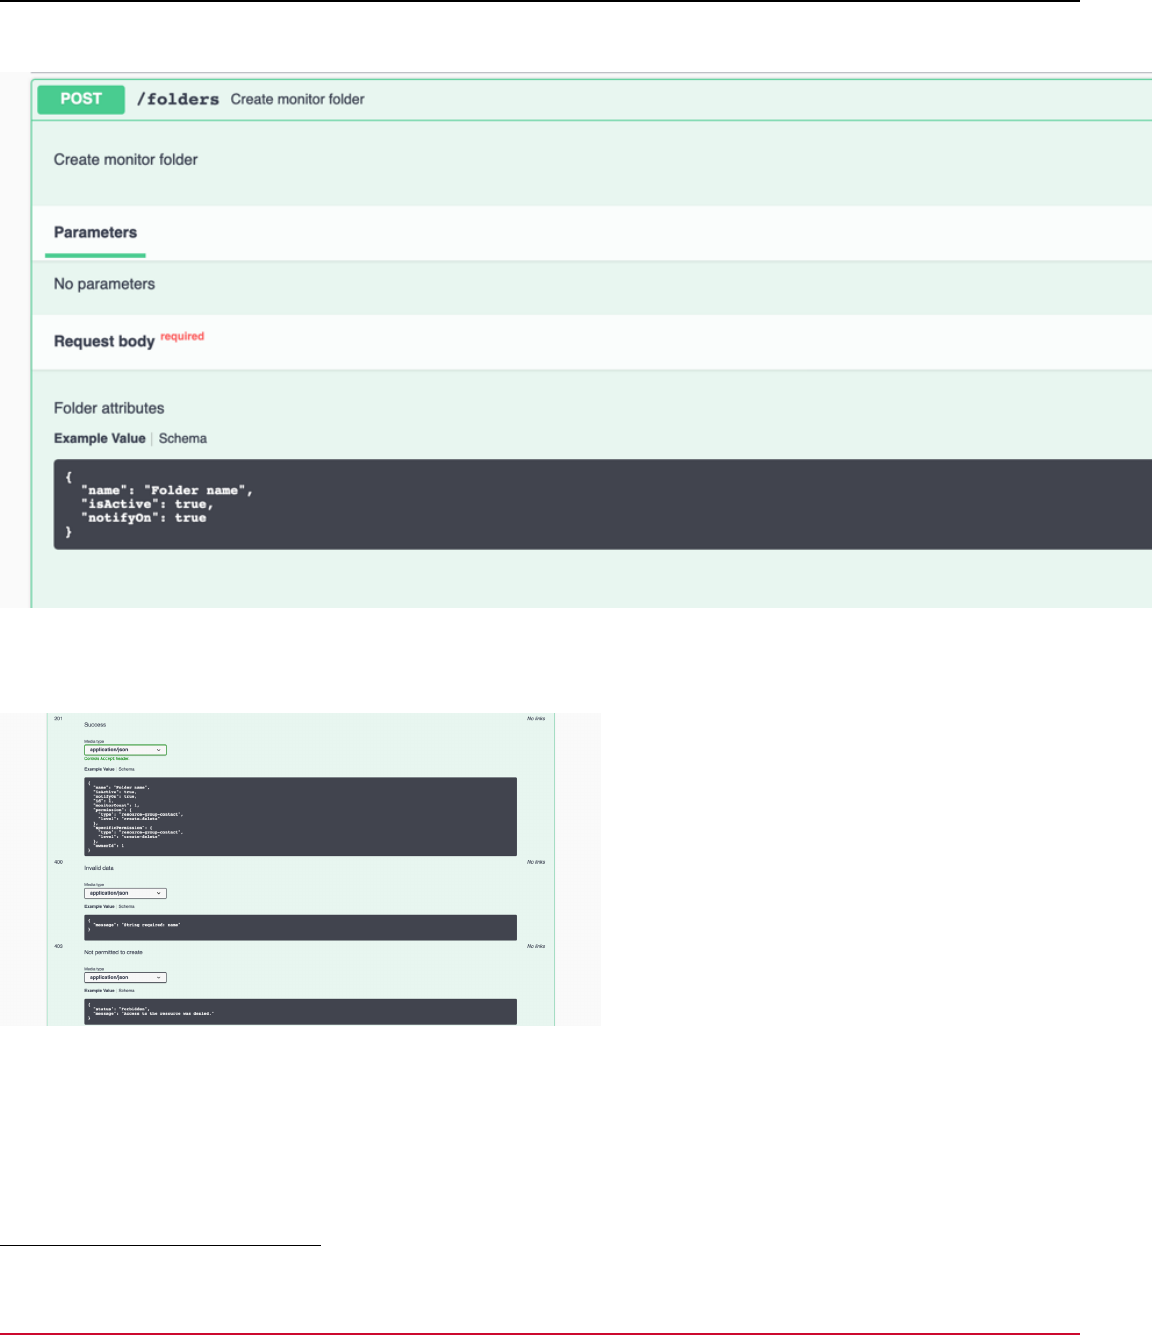
DX App Synthetic Monitor SaaS
You can see the basic description of the API endpoint to allow you to use the endpoint. Select the required API endpoint
to view more details and try out. The endpoint shows a sample request.
Modify the request as per your requirement and click Try it out. You can see the response below the request.
You can see the response description (Success, Invalid data, and so on in this example), status code, and the response
body.
NOTE
Next step, see REST API for ASM.
REST API for ASM
This section illustrates examples of REST API requests and responses for the supported operations.
Create an OAuth Client (one-time)
This step is required only once, at the beginning. The created Oauth client is used throughout all the other API calls.
142

DX App Synthetic Monitor SaaS
Method:
POST
Authorization:
Basic dXNlcm5hbWU6cGFzc3dvcmQ=
(=base64_encode('username:api_password')) where username is the name used to log in to the website and
api_password is the API password set in the account settings, not the website login password.
Request:
POST
Example:
curl -X POST "https://api.asm.saas.broadcom.com/v3/oauth2" -H "accept: application/json" -H "authorization:
Basic dXNlcm5hbWU6cGFzc3dvcmQ=" -H "Content-Type: application/json" -d "{ \"name\": \"Symantec ASm client
\", \"valid_until\": \"2031-03-01 15:00:00\", \"access_token_validity\": 3600, \"refresh_token_validity\":
604800}"
Response:
{
"status": "Created",
"data": {
"id": 3,
"name": "Symantec ASM client",
"client_id": "xV9+20a0VOpbqoSYWjIUHh/aBuEyLJDFlyZx0Fr2T9Y=",
"valid_until": "2035-02-01T15:00:00+01:00",
"access_token_validity": 3600,
"refresh_token_validity": 604800,
"client_secret": "ZIGnaWf0sftKZKhKiAryJY+h+J2QA87JKn4cmt8scpg="
}
}
Create a New Access Token and a Refresh Token From the Client Credentials
Method:
POST
Request:
POST /oauth2/token
Example:
POST /oauth2/token
grant_type=client_credentials
client_id=...
client_secret=...
curl -X POST "https://api.asm.saas.broadcom.com/v3/oauth2/token" -H "accept:
application/json" -H "Content-Type: application/x-www-form-urlencoded" -d
"grant_type=client_credentials&client_id=hYlUMFbgPVG6R0FlyIuxsnSbEMVt5HEmzdF52m9KX%2BU
%3D&client_secret=CzkfkZMFv%2FXkC5NA%2BGfRIBC2WlMSA9zFnmYpkMlggSI%3D"
Response:
143

DX App Synthetic Monitor SaaS
{
"access_token": "yyNn5xvoxRTr6FBIo2dFOdfOhsrLzO9BhpOBnUFawns=",
"token_type": "bearer",
"expires_in": 3600,
"refresh_token": "v6dz11ESSa3ZknFLk4gcaDJc0POqTgh01J9A2tsn1c0=",
"refresh_token_expires_in": 604800
}
Create a New Folder (optional)
Method:
POST
Request:
POST /folder
Example:
POST /folder
{
"name": "Monitor Folder 1",
"isActive": true,
"notifyOn": true
}
curl -X POST "https://api.asm.saas.broadcom.com/v3/folders" -H "accept: application/json" -H "Authorization:
Bearer e5+tvvb33I2kfJp3s1bmG79BaniBKGShil8rpiuaK4o=" -H "Content-Type: application/json" -d "{ \"name\":
\"Monitor Folder 1\", \"isActive\": true, \"notifyOn\": true}"
Response:
{
"id": 126,
"monitorCount": 0,
"permission": {
"type": "folder",
"level": "create-delete"
},
"specificPermission": null,
"ownerId": 1,
"name": "Monitor Folder 1",
"isActive": true,
"notifyOn": true
}
Create a New Alert Contact (optional)
Creating and updating a new alert contact is not possible through the API, it requires logging in to the website. It is
possible to assign an existing alert contact to a monitor through the API.
Create a new maintenance window (optional)
Creating and updating a new maintenance window is not possible through the API, it requires logging in to the website. It
is possible to assign an existing maintenance window to a monitor through the API.
144

DX App Synthetic Monitor SaaS
Create a New Monitor
Method:
POST
Request:
POST /monitors
Example:
POST /monitors
{
"url": "https://example.com/",
"userAgent": "wm",
"useProxy": false,
"username": null,
"requestHeaders": "",
"postVariables": "",
"redirectLimit": 5,
"useNtlm": false,
"avoidCompression": false,
"matchString": null,
"ipVersion": 0,
"type": "https",
"name": "API monitor",
"folderId": 126,
"maintenanceGroupIds": [],
"tagNames": [],
"transactionTag": "",
"userNote": "",
"check": {
"mode": 2,
"interval": "00:05:00",
"periodFrom": "00:00",
"periodTo": "23:59",
"days": [0, 1, 2, 3, 4, 5, 6]
},
"alert": {
"timeWarn": 2500,
"timePoor": 6000,
"timeOut": 50,
"alertAfter": -1,
"dontDoPostMortem": false,
"contactId": null,
"notifyWhenUp": true,
"quietPeriod": null,
"checkThreshold": 1
},
"checkpoint": {
"usePublic": true,
"groupIds": [],
"algorithm": "random",
"defaultGroupId": null
},
145

DX App Synthetic Monitor SaaS
"proxyProtocol": "http",
"proxyAddress": "proxy-address",
"proxyPort": 1234,
"proxyUsername": "abc",
"proxyPassword": "foo",
"certificates": null
}
curl -X POST "https://api.asm.saas.broadcom.com/v3/monitors" -H "accept: application/json" -H
"Authorization: Bearer e5+tvvb33I2kfJp3s1bmG79BaniBKGShil8rpiuaK4o=" -H "Content-Type: application/json" -
d " { \t\"url\": \"https://example.com/\", \t\"userAgent\": \"wm\", \t\"useProxy\": false, \t\"username
\": null, \t\"requestHeaders\": \"\", \t\"postVariables\": \"\", \t\"redirectLimit\": 5, \t\"useNtlm\":
false, \t\"avoidCompression\": false, \t\"matchString\": null, \t\"ipVersion\": 0, \t\"type\": \"https
\", \t\"name\": \"API monitor\", \t\"folderId\": 126, \t\"maintenanceGroupIds\": [], \t\"tagNames\":
[], \t\"transactionTag\": \"\", \t\"userNote\": \"\", \t\"check\": { \t\t\"mode\": 2, \t\t\"interval
\": \"24:00:00\", \t\t\"periodFrom\": \"00:00\", \t\t\"periodTo\": \"23:59\", \t\t\"days\": [ \t\t\t0,
\t\t\t3, \t\t\t5 \t\t] \t}, \t\"alert\": { \t\t\"timeWarn\": 2500, \t\t\"timePoor\": 6000, \t\t
\"timeOut\": 50, \t\t\"alertAfter\": -1, \t\t\"dontDoPostMortem\": false, \t\t\"contactId\": null, \t\t
\"notifyWhenUp\": true, \t\t\"quietPeriod\": null, \t\t\"checkThreshold\": 1 \t}, \t\"checkpoint\": { \t
\t\"usePublic\": true, \t\t\"groupIds\": [], \t\t\"algorithm\": \"random\", \t\t\"defaultGroupId\": null
\t}, \t\"proxyProtocol\": \"http\", \t\"proxyAddress\": \"proxy-address\", \t\"proxyPort\": 1234, \t
\"proxyUsername\": \"abc\", \t\"proxyPassword\": \"foo\", \t\"certificates\": null }"Response:
Response:
{
"monitorId": "95" A newly created monitor is not active yet}
}
NOTE
Always create a new monitor with mode = 2"check": { "mode": 2
Activate and Deactivate Monitors
Method:
PUT
Request:
PUT /monitors/activate?monitor=[comma-separated monitor IDs]
Example:
curl -X PUT "https://api.asmdev.cz/v3/monitors/activate?monitor=1,15,32" -H "accept: application/json"
Response:
{
"status": "Multi-status",
"message": "Bulk response",
"data": {
"responses": [
{
"status": 200,
"message": "OK",
"id": 1,
146

DX App Synthetic Monitor SaaS
"resource": null
},
{
"status": 404,
"message": "Monitor '15' not found.",
"id": 15,
"resource": null
},
{
"status": 200,
"message": "OK",
"id": 32,
"resource": null
}
],
"metadata": {
"success": 2,
"redirect": 0,
"client_errors": 1,
"server_errors": 0
}
}
}
Update a Monitor
Method:
PUT
Request:
PUT /monitors/{id}
NOTE
The request should contain the updated parameters.
Example:
curl -X PUT "https://api.asm.saas.broadcom.com/v3/monitors/95" -H "accept: application/json" -H
"Authorization: Bearer e5+tvvb33I2kfJp3s1bmG79BaniBKGShil8rpiuaK4o=
Response:
{
"message": "Monitor updated"
}
Delete a Monitor
Method:
DELETE
Request:
DELETE /monitors/{id}
Example:
147

DX App Synthetic Monitor SaaS
curl -X DELETE "https://api.asm.saas.broadcom.com/v3/monitors/95" -H "accept: application/json" -H
"Authorization: Bearer e5+tvvb33I2kfJp3s1bmG79BaniBKGShil8rpiuaK4o=
Response:
HTTP 200
Get All Monitors
Method:
GET
Request:
GET /monitors
Example:
curl -X GET "https://api.asm.saas.broadcom.com/v3/monitors" -H "accept: application/json" -H "Authorization:
Bearer yyNn5xvoxRTr6FBIo2dFOdfOhsrLzO9BhpOBnUFawns="
Response:
[
{
"url": "https://example.com/",
"userAgent": "wm",
"useProxy": false,
"username": null,
"requestHeaders": "",
"postVariables": "",
"redirectLimit": 5,
"useNtlm": false,
"avoidCompression": false,
"matchString": null,
"ipVersion": 0,
"id": 1,
"type": "https",
"name": "Just a normal monitor",
"folderId": null,
"maintenanceGroupIds": [],
"tagNames": [],
"transactionTag": "",
"userNote": "",
"check": {
"mode": 2,
"interval": "24:00:00",
"periodFrom": "00:00",
"periodTo": "23:59",
"days": [
0,
3,
5
]
},
"alert": {
148

DX App Synthetic Monitor SaaS
"timeWarn": 2500,
"timePoor": 6000,
"timeOut": 50,
"alertAfter": -1,
"dontDoPostMortem": false,
"contactId": null,
"notifyWhenUp": true,
"quietPeriod": null,
"checkThreshold": 1
},
"checkpoint": {
"usePublic": true,
"groupIds": [],
"algorithm": "random",
"defaultGroupId": null
},
"proxyProtocol": null,
"proxyAddress": null,
"proxyPort": null,
"proxyUsername": null,
"proxyPassword": "",
"certificates": null
}
...
]
Request Monitor Statistics
Method:
GET
Request:
GET /statistics
Response:
[
{
"timestamp": "2020-01-20T14:48:00+02:00",
"monitors": [
{
"id": 29,
"name": "A good monitor, always successful"
},
{
"id": 27,
"name": "Sometimes failing, sometimes slow monitor"
}
],
"locations": [
{
"id": 23,
"name": "alpha 2c [CANet, DebJessie]"
149

DX App Synthetic Monitor SaaS
},
{
"id": 33,
"name": "alpha 3c [AWS, DebJessie]"
},
{
"id": 22,
"name": "alpha 2b [CANet, DebJessie]"
},
{
"id": 21,
"name": "alpha 2a [CANet, DebJessie]"
},
{
"id": 32,
"name": "alpha 3b [AWS, DebJessie]"
},
{
"id": 12,
"name": "alpha 1b [CANet, DebJessie]"
},
{
"id": 11,
"name": "alpha 1a [CANet, DebJessie]"
},
{
"id": 31,
"name": "alpha 3a [AWS, DebJessie]"
},
{
"id": 13,
"name": "alpha 1c [CANet, DebJessie]"
}
],
"metrics": {
"probes": 78,
"probe_ok": 62,
"probe_errors": 16,
"checks": 77,
"check_errors": 16,
"checks_maint": 0,
"maint_errors": 0,
"rtime": 31,
"ctime": 50,
"ptime": 53,
"dtime": 1105,
"rtime_ok": 30,
"ctime_ok": 45,
"ptime_ok": 49,
"dtime_ok": 904,
"dsize": 369,
"dev_rtime": 124.97864117322969,
"dev_ctime": 24.144194816285733,
150

DX App Synthetic Monitor SaaS
"dev_ptime": 22.81010998846198,
"dev_dtime": 1583.5679844808415,
"dev_dsize": 35.24890362976702,
"xtime": 1052,
"xtime_ok": 855,
"xspeed": 351,
"upstatus": 2,
"perfstatus": 0,
"score": 70.23076923076923,
"spi_score": 948.3225806451613,
"spi_penalty": 2051.2820512820513,
"uptime": 79.22077922077922,
"downtime": 20.77922077922078,
"ttime": 1185,
"ttime_ok": 978,
"dspeed": 0,
"slawarn": 61.53846153846154,
"slapoor": 71.7948717948718,
"apdex": 0.7051282051282052
}
}
]
NOTE
The most important are "checks" and "check_errors"
Request a Log of Monitor Checks
Method:
DELETE
Request:
GET /log
Example:
GET /log
monitor=[comma-separated monitor IDs]
from=[ISO 8601 date, eg. "2020-01-30T01:23:45+06:00"]
to=[dtto, default now]
curl -X GET "https://api.asm.saas.broadcom.com/v3/log?
monitor=27,29&from=2020-01-20T14%3A48%3A00%2B02%3A00&extended=false&limit=20" -H "accept: application/json" -
H "Authorization: Bearer e5+tvvb33I2kfJp3s1bmG79BaniBKGShil8rpiuaK4o="
Example:
GET /log
Response:
[
{
"id": "2b78f340-442f-11ea-89e5-4308079a2aa4",
"monitor": {
151

DX App Synthetic Monitor SaaS
"id": 29,
"name": "A good monitor, always successful"
},
"location": {
"id": null,
"name": "alpha 1a [CANet, DebJessie]"
},
"start": "2020-01-31T13:39:57+00:00",
"monitor_type": "http",
"result": {
"code": 0,
"description": "All 1 checks OK",
"type": "unscheduled"
},
"metrics": {
"rtime": 509,
"ctime": 39,
"ptime": 44,
"dtime": 44,
"dsize": 341
},
"assets": []
}
...
]
Event Stream API
Event Stream is a preferred alternative to API endpoints rule_log (API 1.6) and /log (APIv3) for use cases where the client
consumes a live feed of Monitor Probe results (events). The advantage is that the stream sends events in near-real-time
and there is no need for repeated polling of the API.
Prerequisites
Ensure that you understand the following prerequisites:
•
Accessibility:
–
Only the master account can access an event stream.
–
Sub-accounts cannot run the API.
–
Connection by sub-account results in 403 error.
–
The stream is always read-only.
•
Authentication:
–
A valid API Token. For more information, see Create an API Token and Authorize Using API Token sections in the
Using Swagger API in DX ASM article.
–
A HTTP client and a JSON parser that supports line-delimited JSON streams. For example, Jackson.
Event Stream API - Usage
Method:
GET
Request:
152

DX App Synthetic Monitor SaaS
GET https://stream.asm.saas.broadcom.com/events?[from=<UUID>][&monitor=<monitor names or IDs>][&folder=<folder
names or IDs>][&location=<location names or IDs>][&status=<error|confirmed_error>]
•
monitor, folder - comma-separated IDs or names. Receive events from any of the listed monitors and from monitors
contained in any of the listed folders. If both are omitted, receive events from all active monitors of the current account.
Valid IDs can be obtained from /monitors or /folders API endpoints.
•
location - comma-separated IDs or names. Receive events produced on any of the listed locations. If omitted, receive
events produced on any location. Valid IDs can be obtained from /locations/leaf/all API endpoints.
•
status - receive events with a given result type. If omitted, receive events with any type of result.
–
confirmed_error - receive only events where the result is a confirmederror.
–
error - receive events where the result is either a confirmed or unconfirmed error.
•
from - receive all events produced after the event with the specified ID. If omitted, start from the first event produced
after the connection is established.
NOTE
•
You must add a request header X-Asm-Auth: containing a valid API token.
•
Enable compression by supplying a Accept-Encoding: gzip header.
Response
An endless stream of text in the JSON Lines format. Each line of text is delimited by a Line Feed character forms a
separate event object.
The format of an event object, as used both in Event Stream API and APIv3, is declared in the OpenAPI definition as #/
components/schemas/LogEvent.
Events are ordered by the time of their insertion into the stream. This is different from rule_log and /log API endpoints
where Events are ordered by the start time of the probe request.
Availability
Store the id of the last received event. In case the client gets disconnected from the event stream, it can reconnect using
the parameter from=<last_good_event_id> . This way no events is lost. The stream retains events for at least one
hour before discarding them.
Monitor List Search
The search function in the monitors page enables you to search for specific monitors and search by type and by status.
Perform the following steps to search the monitors and folders.
1. To get the list of monitors page, select Monitors from the MONITORING menu.
2. Enter the search criteria in the search field.
The search feature completes a full-text search of all visible fields on the monitors table, including:
–
names of the monitors and folders
–
tags
–
type of the monitors (http, Firefox, script, and others)
–
alerting contact names (including (none))
–
monitor limits (for example, 5 MB, 1′, and others)
–
all descriptions (for example, description indicating number of monitors in the folder "two monitors")
Search Monitor Options
153

DX App Synthetic Monitor SaaS
You can use the special search expressions to find monitors and folders that are based on the type or status. The
following table lists the various search options, search expressions, and their meaning:
Search Options
Supported Search
Expression
Description
status:maintenance Show monitors in the maintenance mode. Do not schedule my monitors in
maintenance.
status:inactive Show inactive monitors
status:active Show active monitors
status:error Show monitors with errors
status:ok show monitors in OK status (not failing)
Monitor by status
status:unhealthy Show monitors with an insufficient number of monitoring stations
scheduler:seq Searches monitor synchronously and display them
scheduler:async-seq Searches monitors asynchronously sequential
scheduler:multi show monitors scheduled in parallel (special monitor mode available on-
demand only)
Monitor by schedule type
scheduler:async-multi show monitors running asynchronously ana in parallel mode
Monitor by ID id:<monitor_id> Searches the monitors by their monitor id. For example, id:123
Monitor by host host:<host_name> Searches the monitor by hostname. For example, host:www.example.com
alerting:on Searches the monitor for which alerting is enabled (disregarding folder
alerting status, an older status, and monitor status)
alerting:off Searches the monitor for which alerting is disabled (disregarding folder
alerting status, an older status, and monitor status)
alerting:active Searches the monitors for which alerting is enabled (both monitor and
folder) AND monitor is running, you can expect notifications
alerting:inactive Searches the monitors for which alerting is disabled (both monitor and
folder) AND monitor is running, you can expect notifications
Monitor by alerting status
alerting:blocked Searches the monitors that are running but notifications cannot be sent
because either monitor or folder have notifications disabled or alert contact
is missing
folder:active Show active folders
folder:inactive Show inactive folders
folder:ok show folders where no monitors are failing
folder:error Show folders with errors
folder:empty Show empty folders
Folder by status
folder:nonempty Show non-empty folders
Search Considerations
You must note and follow the following special rules or considerations while using the search expressions:
154

DX App Synthetic Monitor SaaS
•
These special expressions are not translated to other languages.
•
Monitors are categorized in folders and monitors without this context might be hard to find. Folders that contain one or
more monitors passing the search expressions are also displayed. Results meeting the search criteria are highlighted
yellow in the monitor list.
•
When highlighting is an active selection, checkboxes behave with specific conditions.
•
The function of checkboxes for selecting monitors and folders is modified when a search filter is active. All selected
elements are clearly visible. If a search filter is applied or amended, the following conditions apply:
–
All items that do not meet the search criteria are unchecked automatically.
–
If a folder is checked, only the elements that meet the search criteria within that folder are selected.
–
The Select all checkbox selects monitors that meet the search criteria but does not select folders.
Schedule Maintenance
You can tell ASM when your services are down for scheduled maintenance. ASM then does not return false service
availability errors. When the services are scheduled for maintenance, ASM monitoring stations still run the checks. In the
monitor log, the check is recorded with the result in maintenance. Postmortem checks will not be performed for monitors in
maintenance.
NOTE
Contact Broadcom Support to disable the monitor checks at the user level (not per monitor) during the
maintenance window.
Create a maintenance window that includes the time windows of scheduled maintenance and the group of affected
monitors.
Consideration for Daylight Saving Time (DST)
Although customers enter the start time and end time of the maintenance windows, ASM always translates this to start
time after midnight (for example, start 2 hours after midnight) and duration of the time window. In most cases, such
specification does not make any difference. The only exception is when there is a DST switch during the maintenance
period. In such cases, the length of the time window is preserved but the customer time zone can seem to be one hour
shorter or longer. Usually, the time window for the maintenance is fine-tuned for some operation (backup, upgrade, and so
on.) and it usually needs a constant amount of time. The reason for this "translation" is that the customer timezone is not
suitable for the specification as in some cases the time value is not unique or it does not exist at all.
NOTE
Example 1: The maintenance window starts at 1 a.m. and ends at 2:30 a.m. During the DST switch to the
summertime, the 2:30 a.m. value is skipped and such time doesn't exist at all. During the DST switch to the
wintertime, 2:30 a.m. occurs twice that day. ASM always starts the MW one hour after midnight, i.e. at 1 a.m.
local time and the duration is 1 hour and 30 minutes. Thus, the end is:
•
at 2:30 a.m. local time: anytime except the days when the DST switch occurs
•
at 2:30 a.m. local time (the first time this time occurs) the day when time is switched from the summertime to
the wintertime (clock pushed 1 hour back)
•
at 3:30 a.m. local time the day when time is switched from the wintertime to the summertime (clock pushed 1
hour forwards)
NOTE
Example 2: The maintenance window starts at 5 a.m and ends at 5:30 a.m. The start is always 5 hours after
midnight, that is,
155

DX App Synthetic Monitor SaaS
•
at 5 a.m. local time: anytime except the days when the DST switch occurs
•
at 4 a.m. local time the day when time is switched from the summertime to the wintertime (clock pushed 1
hour back)
•
at 6 a.m. local time the day when time is switched from the wintertime to the summertime (clock pushed 1
hour forwards)
Both these examples describe recurring windows only - the MW is specified for some ordinary day but the recurring
maintenance coincides with the DST switch. For fixed MWs, even if the DST switch is included, the start and end date
correspond with the values entered by the user.
Create a Maintenance Window
You can schedule one-off and regular recurring maintenance periods which affect one or more monitors in a maintenance
window. Create the maintenance window with a name. Add time windows that specify when the maintenance is ongoing.
Add the monitors that are affected.
From 10.3, you can create a maintenance window without time windows in it. Such empty windows are called Persistent
Maintenance window. You can then grant permission to the subaccount to create time windows as per their needs. With
this option, you can continue to see the maintenance window even after the time window expires.
Follow these steps:
1. In the ASM Dashboard select Monitoring, Maintenance, Create Window.
2. Provide a name for the maintenance window.
3. Select the Persistent checkbox, to create an empty maintenance window.
4. Add one or more time windows.
5. Specify when the maintenance is ongoing.
6. From the list of monitors, select all monitors that are affected by this maintenance.
7. Select Save.
The Maintenance window is saved and appears in the Maintenance Windows section of the page.
Add, Remove, or Edit Time Windows in a Maintenance Window
Make changes to when the maintenance is scheduled by adding, removing, or modifying existing time windows in the
maintenance window.
Add a Time Window
Follow these steps:
1. In Settings, select Maintenance.
2. Select the title of the maintenance window and select the Edit icon.
3. In the time window section, select Create New Window.
4. Complete the fields with the details of the new maintenance session.
5. Save the Time window and Maintenance window.
The details are saved and registered with your dashboard.
Edit a Time Window
Follow these steps:
1. In Settings, select Maintenance.
2. Select the title of the maintenance window and select the Edit icon.
3. Highlight the time window to change and select the Edit icon.
156

DX App Synthetic Monitor SaaS
4. Make the necessary changes.
5. Click Save.
The details are automatically saved and registered with your dashboard.
Remove a Time Window
Follow these steps:
1. In Settings, select Maintenance
2. Select the title of the maintenance window and select the Edit icon.
3. Highlight the time window to change and select the X icon.
4. Confirm deletion, when prompted.
Add or Remove Monitors from a Maintenance Window
You can change the settings of any Maintenance Window.
Follow these steps:
1. In Settings, select Maintenance
2. Select the title of the maintenance window and select the Edit icon.
Monitors registered in this maintenance window appear in the Scheduled section. Monitors that can be added to this
maintenance window appear in the Available section.
3. To add monitors to the window, highlight the required monitors in the Available section and select the + icon.
4. To remove monitors, highlight the required monitors in the Scheduled section and select the trash icon.
The changes are automatically saved and registered with your dashboard.
Schedule Maintenance for an Individual Monitor
You can add an individual monitor to a maintenance window in Monitor Settings.
Follow these steps:
1. In Monitors, select the cog icon next to the required monitor.
2. Scroll down to the Maintenance setting, open the drop-down, and select the name of the maintenance window to add
this monitor to.
3. Select Save.
The monitor is added to the maintenance list.
Remove a Maintenance Window
To remove a maintenance window, in Settings select Maintenance. Highlight the maintenance window to remove and
select the Settings icon and select Delete.
Immediate Maintenance
You can immediately put a monitor into maintenance immediately with the monitor settings.
Follow these steps:
1. In Settings, Monitors, select the title of the monitor you want to schedule for maintenance.
2. Select More Options and scroll down to the Maintenance Section.
3. Expand the Immediate Maintenance drop-down and select the duration of the maintenance period.
4. Select Save.
157

DX App Synthetic Monitor SaaS
The monitor is immediately placed in maintenance status. The monitor is returned to active status automatically at the end
of the period.
Set Maintenance with API
You can use a Public API call to set a simple maintenance window. With the API, you can specify when the maintenance
period starts and the duration of the period. For more information, see API Reference.
Manage Users in ASM
Define users and manage their access rights using permissions and roles. Provide user-profiles and roles with access to
specific folders and contacts in DX APP Synthetic Monitor.
Understand User Permissions and Roles
Use private permissions to grant user access to resource groups and folders. Effective permissions are the overall
permissions that apply to the user or folder. These permissions are calculated based on:
•
Private Permissions - access to a specific folder
•
All Folders - access to all folders in the folder hierarchy
•
User Roles - sets of permissions that can be assigned to multiple users
NOTE
•
A user can be a member of multiple roles. A role is a group of users that share responsibilities within your
organization.
•
Roles and users can also be given permissions on a folder level. Both users and roles can also get access to
all monitors, all contacts, or all maintenance windows.
The following examples show how effective permissions are calculated:
•
Example 1: 'Read' access to All monitor folders, 'Full access' to a sub-folder
The user has 'Read' access to All monitor folders. The private permission is set to 'Full access' on a sub-folder.
Result: The effective permission on the sub-folder is 'Read'. The user can open monitors from the sub-folder, but
cannot edit them.
•
Example 2: 'Read' access to All monitor folders, 'Full access' to a sub-folder, 'Full access' role
The user has 'Read' access to All monitor folders The private permission is set to 'Full access' on a sub-folder. The
role enables 'Full access' to the sub-folder.
Result: The effective permission on the sub-folder is 'Full access'. The user can edit the monitors in the sub-folders.
Create New User
Follow these steps:
1. Select Share access, Users and select Create user.
A new user form appears.
2. Enter the required information in the fields and select Create.
NOTE
•
All fields except Name and Email are pre-populated from the master account.
•
Sub-accounts (new users) do not have access to the custom reports that the master account can see.
These users can have access to Current status.
3. After you create the user, select the following tabs to perform further tasks:
158

DX App Synthetic Monitor SaaS
–
Login as user
–
Send activation e-mail again
–
Block/unblock user
–
Reset password
–
Unlock password
You created a user. You can now assign the user to maintenance window folders, Monitor folders, Roles, and alert contact
folders.
Assign User to Maintenance Window Folders
Assign a user to maintenance window folders.
Follow these steps:
1. On the Users page, select a user or select Edit to access the user maintenance settings.
2. Select Maintenance windows.
A list of maintenance windows and folders appears.
3. To change the privacy permissions for the user, mouse over the folder row and select Edit. Select one of the following
permissions:
•
Full access
•
Read
•
No access
4. To assign access to the maintenance window folder within a role, open a maintenance window folder from the list
and select Roles. Select one or more roles from the list, mouse over the role row, and select Edit. Select one of the
following private permissions:
–
Full access
–
Read
–
No access
5. To assign access to maintenance window for specific users, open a maintenance window folder from the list and
select Users. Select one or more users from the list, mouse over the user row, and select Edit. Select one of the
following private permissions:
–
Full access
–
Read
–
No access
Assign User to Monitor Folders
Assign a user to specific Monitor folders.
Follow these steps:
1. Select a user and select Monitor folders.
A list of Monitor folders appears.
2. (Optional) To create a Monitor folder, go to Monitoring, Monitors and select Add Folder.
3. To change the privacy permissions for the role, mouse over the folder row and select Edit. Select one of the following
permissions:
•
Full accessLets the user access and edit Monitors from the folder
•
ReadGrants the user read-only access to Monitors from the folder
•
Read graphs and logsGrants the user read-only access to the graphs and logs from the associated Monitors
•
No accessBlocks the user from accessing Monitors in the folder
159

DX App Synthetic Monitor SaaS
4. To assign access to a Monitor folder within a role, open a Monitor folder from the list and select Roles. Select roles
from the list, mouse over the role row, and select Edit. Select one of the following private permissions:
–
Full access
–
Read
–
No access
5. To assign access to a Monitor folder for specific users, select Users. Select one or more users from the list, mouse
over the user row, and select Edit. Select one of the following private permissions:
–
Full access
–
Read
–
No access
Assign User to Role
Assign a user to a role.
Follow these steps:
1. Select a user and select Roles.A list of Roles appears.
2. To assign the user to a role, select Is member.
NOTE
You can assign a user to more than one role. Roles can have multiple users who are assigned to them.
Assign User to Alert Contact
Create alert contacts, organize your contacts in folders and groups, and assign users and roles access to these folders.
Follow these steps:
1. Select on a user and select Contacts.
A list of contact folders appears.
2. Select Create Contact to add a new contact.
3. Select Create Folder to organize your contacts in folders.
4. To assign access to a contact folder within a role, open a contact folder from the list and select Roles. Select roles
from the list, mouse over the role row, and select Edit. Select one of the following private permissions:
–
Full access
–
Read
–
No access
5. To assign access to a contact folder for specific users, select Users. Select one or more users from the list, mouse
over the user row, and select Edit. Select one of the following private permissions:
–
Full access
–
Read
–
No access
NOTE
For more information, see Configure DX APP Synthetic Monitor
Create New User Role
Follow these steps:
1. Go to Share access, Roles and select Create role.
2. Type a name and select Create.
A new role form appears.
160

DX App Synthetic Monitor SaaS
3. Under Maintenance windows, assign maintenance windows to the role by searching and selecting the relevant
folders.
4. To change private permissions to the maintenance window folders, mouse over the folder row and select Edit. Select
one of the following permissions:
–
Full access
–
Read
–
No access
5. Under Monitor folders, assign Monitor folders by searching and selecting the relevant folders.
6. To change private permissions to the Monitor folder, mouse over the folder row and select Edit. Select one of the
following permissions:
–
Full access
–
Read
–
Read graphs and logs
–
No access
7. Under Members, organize roles by selecting Is Member.
You created a role. You can now assign the role to maintenance window folders, Monitor folders, other roles, and alert
contact folders.
Grant and Revoke Administrator Access
To grant or revoke a user administrator access, edit the user and select the Grant parent impersonation or Revoke
parent impersonation option as required. For more information about administrator access, see KB000120648.
161

DX App Synthetic Monitor SaaS
Error Messages
All the error messages that are related to DX APP Synthetic Monitor are categorized by the monitors where you encounter
the error message. The same error code can mean something else based on the monitor type. Negative numbers
represent 'internal errors' that only applies to OnPremise monitoring.
•
Cbot
•
Dns
•
Dnsa
•
Dnsns
•
Domain
•
Fpm_new
•
Fpm_old
•
Generic
•
Imap_pop3
•
Jmeter
•
Ping
•
Ping6
•
Traceroute
•
Webdriver
Following are all the error codes and their respective descriptions.
Error Code: -97
Checkpoint unavailable – No response
The monitoring station could not be reached. The tunnel for the OnPremise station is down or not working properly.
Error Code: -95
Checkpoint unavailable – Checkpoint down or incomplete response
The monitoring station received the request but, the response received was either unexpected or the response was an
error code indicating a problem with one of the checker modules on that station.
Error Code: -94
Checkpoint unavailable – Timed out.
The monitoring station received the request but no response from the monitor checker was received.
Error Code: -92
Checkpoint unavailable – General Failure.
Internal error code.
Error Code: -90
Execution of this check was skipped. The account is configured not to execute any monitors which are in maintenance.
Error Code: 1
Posix Operation is not permitted (EPERM) - Posix error code
Error Code: 2
Posix No such file or directory (ENOENT) - Posix error code
162

DX App Synthetic Monitor SaaS
Error Code: 3
Posix No such process (ESRCH) - Posix error code
Error Code: 4
Posix Interrupted system call (EINTR) - Posix error code
Error Code: 5
Posix Inputoutput error (EIO) - Posix error code
Error Code: 6
Posix Device not configured (ENXIO) - Posix error code
Error Code: 7
Posix Argument list too long (E2BIG) - Posix error code
Error Code: 8
Posix Exec format error (ENOEXEC) - Posix error code
Error Code: 9
Posix Bad file descriptor (EBADF) - Posix error code
Error Code: 10
Posix Operation not permitted (EPERM) - Posix error code
Error Code: 11
Posix Resource deadlock avoided (EDEADLK) - Posix error code
Error Code: 12
Posix Cannot allocate memory (ENOMEM) - Posix error code
Error Code: 13
Posix Permission denied (EACCES) - Posix error code
Error Code: 14
Posix Bad address (EFAULT) - Posix error code
Error Code: 15
Posix Block device required (ENOTBLK) - Posix error code
Error Code: 16
Posix Device busy (EBUSY) - Posix error code
Error Code: 17
Posix File exists (EEXIST) - Posix error code
Error Code: 18
Posix Cross-device link (EXDEV) - Posix error code
Error Code: 19
Posix Operation not supported by device (ENODEV) - Posix error code
Error Code: 20
163

DX App Synthetic Monitor SaaS
Posix No such file or directory (ENOENT) - Posix error code
Error Code: 21
Posix Is a directory (EISDIR) - Posix error code
Error Code: 22
Posix Invalid argument (EINVAL) - Posix error code
Error Code: 23
Posix Too many open files in system (ENFILE) - Posix error code
Error Code: 24
Posix Too many open files (EMFILE) - Posix error code
Error Code: 25
Posix Inappropriate ioctl for device (ENOTTY) - Posix error code
Error Code: 26
Posix Text file busy (ETXTBSY) - Posix error code
Error Code: 27
Posix File too large (EFBIG) - Posix error code
Error Code: 28
Posix No space left on device (ENOSPC) - Posix error code
Error Code: 29
Posix Illegal seek (ESPIPE) - Posix error code
Error Code: 30
Posix No such process (ESRCH) - Posix error code
Error Code: 31
Posix Too many links (EMLINK) - Posix error code
Error Code: 32
Posix Broken pipe (EPIPE) - While the checker was sending data, the server being checked closed the connection. The
(confusing) term 'broken pipe' was inherited from the Unix domain (Posix error code).
Error Code: 33
Posix Numerical argument out of domain (EDOM) - Posix error code
Error Code: 34
Posix Result too large (ERANGE) - Posix error code
Error Code: 35
Posix Resource temporarily unavailable (EAGAIN) - Posix error code
Error Code: 36
Posix Operation now in progress (EINPROGRESS) - Posix error code
Error Code: 37
Posix Operation already in progress (EALREADY) - Posix error code
164

DX App Synthetic Monitor SaaS
Error Code: 38
Posix Socket operation on non-socket (ENOTSOCK) - Posix error code
Error Code: 39
Posix Destination address required (EDESTADDRREQ) - Posix error code
Error Code: 40
Posix Message too long (EMSGSIZE) - Posix error code
Error Code: 41
Posix Protocol wrong type for socket (EPROTOTYPE) - Posix error code
Error Code: 42
Posix Protocol not available (ENOPROTOOPT) - Posix error code
Error Code: 43
Posix Protocol not supported (EPROTONOSUPPORT) - Posix error code
Error Code: 44
Posix Socket type not supported (ESOCKTNOSUPPORT) - Posix error code
Error Code: 45
Posix Operation not supported (ENOTSUP) - Posix error code
Error Code: 46
Posix Protocol family not supported (EPFNOSUPPORT) - Posix error code
Error Code: 47
Posix Address family not supported by protocol family (EAFNOSUPPORT) - Posix error code
Error Code: 48
Posix Address already in use (EADDRINUSE) - Posix error code
Error Code: 49
Posix Can't assign requested address (EADDRNOTAVAIL) - Posix error code
Error Code: 50
Posix Network is down (ENETDOWN) - Posix error code
Error Code: 51
Posix Network is unreachable (ENETUNREACH) - Posix error code
Error Code: 52
Posix Network dropped connection on reset (ENETRESET) - Posix error code
Error Code: 53
Posix Software caused connection abort (ECONNABORTED) - Posix error code
Error Code: 54
Posix Connection reset by peer (ECONNRESET) - Posix error code
Error Code: 55
165

DX App Synthetic Monitor SaaS
Posix No buffer space available (ENOBUFS) - Posix error code
Error Code: 56
Posix Socket is already connected (EISCONN) - Posix error code
Error Code: 57
Posix Socket is not connected (ENOTCONN) - Posix error code
Error Code: 58
Posix Can't send after socket shutdown (ESHUTDOWN) - Posix error code
Error Code: 59
Posix Too many references: can't splice (ETOOMANYREFS) - Posix error code
Error Code: 60
Posix Operation timed out (ETIMEDOUT) - Posix error code
Error Code: 61
Posix Connection refused (ECONNREFUSED) - Posix error code
Error Code: 62
Posix Too many levels of symbolic links (ELOOP) - Posix error code
Error Code: 63
Posix File name too long (ENAMETOOLONG) - Posix error code
Error Code: 64
Posix Host is down (EHOSTDOWN) - Posix error code
Error Code: 65
Posix No route to host (EHOSTUNREACH) - Posix error code
Error Code: 66
Posix Directory not empty (ENOTEMPTY) - Posix error code
Error Code: 67
Posix Too many processes (EPROCLIM) - Posix error code
Error Code: 68
Posix Too many users (EUSERS) - Posix error code
Error Code: 69
Posix Disc quota exceeded (EDQUOT) - Posix error code
Error Code: 70
Posix Stale NFS file handle (ESTALE) - Posix error code
Error Code: 71
Posix Too many levels of remote in path (EREMOTE) - Posix error code
Error Code: 72
Posix RPC struct is bad (EBADRPC) - Posix error code
166

DX App Synthetic Monitor SaaS
Error Code: 73
Posix RPC version wrong (ERPCMISMATCH) - Posix error code
Error Code: 74
Posix RPC prog. not avail (EPROGUNAVAIL) - Posix error code
Error Code: 75
Posix Program version wrong (EPROGMISMATCH) - Posix error code
Error Code: 76
Posix Bad procedure for program (EPROCUNAVAIL) - Posix error code
Error Code: 77
Posix No locks available (ENOLCK) - Posix error code
Error Code: 78
Posix Function not implemented (ENOSYS) - Posix error code
Error Code: 79
Posix Inappropriate file type or format (EFTYPE) - Posix error code
Error Code: 80
Posix Authentication error (EAUTH) - Posix error code
Error Code: 81
Posix Need authenticator (ENEEDAUTH) - Posix error code
Error Code: 82
Posix Device power is off (EPWROFF) - Posix error code
Error Code: 83
Posix Device error, e.g. paper out (EDEVERR) - Posix error code
Error Code: 84
Posix Value too large to be stored in data type (EOVERFLOW) - Posix error code
Error Code: 85
Posix Bad executable (EBADEXEC) - Posix error code
Error Code: 86
Posix Bad CPU type in executable (EBADARCH) - Posix error code
Error Code: 87
Posix Shared library version mismatch (ESHLIBVERS) - Posix error code
Error Code: 88
Posix Malformed Macho file (EBADMACHO) - Posix error code
Error Code: 89
Posix Operation canceled (ECANCELED) - Posix error code
Error Code: 100
167

DX App Synthetic Monitor SaaS
Posix No child processes (ECHILD) - Posix error code
Error Code: 101
http Switching Protocols - HTTP status code
Error Code: 104
http Connection reset by peer
Error Code: 110
http Connection timed out
Error Code: 111
Couldn't connect to host
Error Code: 113
Couldn't connect to host
Error Code: 115
http Operation now in progress
Error Code: 200
Posix Not a directory (ENOTDIR) - Posix error code
Error Code: 201
http Created - HTTP status code
Error Code: 202
http Accepted - HTTP status code
Error Code: 203
http Non-Authoritative Information - HTTP status code
Error Code: 204
http No Content - HTTP status code
Error Code: 205
http Reset Content - HTTP status code
Error Code: 206
http Partial Content - HTTP status code
Error Code: 300
Posix Read-only file system (EROFS) - Posix error code
Error Code: 301
http Moved Permanently - HTTP status code
Error Code: 302
http Found - HTTP status code
Error Code: 303
http See Other - HTTP status code
168

DX App Synthetic Monitor SaaS
Error Code: 304
http Not Modified - HTTP status code
Error Code: 305
http Use Proxy - HTTP status code
Error Code: 307
http Temporary Redirect - HTTP status code
Error Code: 400
http Bad Request - HTTP status code
Error Code: 401
http Unauthorized, Access Denied - HTTP status code
Error Code: 402
http Payment Required - HTTP status code
Error Code: 403
http Forbidden - HTTP status code
Error Code: 404
http Not Found - HTTP status code
Error Code: 405
http Method Not Allowed - HTTP status code
Error Code: 406
http Not Acceptable - HTTP status code
Error Code: 407
http Proxy Authentication Required - HTTP status code
Error Code: 408
http Request Time-out - HTTP status code
Error Code: 409
http Conflict - HTTP status code
Error Code: 410
http Gone - HTTP status code
Error Code: 411
http Length Required - HTTP status code
Error Code: 412
http Precondition Failed - HTTP status code
Error Code: 413
http Request Entity Too Large - HTTP status code
Error Code: 414
169

DX App Synthetic Monitor SaaS
http Request-URI Too Large - HTTP status code
Error Code: 415
http Unsupported Media Type - HTTP status code
Error Code: 416
http Requested range not satisfiable - HTTP status code
Error Code: 417
http Expectation Failed - HTTP status code
Error Code: 500
http Internal Server Error - HTTP status code
Error Code: 501
http Not Implemented - HTTP status code
Error Code: 502
http Bad Gateway / Proxy Error - HTTP status code
Error Code: 503
http Service Unavailable / Server capacity reached - HTTP status code
Error Code: 504
http Gateway Time-out - HTTP status code
Error Code: 505
http HTTP Version not supported - HTTP status code
Error Code: 530
http Login incorrect.
Error Code: 1000
http Continue - HTTP status code
Error Code: 1001
all syntax error. Missing, misspelled, or superfluous parameter.
Error Code: 1002
undefined name or id. Reference to an undefined object (or an object outside of the scope of the account.)
Error Code: 1003
account limit exceeded
Error Code: 1004
database error.An error was encountered accessing the CA Cloud Monitor databases
Error Code: 1005
duplicate entry. A name or email address is used and an object of the same type already exists with that name
Error Code: 1006
upgrade account. Adding a monitor, contact, or other object that does not fit in the current subscription. For example,
adding a script monitor and the subscription only covers an http(s) monitor
170

DX App Synthetic Monitor SaaS
Error Code: 1007
not yours (anymore). When referring to a session that does not match to your IP address. Log in again.
Error Code: 1008
session expired. After 15 minutes of inactivity (no calls to the API with the current session key). Use acct_noop to keep
the session alive.
Error Code: 1009
insufficient credits. Not enough credits of the given type
Error Code: 1010
messaging error. When an error occurs in the underlying messaging systems: SMS or email gateway failure
Error Code: 1011
undefined result.
Error Code: 1012
cannot perform that operation.
Error Code: 1013
Illegal parameter value Misspelled parameter value or wrong syntax or type
Error Code: 1014
TOS TOS restriction
Error Code: 1015
unconfirmed address Using an address (contact) not confirmed by the owner yet. Typically a GSM phone or pager. An
activation code sent to that address earlier is supplied first.
Error Code: 1016
contact helpdesk first Using a feature for which contact to the helpdesk or prepayment is needed first
Error Code: 1042
Timeout of monitor sequence - The complete check could not be performed within the maximum time limit and the
checker was terminated.
Error Code: 1043
Rbm. Plugin did not return status. Your plugin should at least return a 'status=' line
Error Code: 1044
Rbm. Timeout while connecting
Error Code: 1045
Rbm. Timeout during negotiation
Error Code: 1046
Rbm. Timeout during transfer
Error Code: 1047
Rbm. Timeout after redirect
Error Code: 1060
171

DX App Synthetic Monitor SaaS
Rbm Over allotted bandwidth per check
Error Code: 2000
http OK - HTTP status code
Error Code: 3000
http Multiple Choices - HTTP status code
Error Code: 6001
Soup Cancelled
Error Code: 6002
Soup Cannot resolve hostname
Error Code: 6003
Soup Cannot resolve proxy hostname
Error Code: 6004
Soup Cannot connect to destination
Error Code: 6005
Soup Cannot connect to proxy
Error Code: 6006
Soup SSL handshake failed
Error Code: 6007
Soup Connection terminated unexpectedly
Error Code: 6008
Soup Message Corrupt
Error Code: 6009
Soup Too many redirects
Error Code: 6100
Soup Continue
Error Code: 6101
Soup Switching Protocols
Error Code: 6102
Soup Processing
Error Code: 6200
Soup OK
Error Code: 6201
Soup Created
Error Code: 6202
Soup Accepted
172

DX App Synthetic Monitor SaaS
Error Code: 6203
Soup Non-Authoritative Information
Error Code: 6204
Soup No Content
Error Code: 6205
Soup Reset Content
Error Code: 6206
Soup Partial Content
Error Code: 6207
Soup Multi-Status
Error Code: 6300
Soup Multiple Choices
Error Code: 6301
Soup Moved Permanently
Error Code: 6302
Soup Found
Error Code: 6303
Soup See Other
Error Code: 6304
Soup Not Modified
Error Code: 6305
Soup Use Proxy
Error Code: 6307
Soup Temporary Redirect
Error Code: 6400
Soup Bad Request
Error Code: 6401
Soup Unauthorized
Error Code: 6402
Soup Payment Required
Error Code: 6403
Soup Forbidden
Error Code: 6404
Soup Not Found
Error Code: 6405
173

DX App Synthetic Monitor SaaS
Soup Method Not Allowed
Error Code: 6406
Soup Not Acceptable
Error Code: 6407
Soup Proxy Authentication Required
Error Code: 6408
Soup Request Timeout
Error Code: 6409
Soup Conflict
Error Code: 6410
Soup Gone
Error Code: 6411
Soup Length Required
Error Code: 6412
Soup Precondition Failed
Error Code: 6413
Soup Request Entity Too Large
Error Code: 6414
Soup Request-URI Too Long
Error Code: 6415
Soup Unsupported Media Type
Error Code: 6416
Soup Requested Range Not Satisfiable
Error Code: 6417
Soup Expectation Failed
Error Code: 6422
Soup Unprocessable Entity
Error Code: 6423
Soup Locked
Error Code: 6424
Soup Failed Dependency
Error Code: 6500
Soup Internal Server Error
Error Code: 6501
Soup Not Implemented
174

DX App Synthetic Monitor SaaS
Error Code: 6502
Soup Bad Gateway
Error Code: 6503
Soup Service Unavailable
Error Code: 6504
Soup Gateway Timeout
Error Code: 6505
Soup HTTP Version Not Supported
Error Code: 6506
Soup Insufficient Storage
Error Code: 6510
Soup Not Extended
Error Code: 7000
Script Script returned no errors
Error Code: 7001
Script Script returned one error
Error Code: 7002
Script Script returned 2 errors
Error Code: 7003
Script Script returned 3 errors
Error Code: 7004
Script Script returned 4 errors
Error Code: 7005
Script Script returned 5 errors
Error Code: 7006
Script Script returned 6 errors
Error Code: 7007
Script Script returned 7 errors
Error Code: 7008
Script Script returned 8 errors
Error Code: 7009
Script Script returned 9 errors
Error Code: 7010
Script Script returned 10 or more errors
Error Code: 7011
175

DX App Synthetic Monitor SaaS
Script Operation timed out
Error Code: 7013
Script Failed to execute script
Error Code: 7014
Script No assertions defined
Error Code: 7015
Script Bandwidth limit exceeded
Error Code: 7016
Script Request limit exceeded
Error Code: 7017
Script Unsupported scripting feature used
Error Code: 7018
Script Could not decode SSL certificates
Error Code: 7019
Read timed out
Error Code: 7020
Script Script result contains invalid XML
Error Code: 7021
Script Script did not perform any requests
Error Code: 7022
Script Script result too large
Error Code: 7023
Script Failed to execute script
Error Code: 7100
Number of hops exceeded
Error Code: 7101
Packets lost
Error Code: 7701
Message not found in mailbox
Error Code: 7702
Protocol error
Error Code: 8000
Dns Hostname unknown, DNS timeout. The name servers of this domain did not respond within the time limit of the
monitor test sequence, typically 10 seconds.
Error Code: 8001
Dns Unknown host - The hostname specified in the rule could not be converted to an IP address.
176

DX App Synthetic Monitor SaaS
Error Code: 8002
DNS Unknown host - The hostname specified in the rule could not be converted to an IP address. No response from
nameservers for this domain
Error Code: 8003
DNS Failed to resolve name servers
Error Code: 8004
DNS No response
Error Code: 8005
DNS Response not consistent
Error Code: 8006
DNS Nameserver error
Error Code: 8007
DNS UDP reply truncated
Error Code: 9000
General unspecified error in monitor module.
Error Code: 9001
Connect failed
Error Code: 9002
Could not retrieve response
Error Code: 9003
Operation timed out
Error Code: 9006
NS: xxx, expected: yyy - Mismatch between specified and retrieved name server
Error Code: 9007
Could not retrieve NS
Error Code: 9008
IP: xxx, expected: yyy - Mismatch between specified and retrieved IP address
Error Code: 9009
Could not retrieve IP address
Error Code: 9201
Curl Unsupported protocol. This build of curl has no support for this protocol.
Error Code: 9202
Curl Failed to initialize.
Error Code: 9203
Curl URL malformat. The syntax was not correct.
Error Code: 9204
177

DX App Synthetic Monitor SaaS
Curl URL user malformatted. The user-part of the URL syntax was not correct.
Error Code: 9205
Curl Couldn't resolve proxy. The given proxy host could not be resolved.
Error Code: 9206
Curl Couldn't resolve host. The given remote host was not resolved.
Error Code: 9207
Curl Failed to connect to host.
Error Code: 9208
Curl FTP weird server reply. The server sent data curl couldn't parse.
Error Code: 9209
Curl FTP access denied. The server denied login.
Error Code: 9210
Curl FTP user/password incorrect. Either one or both were not accepted by the server.
Error Code: 9211
Curl FTP weird PASS reply. Curl couldn't parse the reply sent to the PASS request.
Error Code: 9212
Curl FTP weird USER reply. Curl couldn't parse the reply sent to the USER request.
Error Code: 9213
Curl FTP weird PASV reply, Curl couldn't parse the reply sent to the PASV request.
Error Code: 9214
Curl FTP weird 227 format. Curl couldn't parse the 227-line the server sent.
Error Code: 9215
Curl FTP can't get host. Couldn't resolve the host IP we got in the 227-line.
Error Code: 9216
Curl FTP can't reconnect. Couldn't connect to the host we got in the 227-line.
Error Code: 9217
Curl FTP couldn't set binary. Couldn't change transfer method to binary.
Error Code: 9218
Curl Partial file. Only a part of the file was transferred.
Error Code: 9219
Curl FTP couldn't download/access the given file, the RETR (or similar) command failed.
Error Code: 9220
Curl FTP write error. The transfer was reported bad by the server.
Error Code: 9221
Curl FTP quote error. A quote command returned error from the server.
178

DX App Synthetic Monitor SaaS
Error Code: 9222
Curl HTTP page not retrieved. The requested url was not found or returned another error with the HTTP error code being
400 or above. This return code only appears if f/-fail is used.
Error Code: 9223
Curl Write error. Curl couldn't write data to a local filesystem or similar.
Error Code: 9224
Curl Malformed user. User name badly specified.
Error Code: 9225
Curl FTP couldn't STOR file. The server denied the STOR operation, used for FTP uploading.
Error Code: 9226
Curl Read error. Various reading problems.
Error Code: 9227
Curl Out of memory. A memory allocation request failed.
Error Code: 9228
Curl Operation timeout. The specified time-out period was reached according to the conditions.
Error Code: 9229
Curl FTP couldn't set ASCII. The server returned an unknown reply.
Error Code: 9230
Curl FTP PORT failed. The PORT command failed. Not all FTP servers support the PORT command, try doing a transfer
using PASV instead!
Error Code: 9231
Curl FTP couldn't use REST. The REST command failed. This command is used for resumed FTP transfers.
Error Code: 9232
Curl FTP couldn't use SIZE. The SIZE command failed. The command is an extension to the original FTP spec RFC 959.
Error Code: 9233
Curl HTTP range error. The range 'command' didn't work.
Error Code: 9234
Curl HTTP post error. Internal post-request generation error.
Error Code: 9235
Curl SSL connect error. The SSL handshaking failed.
Error Code: 9236
Curl FTP bad download resume. Couldn't continue an earlier aborted download.
Error Code: 9237
Curl FILE couldn't read file. Failed to open the file. Permissions?
Error Code: 9238
Curl LDAP cannot bind. LDAP bind operation failed.
179

DX App Synthetic Monitor SaaS
Error Code: 9239
Curl LDAP search failed.
Error Code: 9240
Curl Library not found. The LDAP library was not found.
Error Code: 9241
Curl Function not found. A required LDAP function was not found.
Error Code: 9242
Curl Aborted by callback. An application told curl to abort the operation.
Error Code: 9243
Curl Internal error. A function was called with a bad parameter.
Error Code: 9244
Curl Internal error. A function was called in a bad order.
Error Code: 9245
Curl Interface error. A specified outgoing interface could not be used.
Error Code: 9246
Curl Bad password entered. An error was signaled when the password was entered.
Error Code: 9247
Curl Too many redirects. When following redirects, curl hit the maximum amount.
Error Code: 9248
Curl Unknown TELNET option specified.
Error Code: 9249
Curl Malformed telnet option.
Error Code: 9251
Curl The remote peer's SSL certificate wasn't ok
Error Code: 9252
Curl The server didn't reply anything, which here is considered an error.
Error Code: 9253
Curl SSL crypto engine not found
Error Code: 9254
Curl Cannot set SSL crypto engine as default
Error Code: 9255
Curl Failed sending network data
Error Code: 9256
Curl Failure in receiving network data
Error Code: 9257
180

DX App Synthetic Monitor SaaS
Curl Share is in use (internal error)
Error Code: 9258
Curl Problem with the local certificate
Error Code: 9259
Curl Couldn't use specified SSL cipher
Error Code: 9260
Curl Problem with the CA cert (path? permission?)
Error Code: 9261
Curl Unrecognized transfer encoding
Error Code: 9262
Curl Invalid LDAP URL
Error Code: 9263
Curl Maximum file size exceeded
Error Code: 9501
Not matched (assertion failed)
Error Code: 9599
Not matched (no content)
Error Code: 9999
unsupported feature
Error Code: 10000
authentication error. The wrong credentials, blocked account, and more.
Error Code: 70190
Script A non-HTTP error occurred.
181
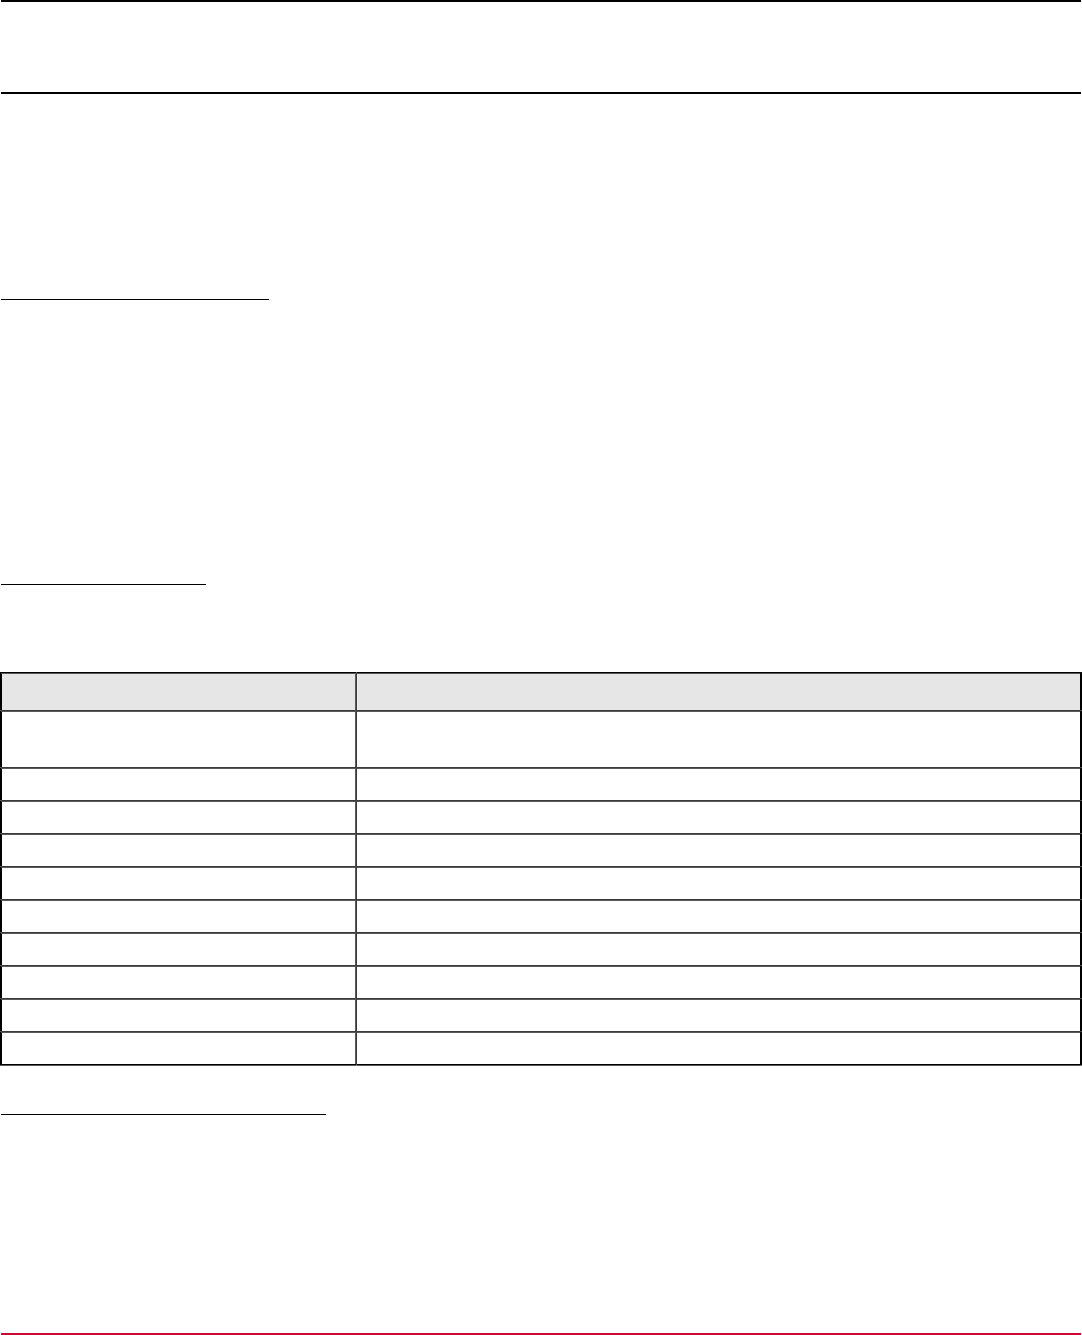
DX App Synthetic Monitor SaaS
Usage Data (Telemetry)
Telemetry is a foundational element of the Enterprise Software Portfolio License Agreement (PLA) model. The
initial requirement of the Telemetry effort is to collect and report the product-specific usage daily to support the new
consumption model. If your organization is a Broadcom customer under Enterprise Software PLA, you must enable
telemetry and must share the usage data. This article describes how to enable telemetry and route the usage data to
Usage Reporting Portal. For more information, see the Usage Reporting Portal section.
Data Collected By Telemetry
Telemetry collects two types of details for each PLA customer:
•
Customer data: This data identifies the customer and the customer site through the site ID. The data also includes an
optional Charge-back ID to identify the division or group to be charged for usage.
•
Usage data: The actual usage data based on the consumption is collected. You must enable the upload of the usage
data. For more information about the usage data that is collected, see the respective product documentation.
NOTE
Telemetry does not collect any personally identifiable information (PII) or sensitive information. For more
information about how your information is collected and used, read our privacy statement.
What Data We Collect
The usage data information is securely transmitted to Broadcom. The data includes the number of devices that are being
monitored. No Personally Identifiable Information (PII) covered under GDPR is transmitted.
Data Description
Instance ID Automatically generated string uniquely identifying customer's ASM account without
revealing any personal information (example: [email protected])
Site ID The Enterprise Support Site ID of the customer
Product SKU SKU Code for Basic or Advanced monitors
SKU Description Human-readable description of SKU
Product Version Current product version
PLA Enabled Flag Distinguishing customers on PLA contracts
Chargeback ID Free-format id for identifying subaccounts, if filled in by the customer
Domain Name The domain name part of the account's email address
Date Collected Date of usage data collection
Usage Usage metrics for the given SKU, see below.
How Usage Metrics are Calculated
The DX App Synthetic Manager metrics are calculated using the following.
Basic monitors calculation
182
DX App Synthetic Monitor SaaS
•
Each basic monitor running on a 10 minute frequency consumes 0.2 Devices. Basic monitors with frequencies that are
more than 10 minutes are equivalent to 10-minute frequency basic monitors.
•
Each basic monitor running on a 5 minute frequency consumes 0.4 Devices.
•
Each basic monitor running on a 1 minute frequency consumes 2 Devices.
•
All calculations are performed as floating points, and the sum of the pladevice count is rounded off to the next integer.
Inputs Multiplier
Constants
Calculation
Final
count pla multiplier multiplied value pladevice count
basic monitor >10 min freq 1 0.2 0.2 0.2
basic monitor 10 min freq 1 0.2 0.2 0.2
basic monitor 5 min freq 1 0.4 0.4 0.4
basic monitor 1 min freq 1 2 2 2
total pladevice count (round up) 3
Advanced monitors calculation
•
Each Advanced Monitor configured for a 5 minute frequency is counted as 2 Devices.
•
Each Advanced Monitor configured for a 15 minute frequency is counted as 0.5 Devices.
•
Each 5 minute Real Browser Monitor configured is counted as 2 Devices.
•
Each on-premise Real Browser Monitor configured is counted as 0.05 Devices.
•
All calculations are performed as floating points, and the sum of the pladevice count is rounded off to the next integer.
Inputs Multiplier
Constants
Calculation
Final
count pla multiplier multiplied value pladevice count
adv monitor 5 min freq 1 2 2 2
adv monitor 10 min freq 1 0.5 0.5 0.5
5 min real browser monitor 1 2 2 2
on-premise real browser monitor 1 0.05 0.05 0.05
total pladevice count (round up) 5
183

DX App Synthetic Monitor SaaS
Documentation Legal Notice
This Documentation, which includes embedded help systems and electronically distributed materials, (hereinafter referred
to as the “Documentation”) is for your informational purposes only and is subject to change or withdrawal by Broadcom
at any time. This Documentation is proprietary information of Broadcom and may not be copied, transferred, reproduced,
disclosed, modified or duplicated, in whole or in part, without the prior written consent of Broadcom.
If you are a licensed user of the software product(s) addressed in the Documentation, you may print or otherwise make
available a reasonable number of copies of the Documentation for internal use by you and your employees in connection
with that software, provided that all Broadcom copyright notices and legends are affixed to each reproduced copy.
The right to print or otherwise make available copies of the Documentation is limited to the period during which the
applicable license for such software remains in full force and effect. Should the license terminate for any reason, it is your
responsibility to certify in writing to Broadcom that all copies and partial copies of the Documentation have been returned
to Broadcom or destroyed.
TO THE EXTENT PERMITTED BY APPLICABLE LAW, BROADCOM PROVIDES THIS DOCUMENTATION “AS
IS” WITHOUT WARRANTY OF ANY KIND, INCLUDING WITHOUT LIMITATION, ANY IMPLIED WARRANTIES OF
MERCHANTABILITY, FITNESS FOR A PARTICULAR PURPOSE, OR NONINFRINGEMENT. IN NO EVENT WILL
BROADCOM BE LIABLE TO YOU OR ANY THIRD PARTY FOR ANY LOSS OR DAMAGE, DIRECT OR INDIRECT,
FROM THE USE OF THIS DOCUMENTATION, INCLUDING WITHOUT LIMITATION, LOST PROFITS, LOST
INVESTMENT, BUSINESS INTERRUPTION, GOODWILL, OR LOST DATA, EVEN IF BROADCOM IS EXPRESSLY
ADVISED IN ADVANCE OF THE POSSIBILITY OF SUCH LOSS OR DAMAGE.
The use of any software product referenced in the Documentation is governed by the applicable license agreement and
such license agreement is not modified in any way by the terms of this notice.
The check mark in a Circle design is the registered trademark of NortonLifeLock Inc. and is used under license therefrom.
The manufacturer of this Documentation is Broadcom Inc.
Provided with “Restricted Rights.” Use, duplication or disclosure by the United States Government is subject to the
restrictions set forth in FAR Sections 12.212, 52.227-14, and 52.227-19(c)(1) - (2) and DFARS Section 252.227-7014(b)
(3), as applicable, or their successors.
Copyright
©
2005–2024 Broadcom. All Rights Reserved. The term “Broadcom” refers to Broadcom Inc. and/or its
subsidiaries. All trademarks, trade names, service marks, and logos referenced herein belong to their respective
companies.
184