
Pega Offline Sync JMeter Framework
The Pega Offline Sync JMeter Framework offers the essential building blocks to construct a
JMeter test plan to simulate most Pega mobile offline-enabled applications. Such a test plan
allows load testing a particular Pega server environment to determine the sustainable peak
concurrent load for a particular usage scenario exercised with the mobile application.
Quick Start
These are the essential high level steps to put together such a JMeter test plan:
STEP 1: Using Charles Web Debugging Proxy or Fiddler to act as a proper proxy between a
mobile device and the Pega server, record the HTTP transactions that result after having
the device disconnected from the network (so it is in full offline mode), and exercising
the particular usage scenario that you wish to load test.
STEP 2: Use the provided Pega Sync Action Extractor tool to unencode (if necessary),
transform and extract the individual actions that were generated due to the offline
mobile application interactions.
STEP 3: Populate the Decomposed Actions component within a copy of the provided sample
Jmeter test plan by copying individual action content from the Pega Sync Action
Extractor tool and pasting into each incremental Action variable within the component.
STEP 4: Adjust the other configurable portions of the Jmeter Test Plan with server and
application specific values (as necessary).
That’s it. The complex JMeter test plan provided with the framework is coded to simulate
much of the Pega mobile offline client’s behavior--issuing the same HTTP sync transactions that
the device would generate, and properly dealing with the variable content within these HTTP
transactions. It also offers many knobs (via Jmeter variables) that may be adjusted to further
explore the load the server might sustain.
More detailed step explanations
STEP 1: Capturing all the mobile “Actions” generated from the key mobile application usage
scenario
As you open and manipulate a Pega Mobile Offline application, various actions are queued up
within the mobile device and eventually sent to the server when a network connection to the
Pega Server is present. The goal of this step is to capture all such actions so that specific
dynamic (varying) values within these payloads might be properly marked up so that they might

be substituted with appropriate dynamic runtime values when the completed JMeter test plan
is eventually executed.
If using a Mac desktop OS, Charles Web Debugging Proxy is the best tool to capture the HTTP
transactions to the Offline service package. To use Charles, make sure to read the “Help/SSL
Proxying/Install Charles Root Certificate on a Mobile Device or Remote Browser” section within
the Charles client. Also see:
https://community1.pega.com/community/pega-support/question/configuring-charles-web-
proxy-mobile-devices
If using a Windows development environment, Fiddler Web Debugging Proxy provides similar
capabilities. See this video within the Pega Community to help set this up for Windows:
https://community.pega.com/video-library/support-guide-using-fiddler-collect-network-traces-
ios-device-pega-mobile-app
Once the Web Debugging Proxy has been setup to properly capture network traces, confirm
that transactions to /prweb/PRRestService/offlinehttp/DataSync/pzSynchronizationService are
being captured. (If using Charles, you may need to set Proxy/Recording Settings and Proxy/SSL
Proxying Settings)
Once the web proxy is confirmed to be setup properly (able to see sync transactions and look at
the POSTed payloads), turn off the Wi-Fi on the mobile device. This will force the Pega
application into true offline mode. Now run through the single usage sequence you desire to
load test. After going thru the desired case manipulation sequence, enable Wi-Fi once again.
Bring the Pega mobile application to the foreground, and the synchronization transactions will
now be seen as they are sent to the Pega server with the various “createNewWork” and/or
“finishAssignment” Pega process engine actions within these transactions. If the application
was customized to utilize the pega.offline.DataSync.setQueueMaxSize API to adjust the queue
size to something other than the default “1”, it will be necessary to wait for the default flush
interval (default 5 mins) to make sure all the actions are flushed.
A Request Approval sample app generated by using Pega Express 7.4 is provided with this
framework posting. Two Charles Proxy capture files are also provided to show the actual
capture from the application from a Pega 7.4 as well as a Pega Infinity 8.1 system. These might
be used as the starting point for exploring the other steps in creating a JMeter test plan (if you
have difficulty capturing the network trace with your own app).
STEP 2: Transform and get ready to Extract the captured Actions
For this step, a web page tool is provided with the framework to inspect, transform and extract
the captured actions that are significant to your key application usage scenario.

To run the app, open the “PegaSyncActionExtractor.htm” from Chrome (or another browser).
(Note: The page has been primarily tested with Chrome but should work well with other
browsers as well)
When open the tool displays the following UI:
Area 1 is the area within which the raw Post payload content should be pasted (after copying
from the Web debugging proxy tool (e.g, Charles or Fiddler)).
Area 2 represents the set of regular expressions that would be run on the captured payload to
transform the content to insert variables for which values will be generated by the JMeter Sync
Framework test plan. This set of rules can be expanded and modified as appropriate for your
application. For example, the rules presently look for an operator value of “loadmobile.user”
and case prefix “ReqApp-“, but your application will likely have a different initial operator and
different case prefix. You can adjust the replacement rules directly within Area 2 and once they
are as desired can edit the core .htm file to include your modifications…so that they will be
present the next time you open the html file. The ones for “clientTimeCreated” and above
should be left alone.
Area 3 is where the scanned or transformed content will be displayed for each Action. The
mobile device at times (particularly when disconnected from Wi-Fi or configured to do so via
special javascript api) will send multiple actions per transaction. The header of this area will
display the total number of actions detected and allow inspecting each of the separate actions.
It will also display a “New” checkbox when content is detected within clientStoreContent.new
portion of the sync payload:
Clicking the New checkbox will display the content of the New payload and change the “Copy
Action” button to “Copy New”.
Buttons at the bottom of the form, provide the following capability:
Decode: Prior to Pega Infinity 8.1, the payload of the transactions were really application/x-
www-form-urlencoded (though the content-type header had the value as text/plain). The
Decode button is useful for decoding this encoded format so that it can be visually
inspected and transformed. Starting with Pega Infininty 8.1, the content-type of the sync
transactions is application/json (and the content is no longer encoded)
Encode: Provides a way to re-encode content that was decoded.
Transform: Transforms the content of the sync payload (in Area 1) by executing the series of
regular expression transformations specified in Area 2. The content in Area 1 is updated
with the result of this transformation. In addition, Area 3 will contain the content specific
to individual Action or the what was found within clientStoreContent.new.
Scan: Parses the payload content within Area 1 (without applying the transforms), populating
Area 2 (and the Area 2 header).
Copy All: Copies the entire contents of Area 1 to the clipboard
Copy Action: Copies the entire contents of currently selected Action or clientStoreContent.new
content displayed within Area 2 to the clipboard. Rather than trying to select the entire
contents of Area 2 and then invoking a copy keyboard syntax, this button provides a more
robust (less error-prone) way to achieve the same.
Clear: Clear the contents within the different Areas of the tool to prepare for the pasting of a
different synchronization payload transaction
When inspecting the captured transactions within Charles or Fiddler, you should notice 1 or
more transactions to pzSynchronizationService. For each such transaction:
a) Select the raw POST contents and paste it into Area 1 of the tool.
b) If the Pega server being utilized is prior to Pega Infinity 8.1, the content will be url
encoded and the “Decode” button will need to be clicked first to decode the contents.
c) Click the “Transform” button to Transform the contents and parse out the relevant
Actions array within this transactions.
d) If there are no Actions (or the only action within the transaction is a “reconciled”
action), click the “Clear” button to clear the payload contents within the tool and
proceed to paste in the next captured transaction from Charles or Fiddler within Area 1.
Once there are legitimate Actions to incorporate within the test plan, proceed to STEP 3.
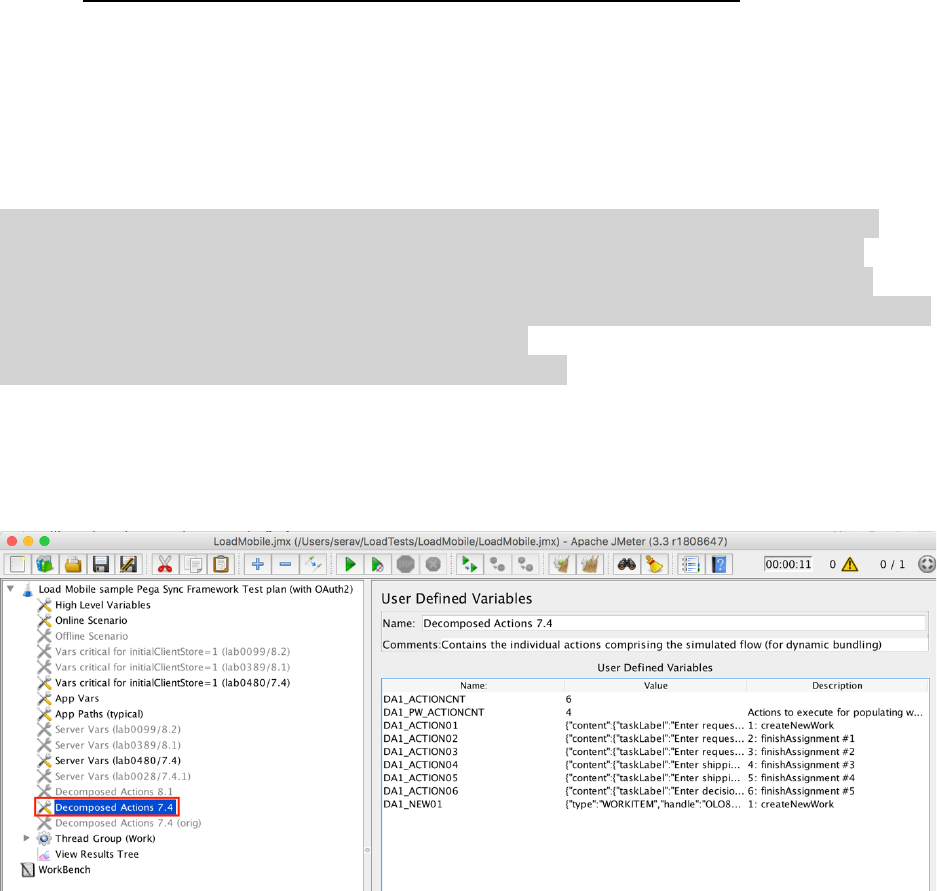
STEP 3: Populate the Decomposed Actions area within the JMeter Test Plan
The Decomposed Actions component within the JMeter Test Plan is the primary portion of the
Framework Test Plan that needs to be modified to contain your application specific content.
Prior to starting this step, open the PegaSyncFramework(LoadMobile).jmx sample file using the
JMeter visual client and do a Save As to save it as a new name (effectively making a copy of the
file).
Note: The PegaSyncFramework(LoadMobile).jmx JMeter test plan was developed primarily
using JMeter 3.2, but should work fine with more recent versions. Version 3.3 or better is
recommended as it deals seamlessly with transactions that return a large response … as is
typically the case with the initial Full Sync transaction. If using Version 3.2 make sure to add the
following entry within your JMeter user.properties file:
httpsampler.max_bytes_to_store_per_request=41943040
Within the left component pane, make a duplicate of the Decomposed Actions segment you
wish to utilize (7.4 or 8.1) and enable the new copy created and disable all other Decomposed
Actions segments. (It is best to adjust the name of the original that is being disabled…perhaps
by adding “ (orig)” to the end of the Name)
The framework file is setup to support multiple “usage scenarios” and execute each one a
particular percentage of the time (for every simulated user). However, as in the LoadMobile
sample, focus on just one usage scenario initially. The first usage scenario will have variables
with the prefix “DA1” (for Decomposed Actions #1).
Clear out the current values within DA1_ACTIONXX and DA1_NEWXX variables to insure that
new relevant content from the recently transformed captured transactions is utilized (and stale
content specific to the LoadMobile sample app isn’t left behind).
For each action found within the Pega Sync Action Extractor tool (using the steps outlined at
the end of STEP 2):
a) Select each incremental Action using the Actions dropdown (start with 1 and select each
incremental one the next time this sub step is reached)
b) Click the “Copy Action” button to copy the transformed contents of this action to the
clipboard
c) Place the cursor within the next DA1_ACTIONXX variable value area and use the Paste
shortcut (Ctrl+v for Windows or Cmd+v for Mac)
d) Update the comments field for the action entry to uniquely identify this action/screen
transition (perhaps by the action value and/or the screen name this action relates to).
Each screen transition should generate a “finishAssignment” action.
After transferring all the Action contents into the JMeter test plan for a specific transformed
transaction, if the “New” checkbox is displayed between Areas 2 & 3 (it will be displayed only if
there was a “createNewAction” action within the actions array for the transaction and some
content was present within clientStoreContent.new):
a) Click the “New” checkbox to display the content of clientStoreContent.new within Area
3
b) Click the “Copy New” button to copy the transformed New content to the clipboard
c) Create a variable named DA1_NEWYY where YY is the same action number (conveyed by
XX of DA1_ACTIONXX). Place the cursor within the variable’s value area and use the
Paste shortcut (Ctrl+v for Windows or Cmd+v for Mac)
d) Update the comments field for the action entry if desired
(To summarize: A DA1_NEWYY variable should be created only for any DA1_ACTIONXX
variables that have a value containing a “createNewWork” action.)
Repeat the above procedures for the additional captured HTTP pzSynrchronizationService
transactions so that all the relevant actions for the scenario are incorporated into the test plan.
Enter the total number of unique non-“reconciled” actions to pzSynchronizationService that
were captured within the DA1_ACTIONCNT value. (This should be Integer value represented by
the XX for the last DA1_ACTIONXX variable with actual action payload)
The DA1_PW_ACTIONCNT integer value specifies the incremental sequence of actions to
execute when populating work within the worklist (PW stands for Populate Work). This is
relevant only if “1” is specified for the global variable “createNewWork” and “OPENCASES” is
set to a integer value greater than “0”. If relevant, it should be set to a value less than
DA1_PW_ACTIONCNT. In this manner, if there are less than the specified desired number of
OPENCASES, it will go thru and issue the actions in consecutive order but stop at this lower
action count value, so that the case would then be left in the open-assigned state (within the
current user’s worklist). This would be done for as many incremental cases are needed to reach
the desired “OPENCASES” count.
When moving captured actions to the Decomposed Actions area, remember that any actions
with the “action” property value of “reconciled” should be ignored. The logic within the test
plan will automatically generate the “reconciled” action when necessary.
STEP 4: Adjust other portions of the configurable test plan
The final step is to adjust various global server and application specific variables.
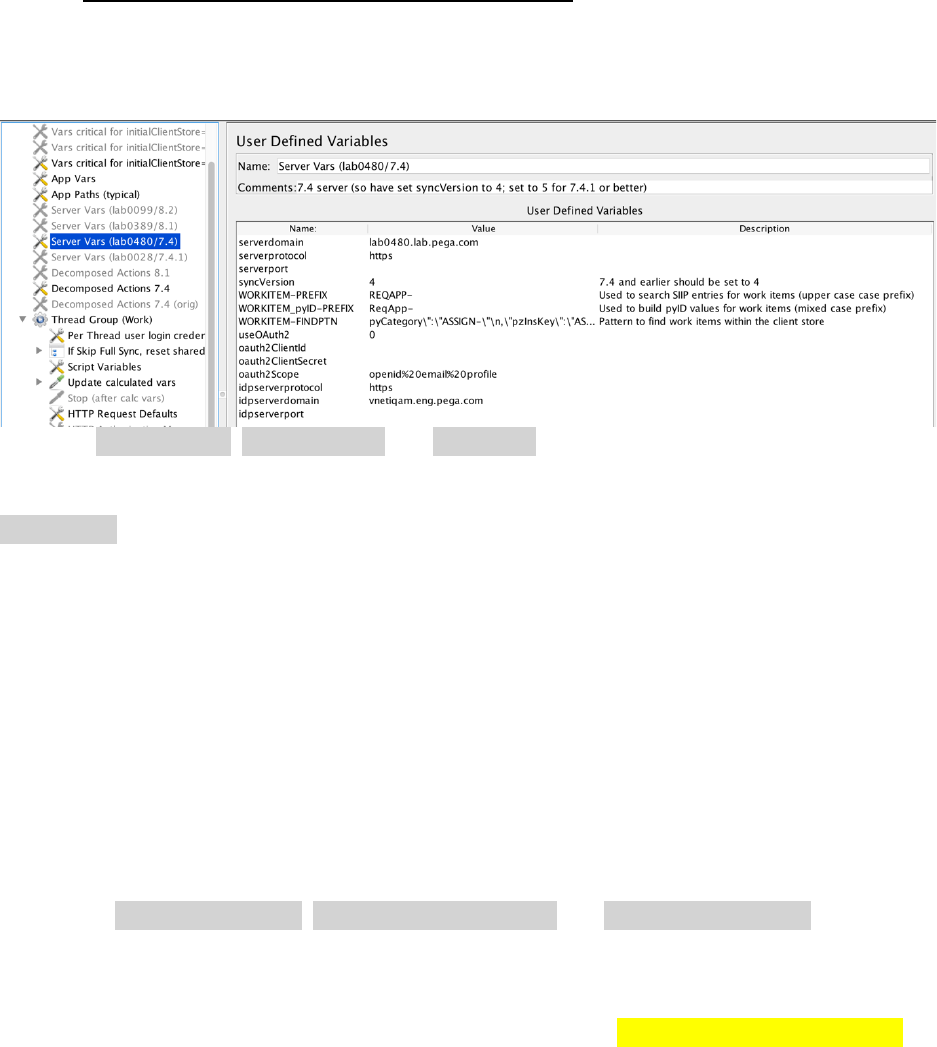
4.1 Specify proper “Server Vars” values
Enter the serverdomain, serverprotocol and serverport values for your Pega server which you
wish to load test (and has the mobile offline-enabled application deployed).
syncVersion should be set to “4” for a Pega 7.4 or earlier server and to “5” for any later servers.
There were several changes to the request payload in version 5 when compared to version 4.
The logic within the Framework test plan will simulate the proper version based on this setting.
Some of the changes include:
• MIME content-type is “application/json” (was previously application/x-www-form-
urlencoded and the POST content was URL encoded)
• Various top level synchronization attributes within the requestJSON structure moved to
be HTTP request headers
• Support for forced bundling of actions to minimize the number of transactions during
normal operation
• Support for chunking large accumulated set of actions when disconnected to be
separate transactions to avoid very, very, large transacctions
Update the WORKITEM-PREFIX, WORKITEM_pyID-PREFIX and WORKITEM-FINDPTN values to
reflect the proper values for your application. The WORKITEM-PREFIX is typically all upper case
characters, whereas the WORKITEM_pyID-PREFIX will typically be mixed case. The WORKITEM-
FINDPTN should contain a value such as:
pyCategory\":\"ASSIGN-\"\n,\"pzInsKey\":\"ASSIGN-WORKLIST OLO8KL-LOADMOBILE-WORK
The portion in yellow highlight will need to be updated to properly reflect your application.
This is used to find open assignments within the current user’s worklist. To get the proper
value look at the response to an initial full sync (when there is atleast one open work item in
the user’s worklist), and search for the portion before the yellow within the response.
useOAuth2 should be set to “1” if leveraging OAuth2 authentication, otherwise set to “0” to
leverage basic authentication. The remaining vars on this variable component are all related to
leveraging OAuth2. The OAuth2 authentication logic will be very specific to the type of identity
provider server that is being leveraged. The sample JMeter file includes an implementation
which works against a NetIQ Access Manager appliance, but will require modifications if going
against any other identity provider server.
(As the example file shows, there can be multiple Server Vars referencing different servers, but
only one should be enabled when attempting to run the test plan)
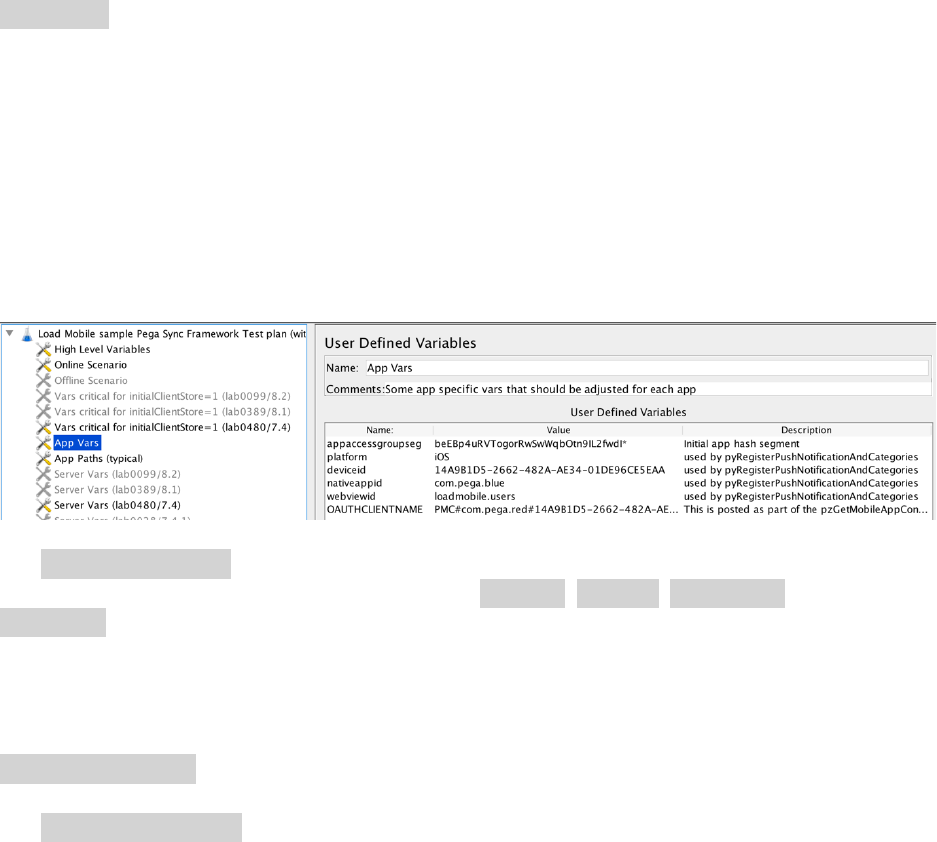
4.2 Specify proper “App Vars” component values
The appaccessgroupseg variable should be the initial application access group segment value
for the web application. The next four variables (platform, deviceid, nativeappid and
webviewid) are values found when a certificate with push notifications is utilized. These would
be found within the POST transaction which follows the login POST and specifies
pyActivity=pyRegisterPushNotificationsAndCategories. Capture this transaction using Charles
or Fiddler and extract these other POST values and update the appropriate corresponding
variable within the “App Vars” component. (Note: These four variables are not utilized if
usePushNotification is set to “1” within the “High Level Variables” component)
The OAUTHCLIENTNAME variable is posted as part of the pzGetMobileAppConfiguration POST
transaction when not configured to use OAuth2 and when not doing an initial sync
(initialClientStore is set to “0” witin the “High Level Variables” component). Extract this value
from a Charles or Fiddler trace of the initial sync.
4.3 Adjust the “High Level Variables” as necessary
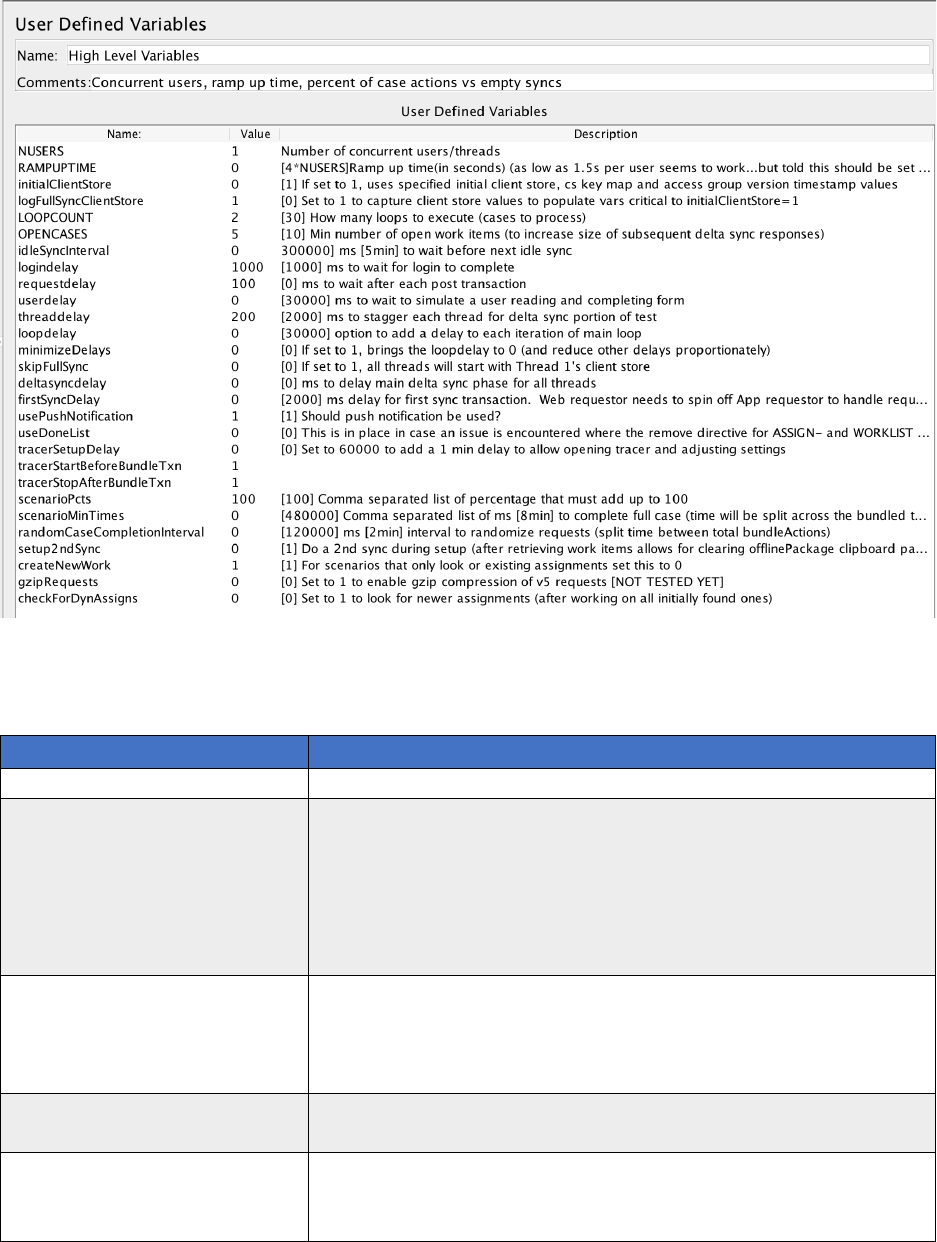
Most of the global variables above are documented within the comments section of the test
plan. In most cases for Boolean variables, the values of “1” and “0” are used (rather than “true”
and “false”). Some of the significant High Level Variables include:
Var Name
Description
NUSERS
The number of concurrent users to simulate on any run
initialClientStore
Set to “1” to simulate an operator logging in to a device with
an already installed application. If set to “0”, the test plan
will need to always do an initial full sync. When set to “1”,
the “initialClientStore” component will need to be enabled, as
the vars there will be utilized to simulate the clientstore of
the installed app
logFullSyncClientStore
Set to “1” to have the script emit the values into the log
viewer so that they might be copied and pasted to populate
the clientstore variables. Once populated and up to date, this
can be set back to “0”.
LOOPCOUNT
The number of cases to process during the main “work” and
concurrent load test portion of the test plan.
OPENCASES
The number of items that should be created and left open
during the setup phase so that each operator has an expected
number of open items within their worklist. This is only
relevant if the “createNewWork” high level variable is also set
to “1”.
idleSyncInterval
Interval in ms to always issue a transaction. (0=disabled,
300000=5 min=default value). Any queued actions will be
transmitted to server if this much time expires after the last
transaction.
minimizeDelays
May be set to “1” to disable several other configured delays.
Useful for test plan development and avoids having to change
many separate variables to accomplish this.
skipFullSync
Provides a way to speed up each JMeter thread getting the
initial client store. It results in the first thread doing a full
sync and then communicating the clientstore variables to all
the subsequent threads. An additional deltasync is done to
remove any records that might be specific to the operator
assigned to the first thread and to load ones specific to the
current operator associated with the thread.
tracerSetupDelay,
tracerStartBeforeBundleTxn,
tracerStopAfterBundleTxn
debug settings useful to pause a run before and after a
particular transaction within the main load test loop to
facilitate using Designer Studio and tracer to capture the
details of what the requestor is doing for that particular
sequence of transactions.
scenarioPcts,
scenarioMinTimes
These settings allow multiple DecomposedActions (scenarios)
to be utilized and each one being utilized some percentage of
the time. The minimum time to complete each scenario can
also vary. Both these vars should have a consistent number
of comma separated values. (When multiple scenarios are
used, each variable within each additional active
“Decomposed Actions” component should begin with the
next proper integer value (e.g, “DA2” and then “DA3”))
createNewWork
The exercised case scenario includes creating a new case (as
opposed to the script only selecting and working on cases
within this user’s worklist.
gzipRequests
Set to 1 to simulate the Pega Infinity 8.1 ability to compress
posted content.
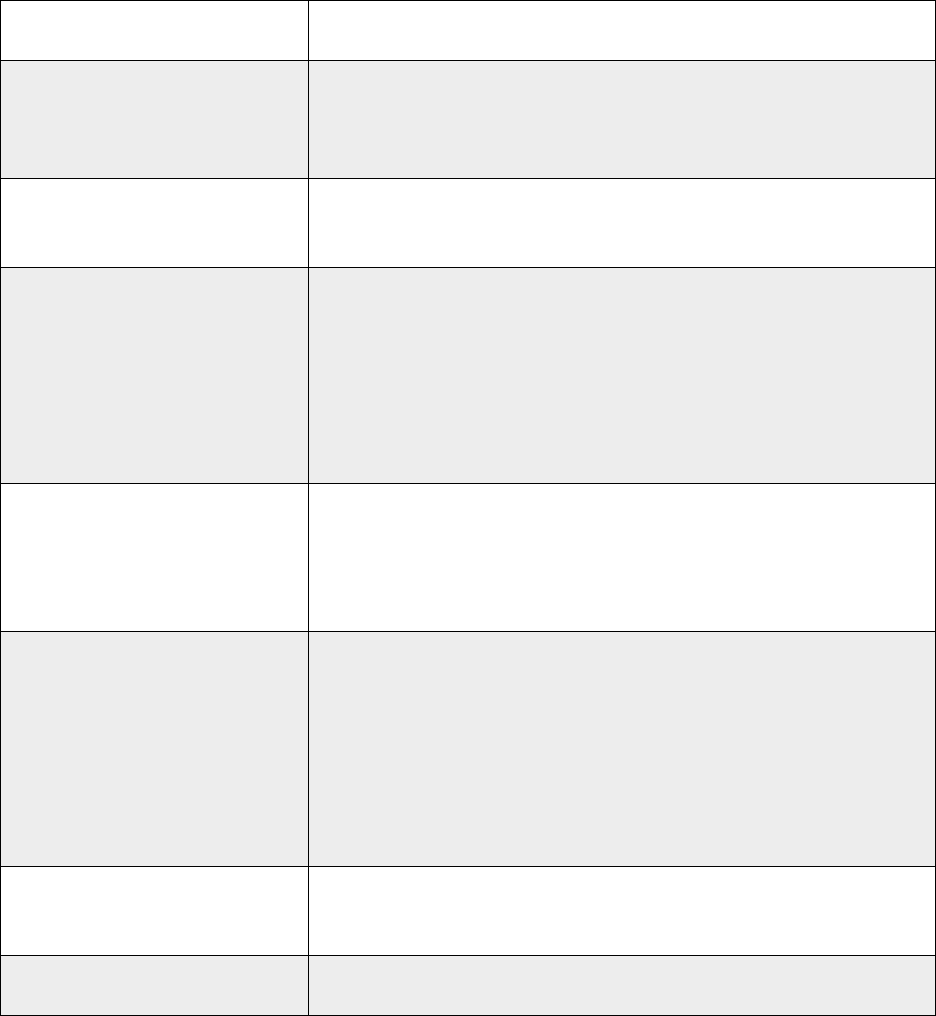
4.4 Enable the proper “Online” or “Offline” scenario and adjust variables as necessary
If the load test is meant to simulate typical server load when mobile devices have a network
connection, the “Online Scenario” component should be Enabled (and the “Offline Scenario”
component must be disabled).
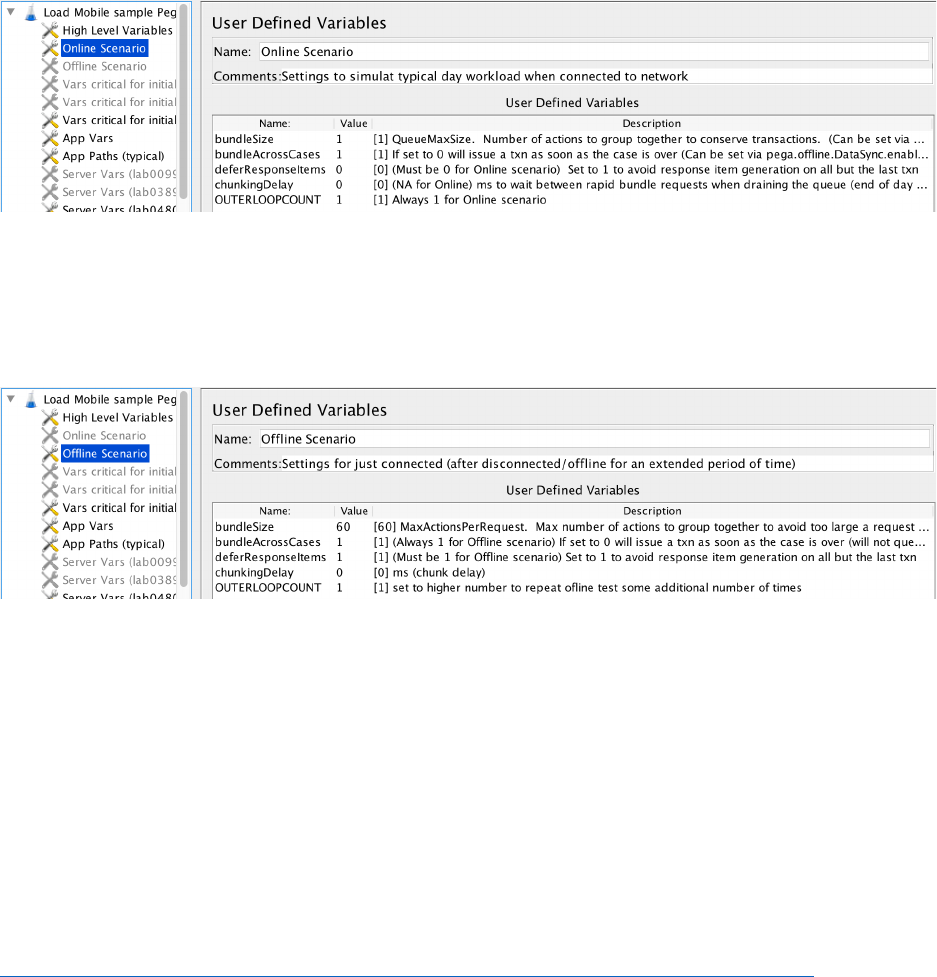
If the load test is meant to simulate a scenario where the users do not have network
connectivity when performing the main usage scenario for the test, and then users establish a
network connection at the same time to synch all the completed work to the Pega server, then
the “Offline Scenario” component should be Enabled (and the “Online Scenario” component
shoud be disabled).
In most cases you likely want to simulate the “Online” (Connected) rather than the “Offline”
(Disconnected) scenario.
The variables within these two components have identical names, but the Description within
each of the components varies a bit. Prior to Pega 8.1, the bundleSize within the “Online
Scenario” is always “1”, and the setting for the “Offline Scenario” was always the largest
possible integer value (all offline generated actions would be sent together with the next HTTP
transaction).
The Offline Mobility Guidelines document references the critical APIs available to configure the
application to leverage a custom bundleSize for online and offline scenarios. See:
https://community.pega.com/knowledgebase/articles/offline-mobility-guidelines-0
The relevant APIs related to these variables are:
pega.offline.DataSync.setQueueMaxSize
pega.offline.DataSync.setQueueFlushInterval
pega.offline.DataSync.enableFlushOnLastStep
pega.offline.DataSync.setMaxNumberOfActionsPerRequest
Additional miscellaneous information about the provided framework
The framework is provided to help bootstrap your efforts to create a JMeter test plan for your
Pega offline-enabled mobile application. Feel free to experiment and modify it as you deem fit.
To understand the deeper details of how the framework works, greater working knowledge of
JMeter will be required. The framework leverages many standard JMeter components to
achieve the Pega Offline-enabled Mobile Application simulation. It leverages “JSR233
Samplers” and Groovy code for much of the implementation.
Many comments have been left within the code. Also various console output log statements
have been commented out but left so that they might be re-enabled if needed to debug
portions of the implementation.
The most significant JMeter components with Groovy code are the following:
“Request Shaping Manager” PreProcessor: establishes some key sync variables and sets up
the HTTP request properly based on whether it is version 5 (Pega Infinity 8.1) or earlier
version.
“clientStore Content Manager” PostProcessor: handles parsing the responses to every sync
transaction and manages the critical “clientStore”. It also detects any token expired errors
when OAuth2 is being utilized so that the token may be later renewed and the current HTTP
transaction be retried.
“Initialize case instance specific vars” Sampler: initializes key case-specific variables used by
the framework. A blank “Extension: Initialize case instance specific vars” Post Processor is
provided in case it becomes necessary to add and initialize various application specific
variables.
“Case Actions bundler ${dispCaseInfo}” Sampler: implements the complex logic that deals
with replacing variables within the Actions payload as well as determining how many
actions to include within each transaction.
The standard “View Results Tree” component is a great component to have enabled when
constructing and testing out the test plan. This is a great way to monitor the transactions that
are actually occurring. (Note: This component should be disabled when doing a real load test
with many users)
Additional information about the provided Sample Application (LoadMobile_74_RAP.zip)
The application includes a “UIPerfLoad” ruleset which includes some useful activities:
CloneUser – provides a way to easily duplicate an existing operator appending numeric
values to disambiguate the users. (If the operator being duplicated has a “@” in the name
the disambiguating numbers are inserted preceding the “@” character)
CloneUserCleanup – eliminate operators created via CloneUser
RemoveStressTestRequestors – kill requestors for operators that are to be used in a load
test (that begin with a common prefix)
The application archive includes the following operators (which will need to be enabled after
the application is imported):
loadmobile.author (with password “rules”)
loadmobile.user (with password “rules”)
Questions about the provided framework may be posted within the Pega Community.
© 2019 Pegasystems Inc. All rights reserved.
