PENBOOK
Manual v6.1

Why we built Penbook 6.1
We built Penbook 6.1 over the summer to take advantage of all
the new features in iOS 17. You’ll love the new brush types and
deeper PDF support (see page 11), and we’ve retooled major
parts of the app to provide better stability and performance,
too.
Make sure your device is fully updated to get the full benefit of
our hard work!
– Slaven & Ben
Vancouver, Canada

1. NAVIGATION 1
1App Menu
2. SHELF 2
7 Using your Tags
6 Create, edit, and add Tags
5 Editing a notebook
4 Adding an Editions notebook
3 Creating a custom notebook
2Overview
3. WRITING 8
8Navigating the Writing Page
9Tool drawer
10Useful gestures
5. ATTACHMENTS 12
12Adding Attachments
13Layout Editor
14Typing in a Text Note
6. PAGE MANAGEMENT 15
16Page Organizer
15Minimap
7. STATIONERY OPTIONS 17
17Choosing stationery
18Customizing stationery
APPENDIX 19
19Appendix A: Gestures
4. PDFS 11
11Using PDFs in Penbook
1
2
3
4
5
6
7
1
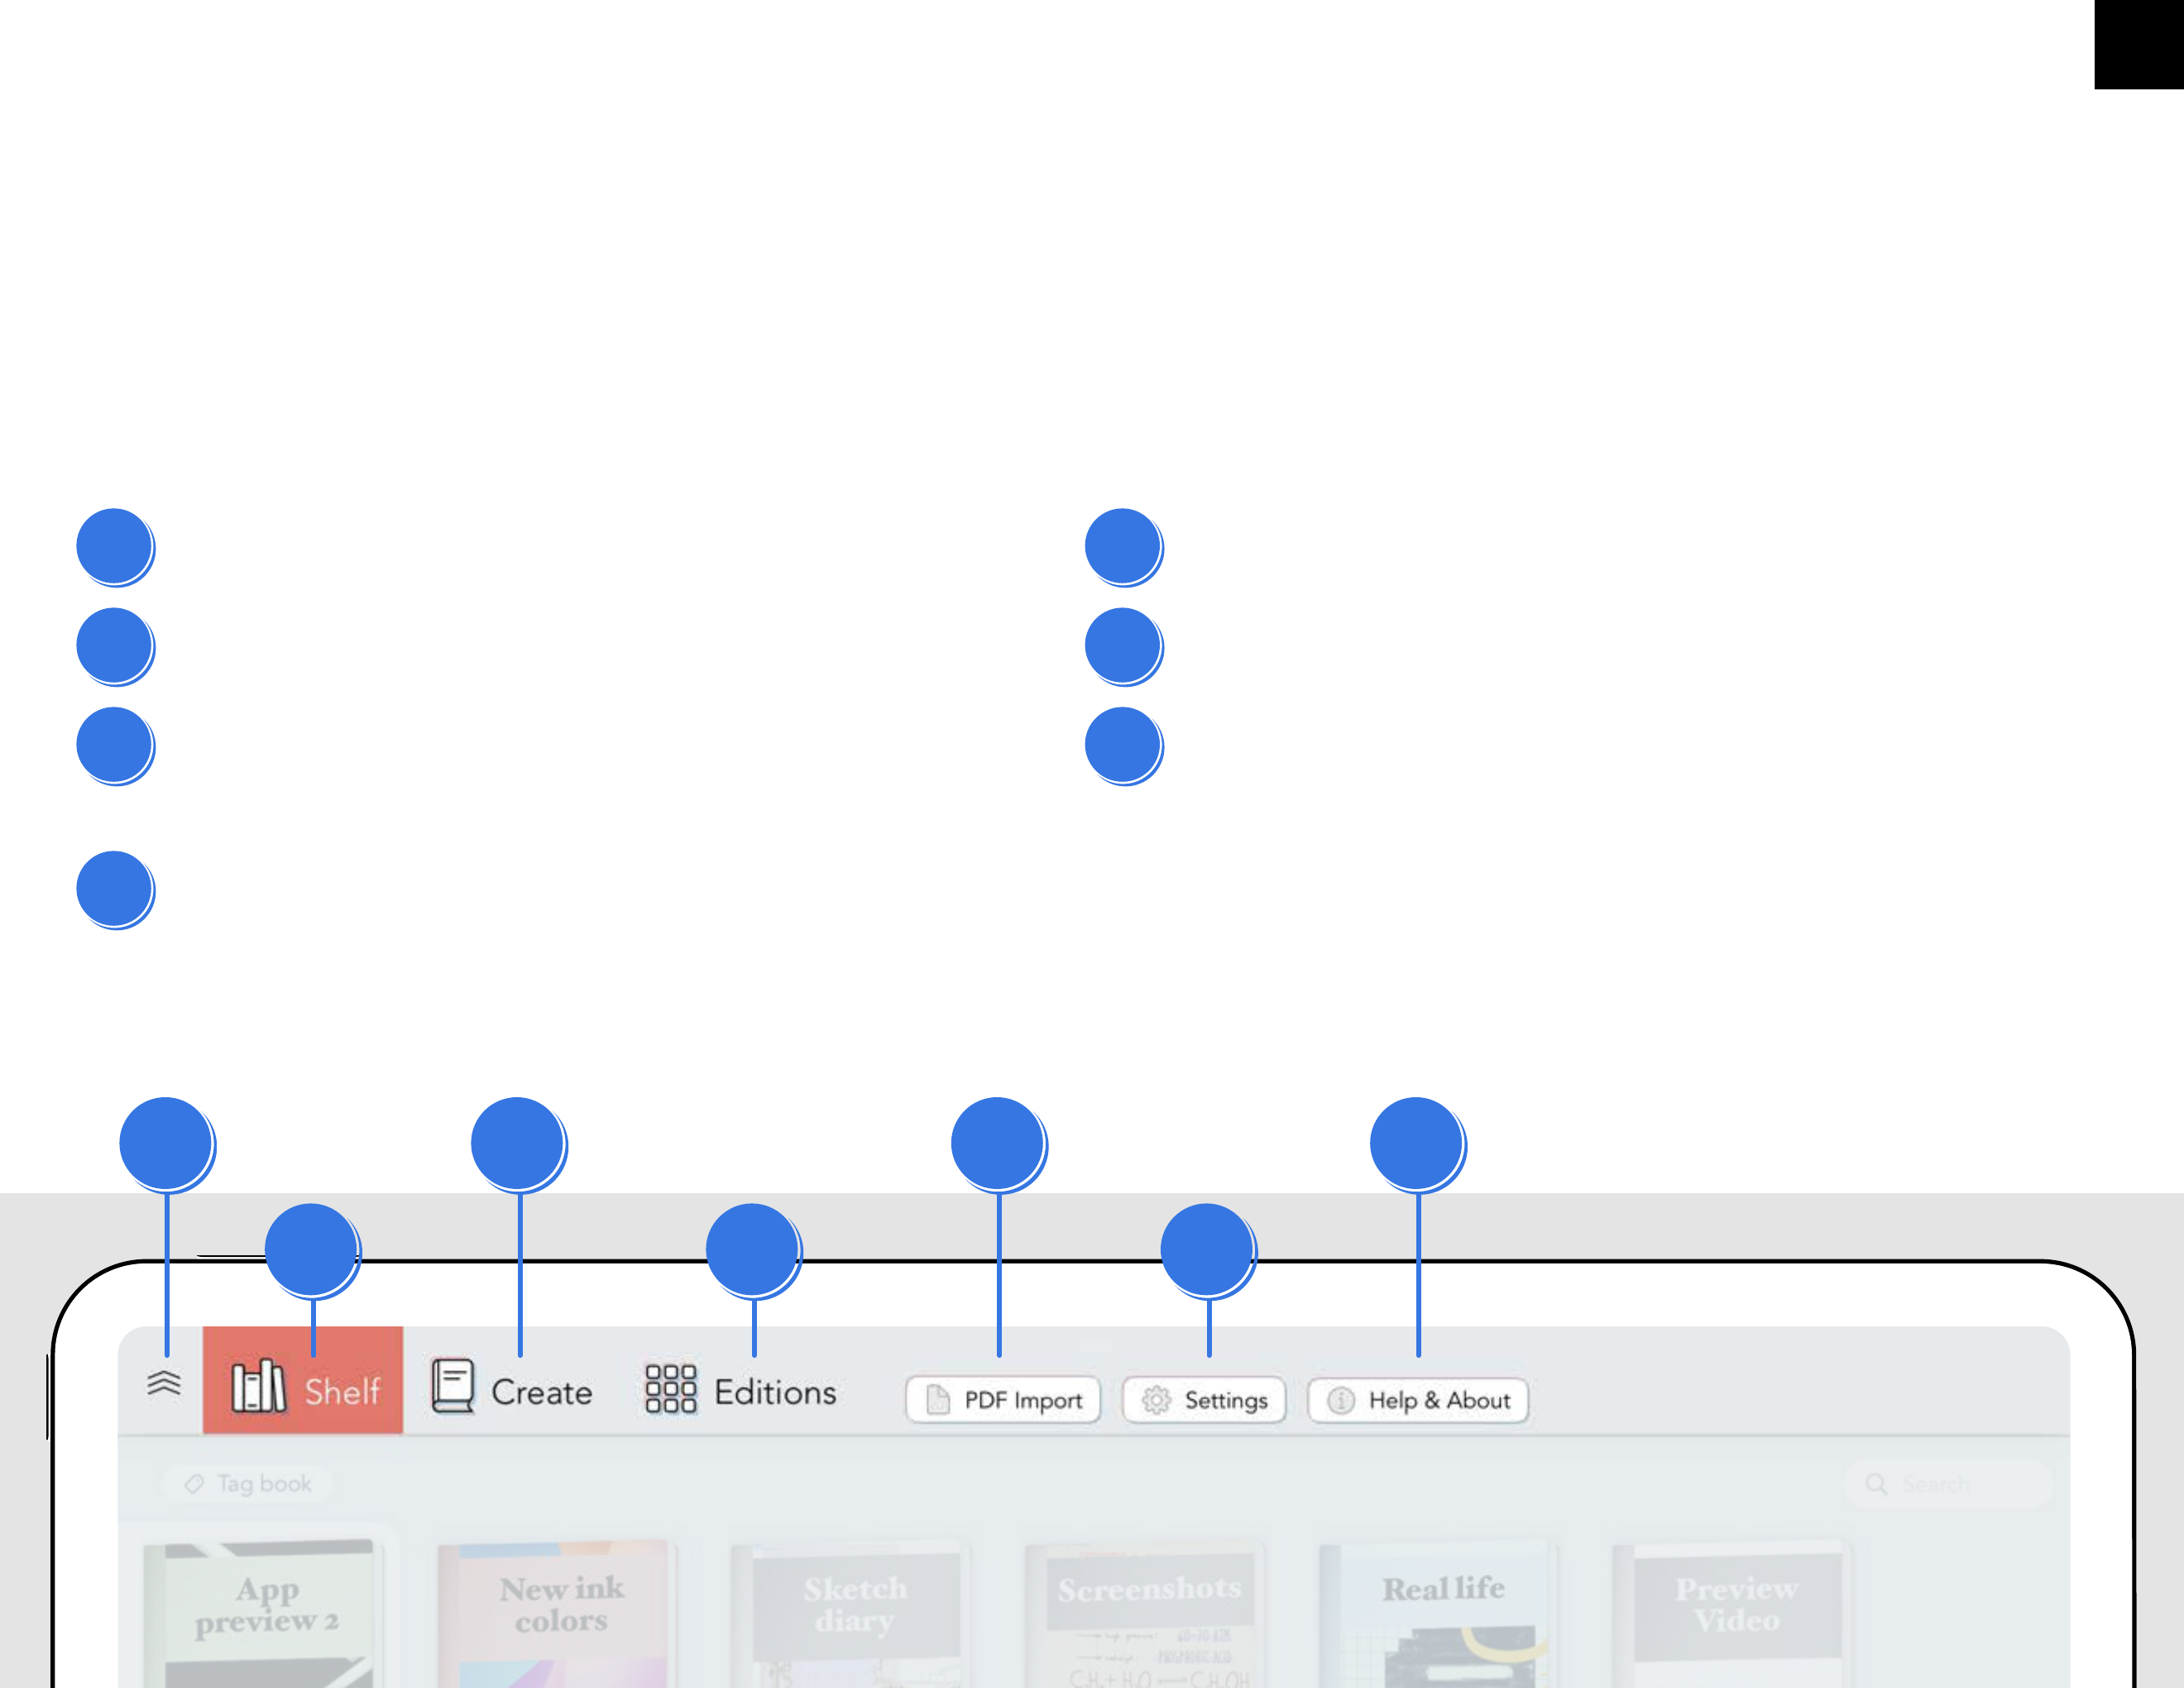
Navigation App menu
1
Return to the writing page
2
Shelf tab – your notebooks live here
3
Book Creator tab, for making custom
notebooks
4
Editions tab, for adding Penbook’s special
pre-made notebooks
5
Import a PDF and use it as a notebook
6
Customization and calendar settings
7
Miscellany & troubleshooting
The App Menu leads to the writing page, notebook creation options, app
customization, and support options.
6
1
2
3
5
4
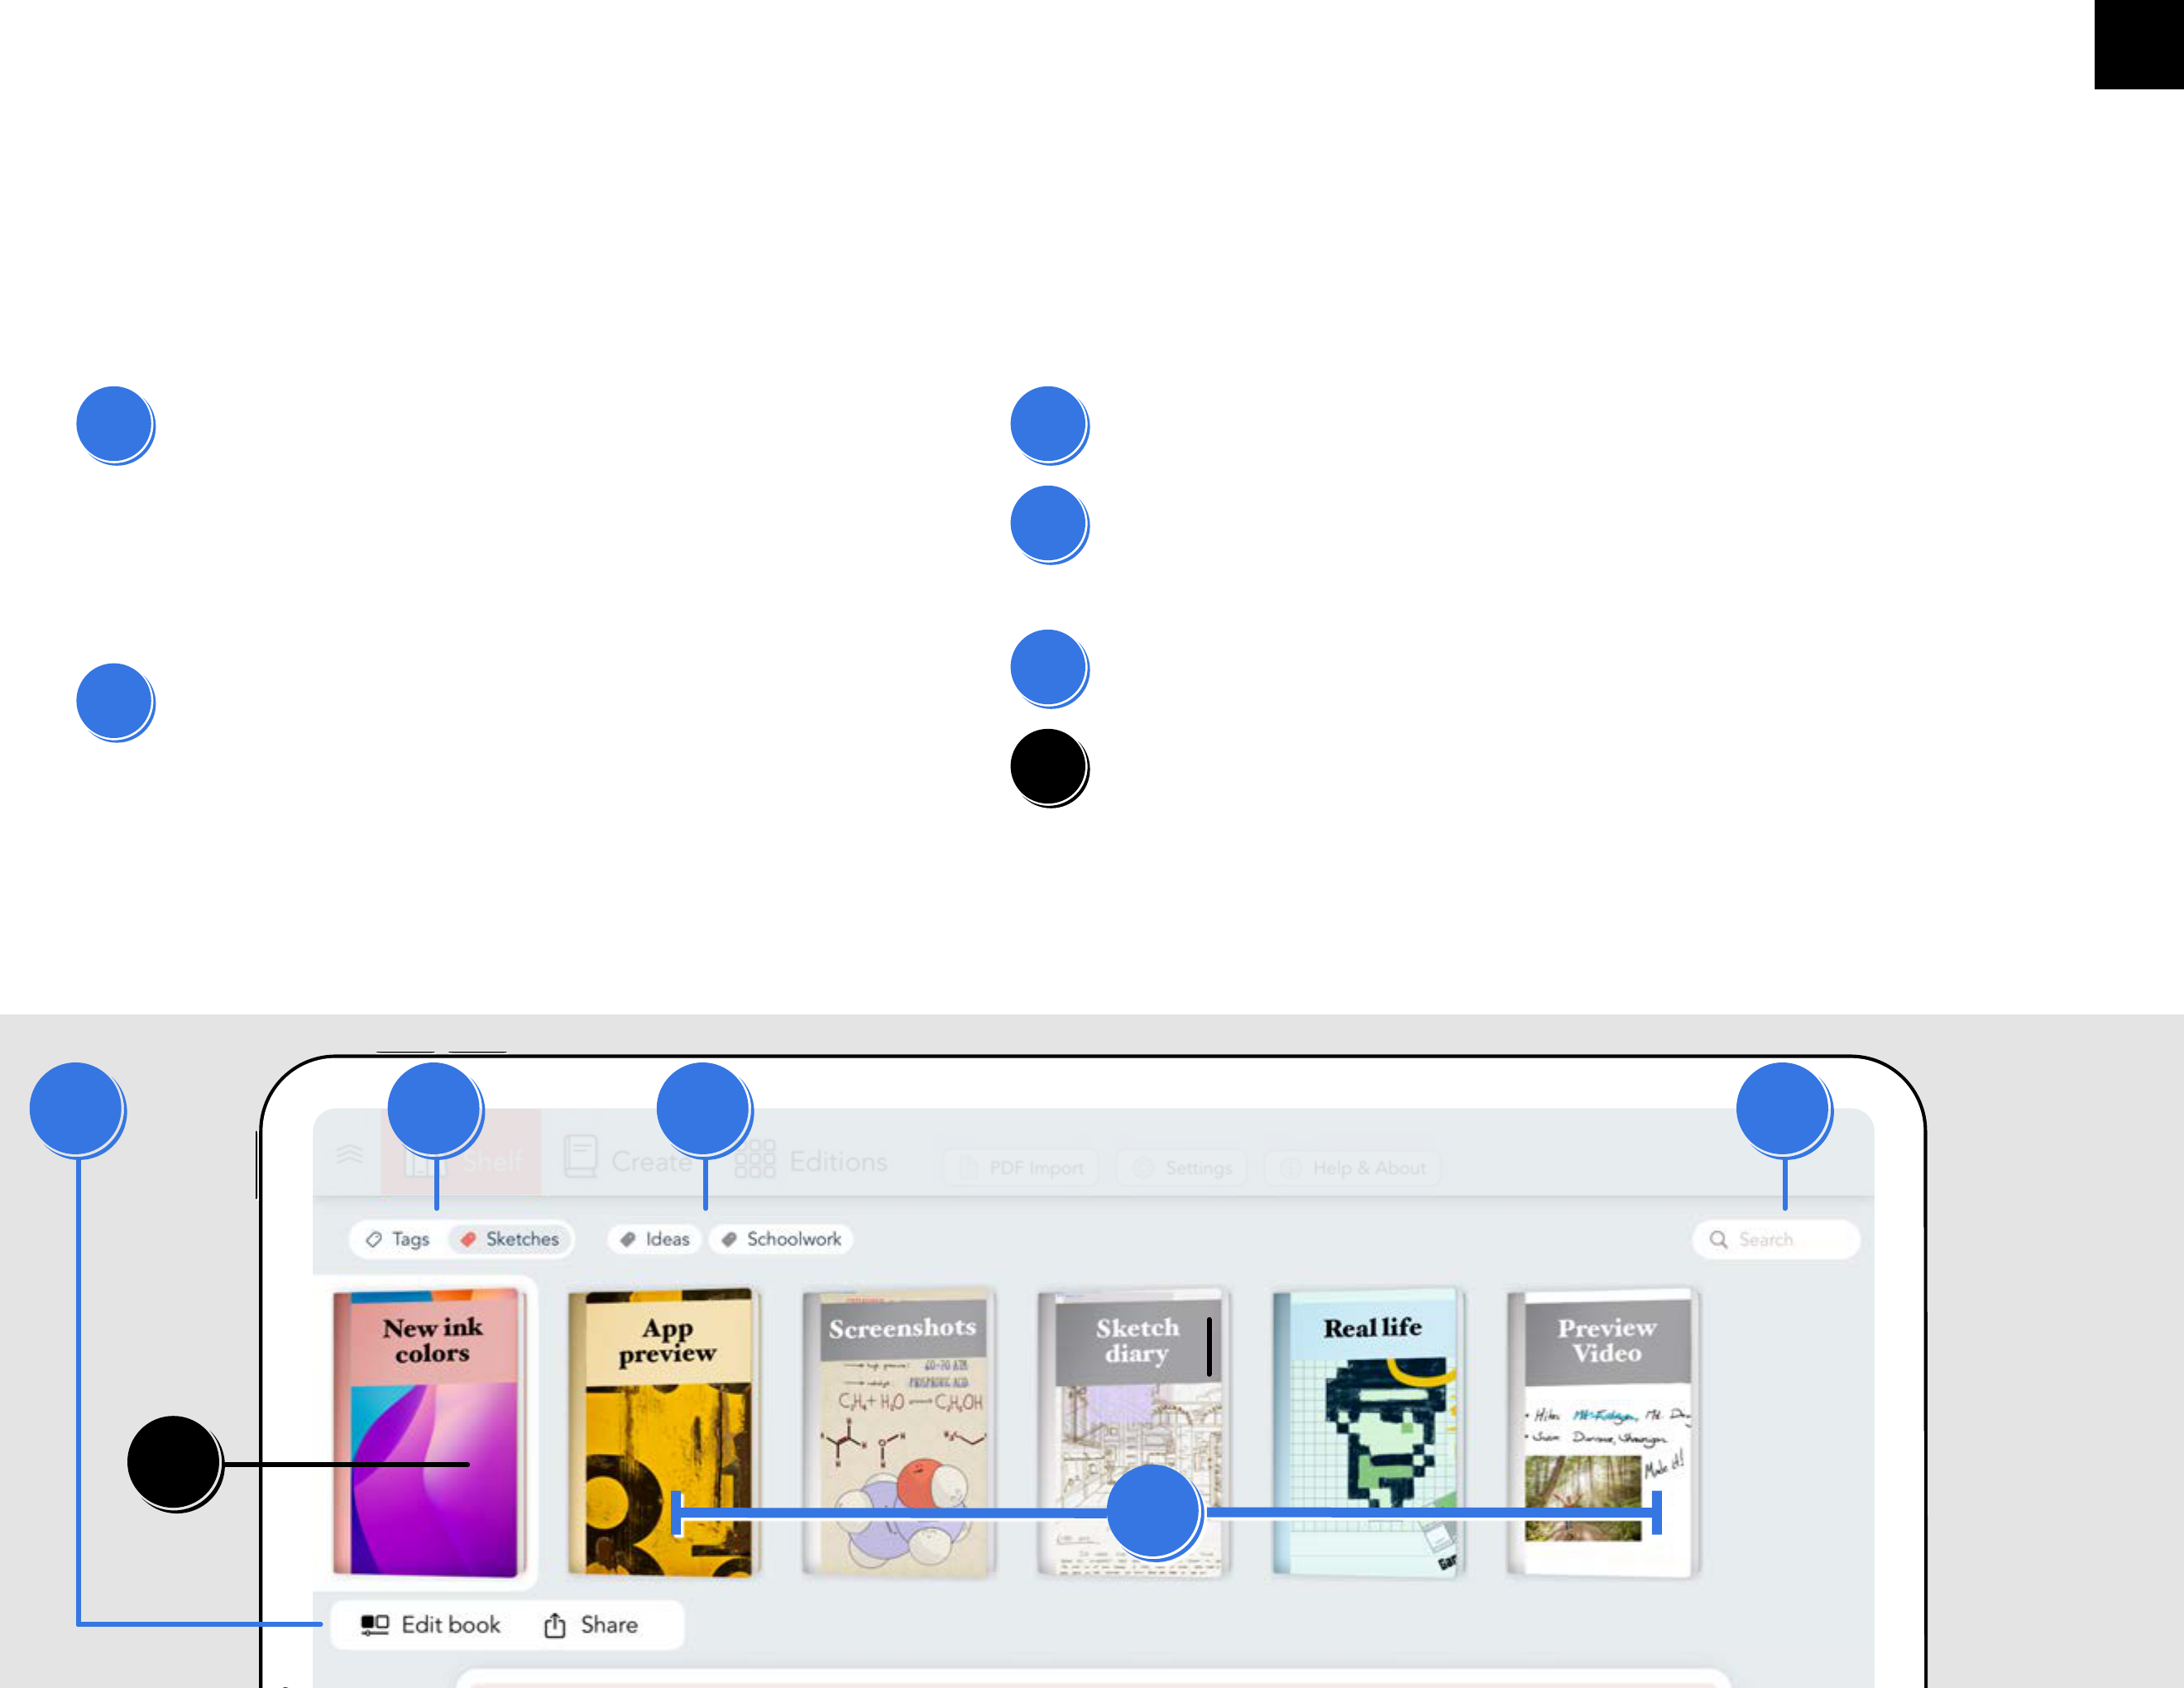
2
Shelf Overview
6
Your current notebook
1
Change the current notebook’s
title and cover, or delete it
Share the current notebook as a
PDF
2
Your current notebook’s Tags. Tap
Tags to create and edit Tags, and
to add them to your current
notebook.
3
Your Shelf’s other Tags
4
Your other notebooks. Tap to switch
to them
5
Search your entire Shelf
This is where the notebooks that you create are kept.
3
Shelf Creating a custom notebook
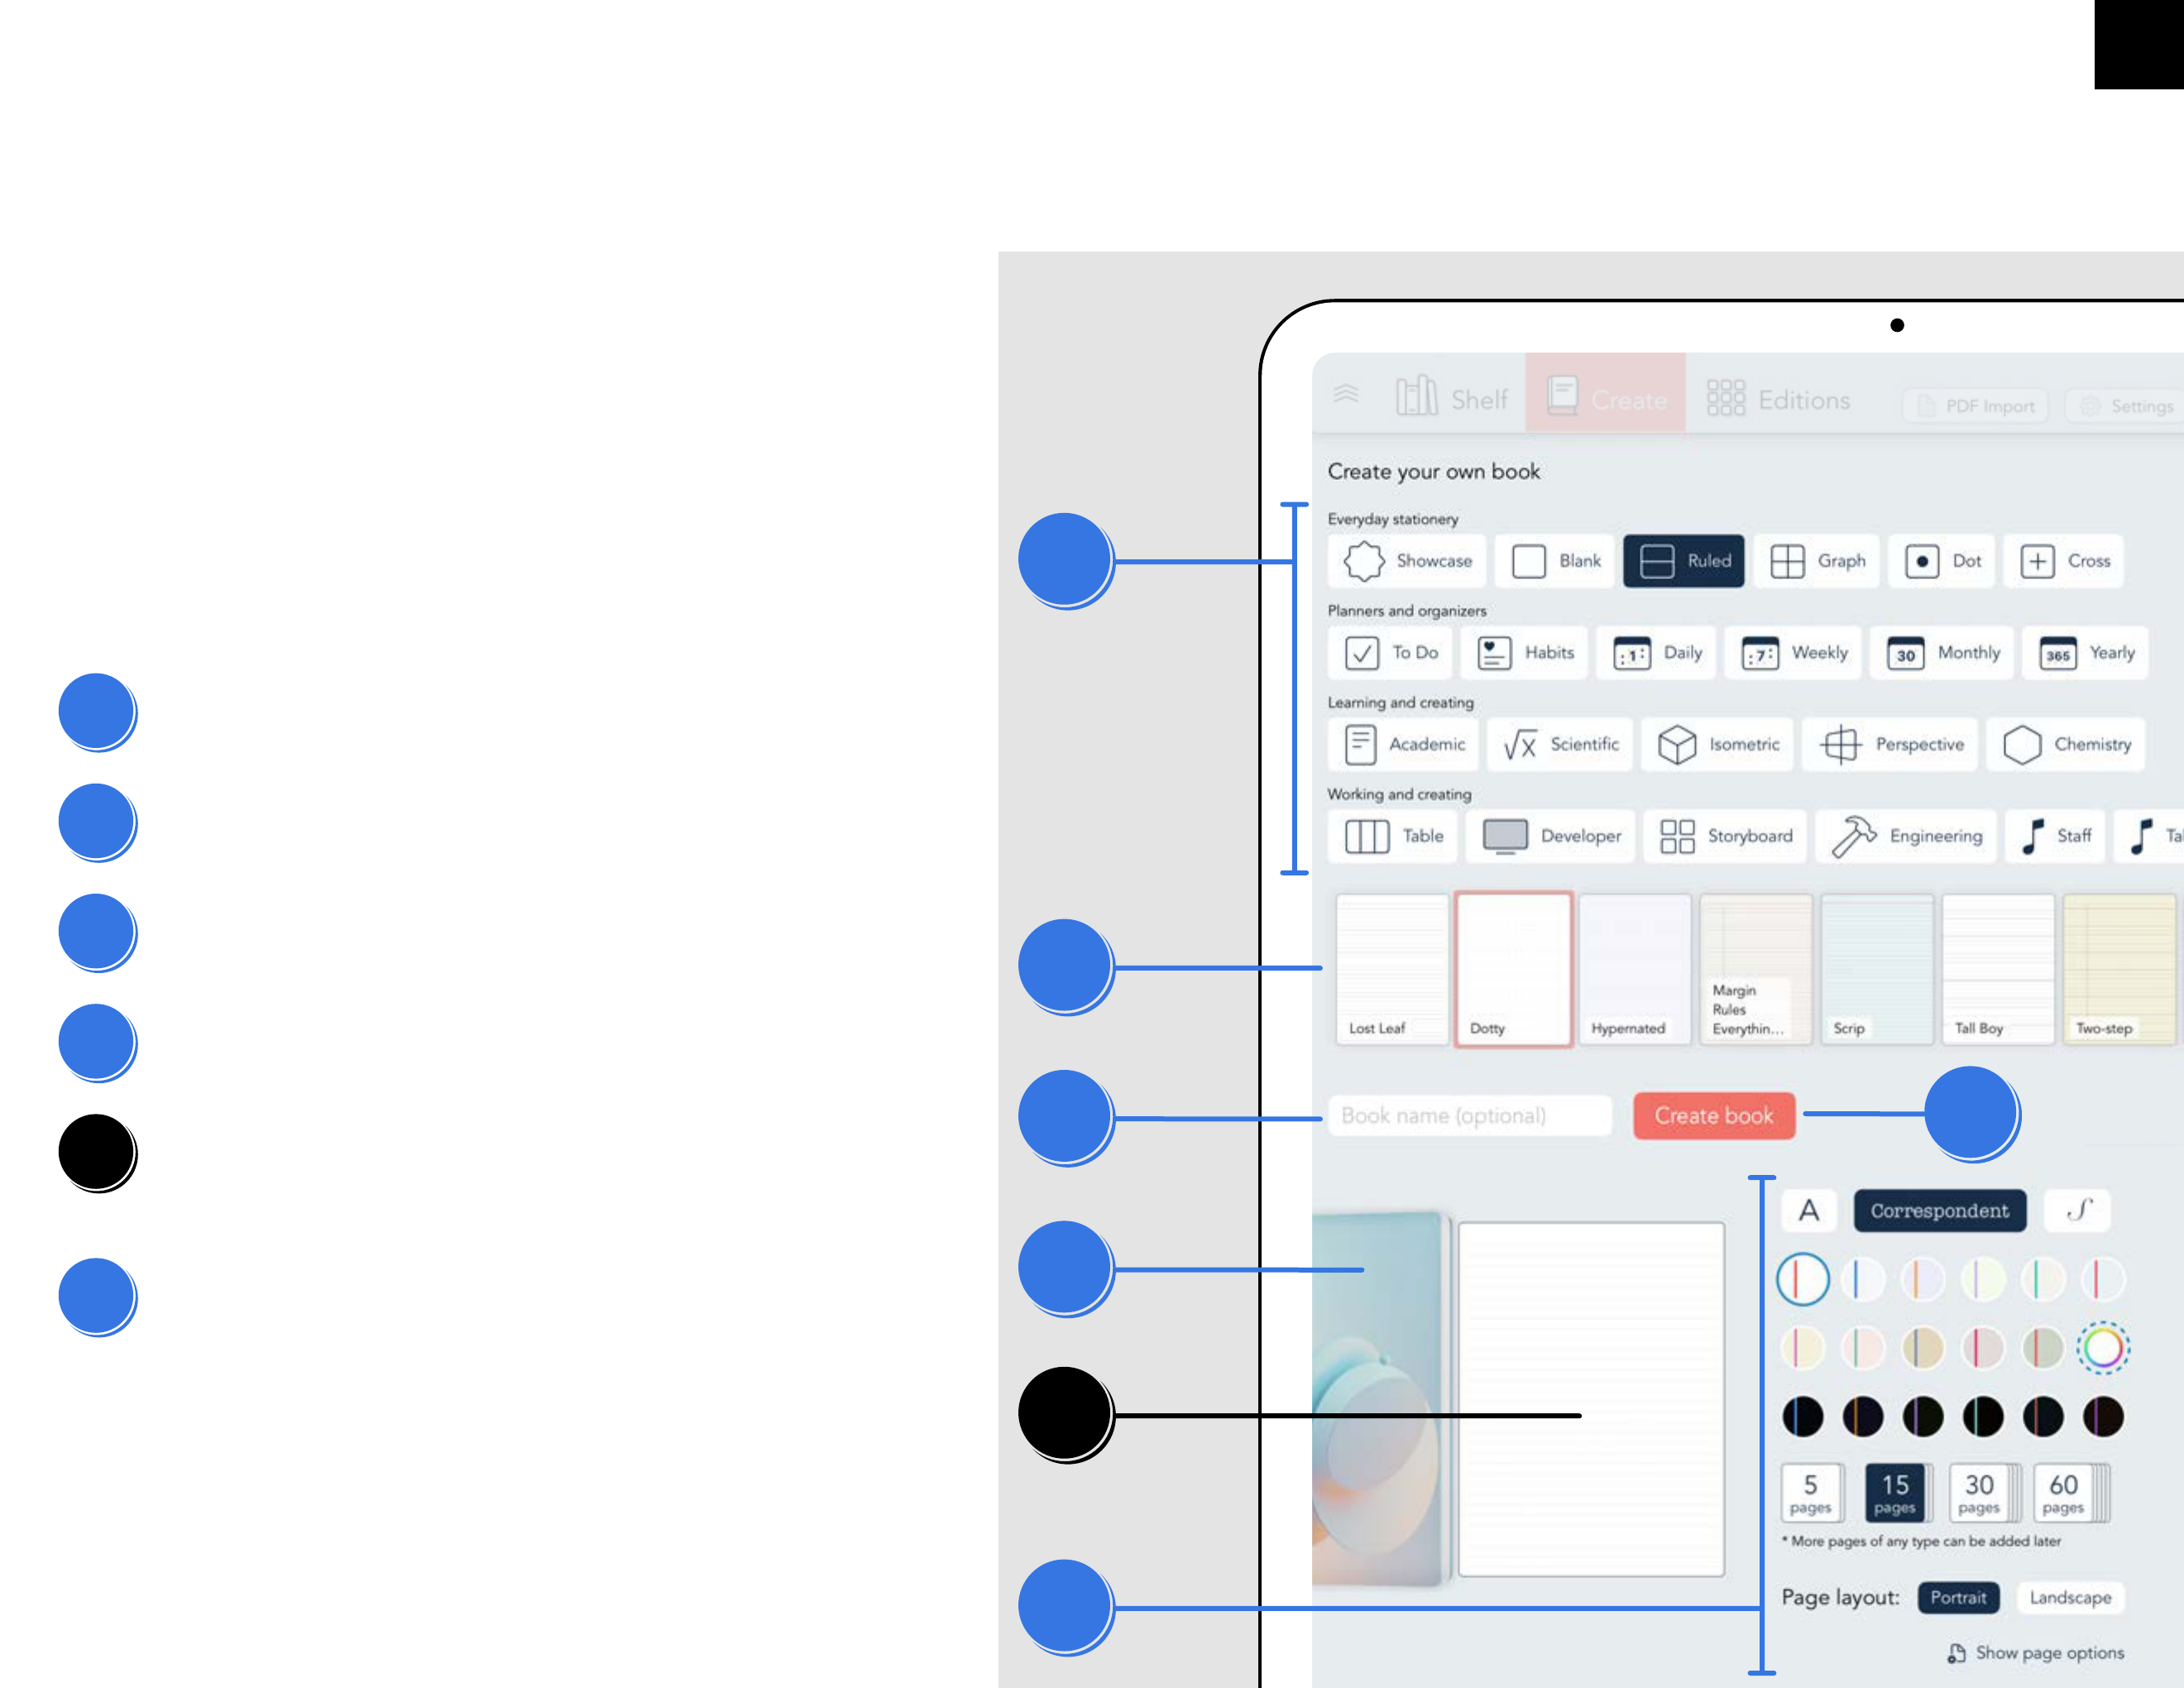
1
Penbook’s stationery categories
2
Stationeries in the selected category
3
Optionally, name your notebook
4
Tap here to edit your notebook’s cover
5
This is a preview of your customized
stationery.
6
Customize your stationery and notebook
here.
You can see more options for each
stationery by tapping Show page
options
In the Create tab, you can make
your own perfect notebook by
starting from one of Penbook’s
400+ stationeries.
1
6
2
3
4
5
7
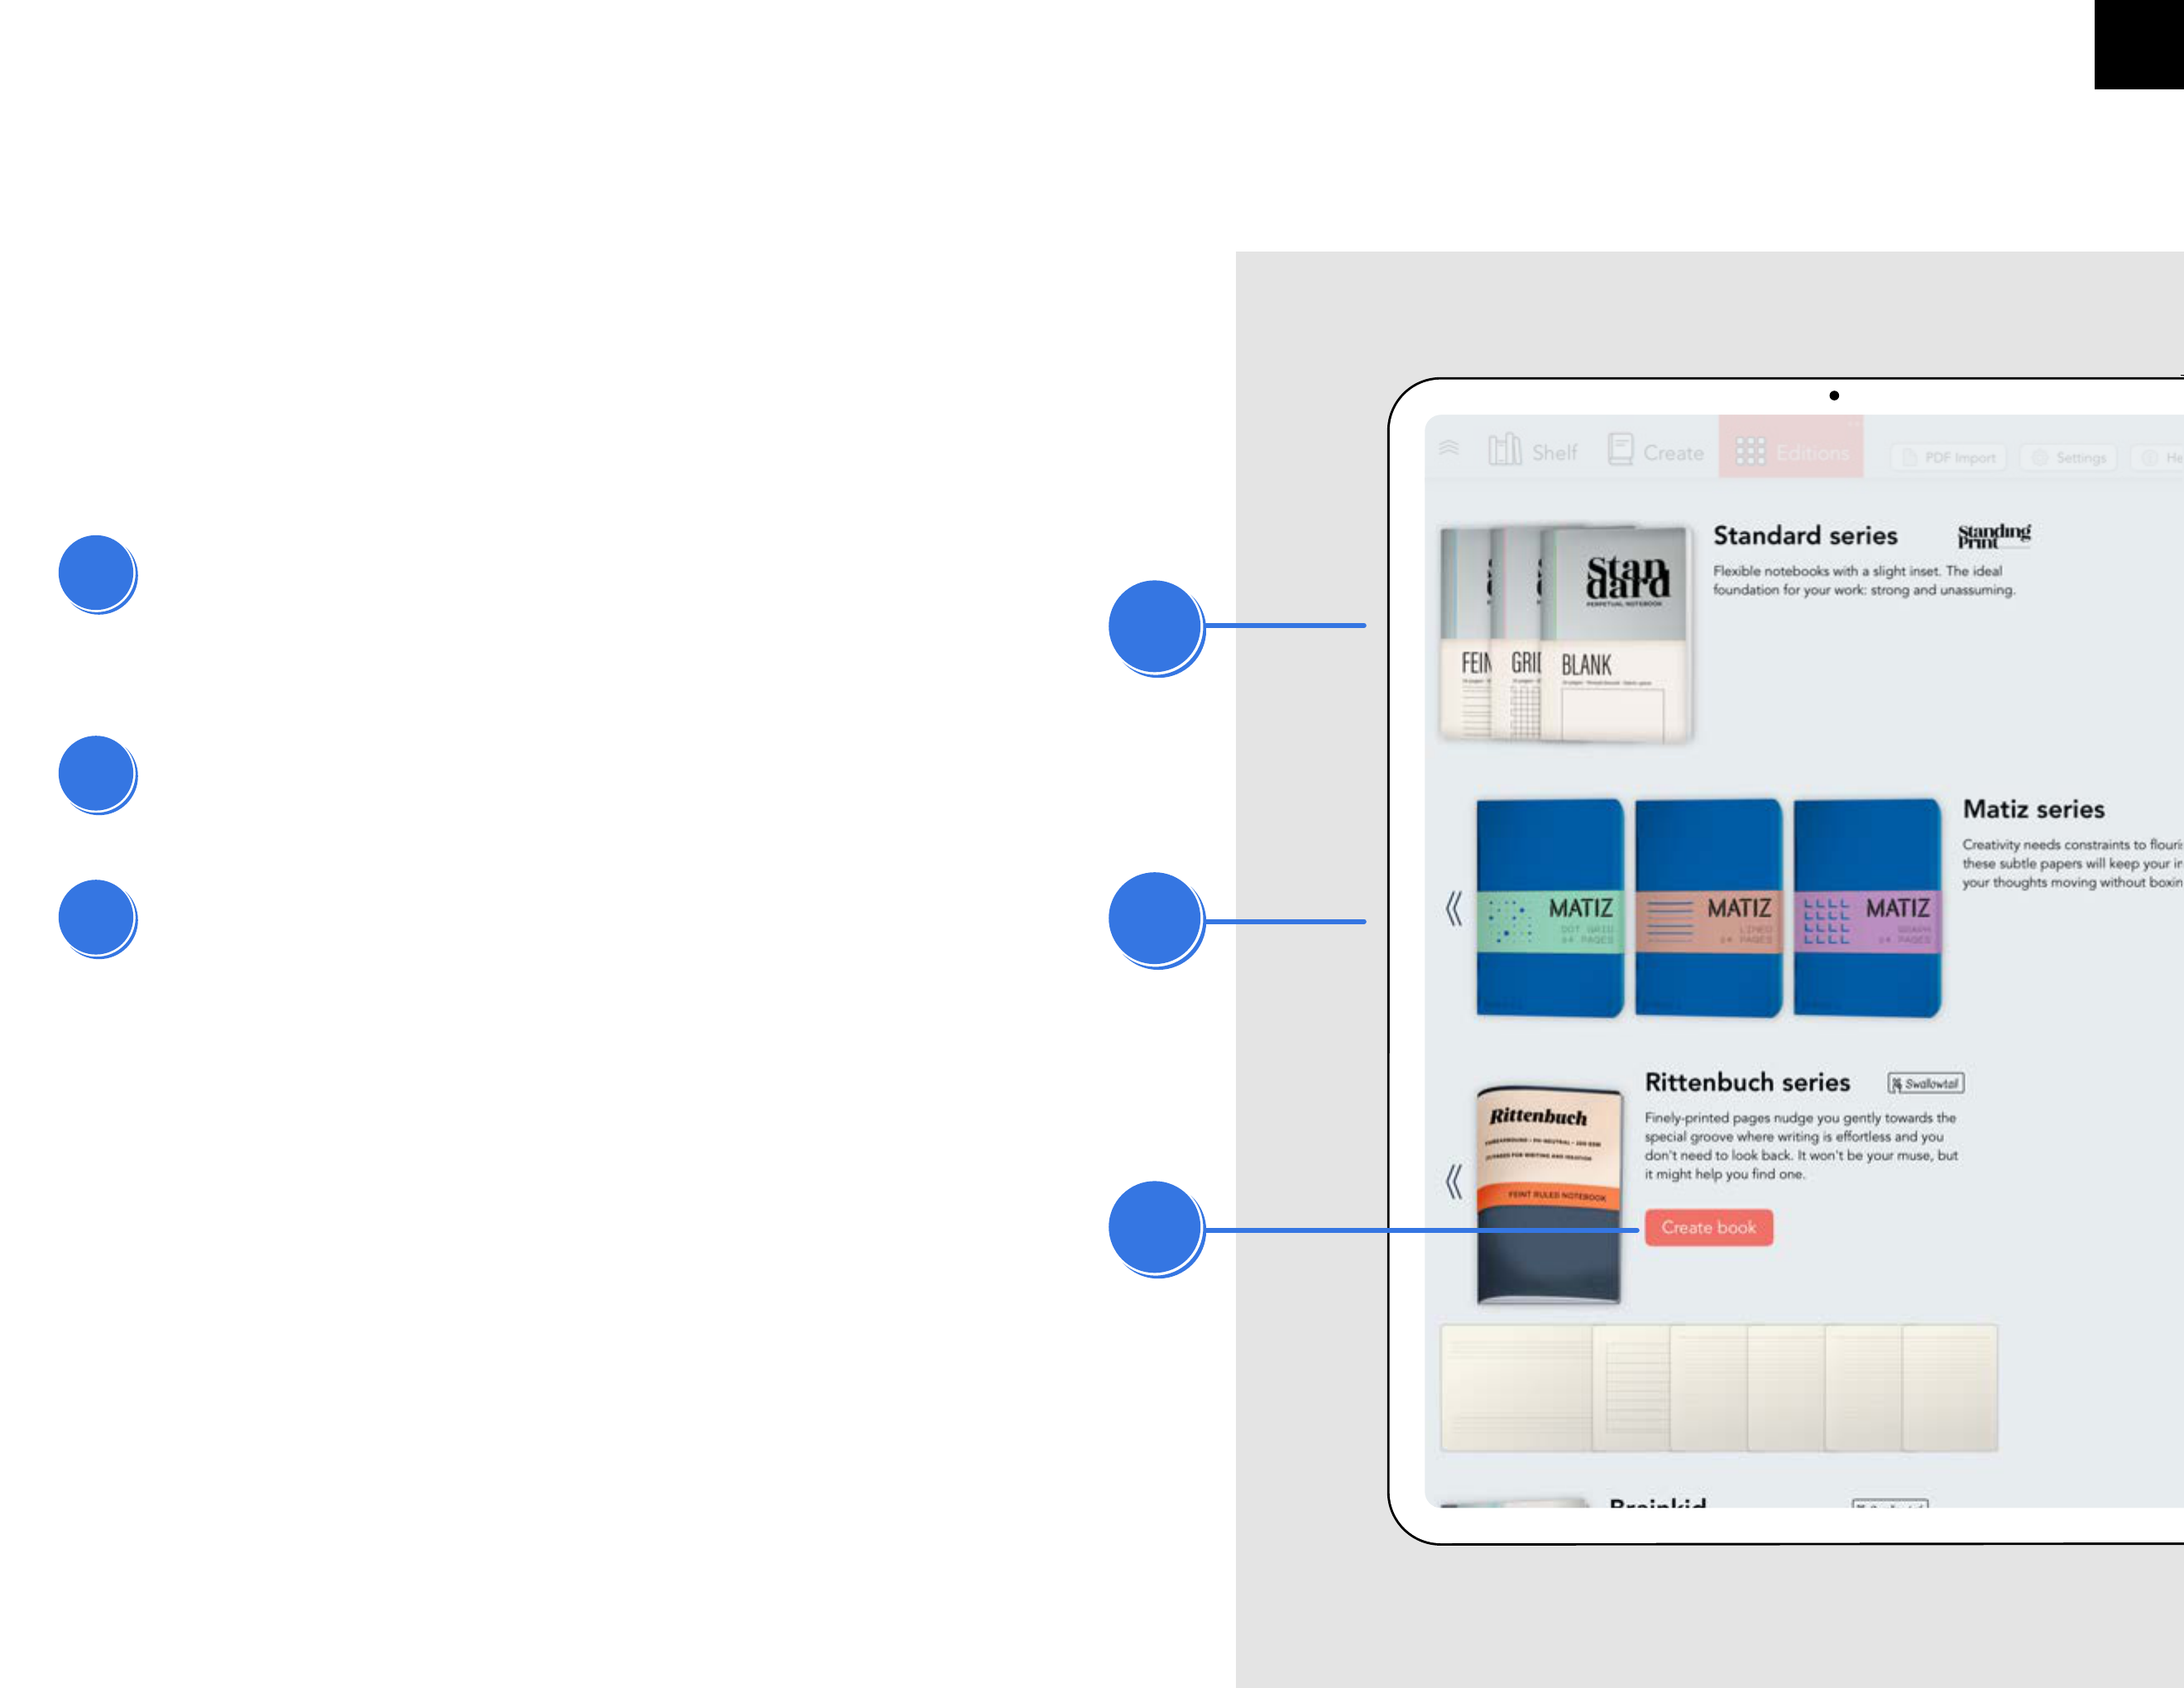
4
Shelf Adding an Editions notebook
1
Each Edition Series can be tapped to
expand it and reveal the Series’
individual notebooks.
2
Tap a specific notebook in an expanded
Series to preview its pages.
3
When you find an Edition notebok you
like, tap Create book to add it to your
Shelf.
Notebooks in the Editions tab are
specially-designed to give you
the best of Penbook.
1
2
3
5
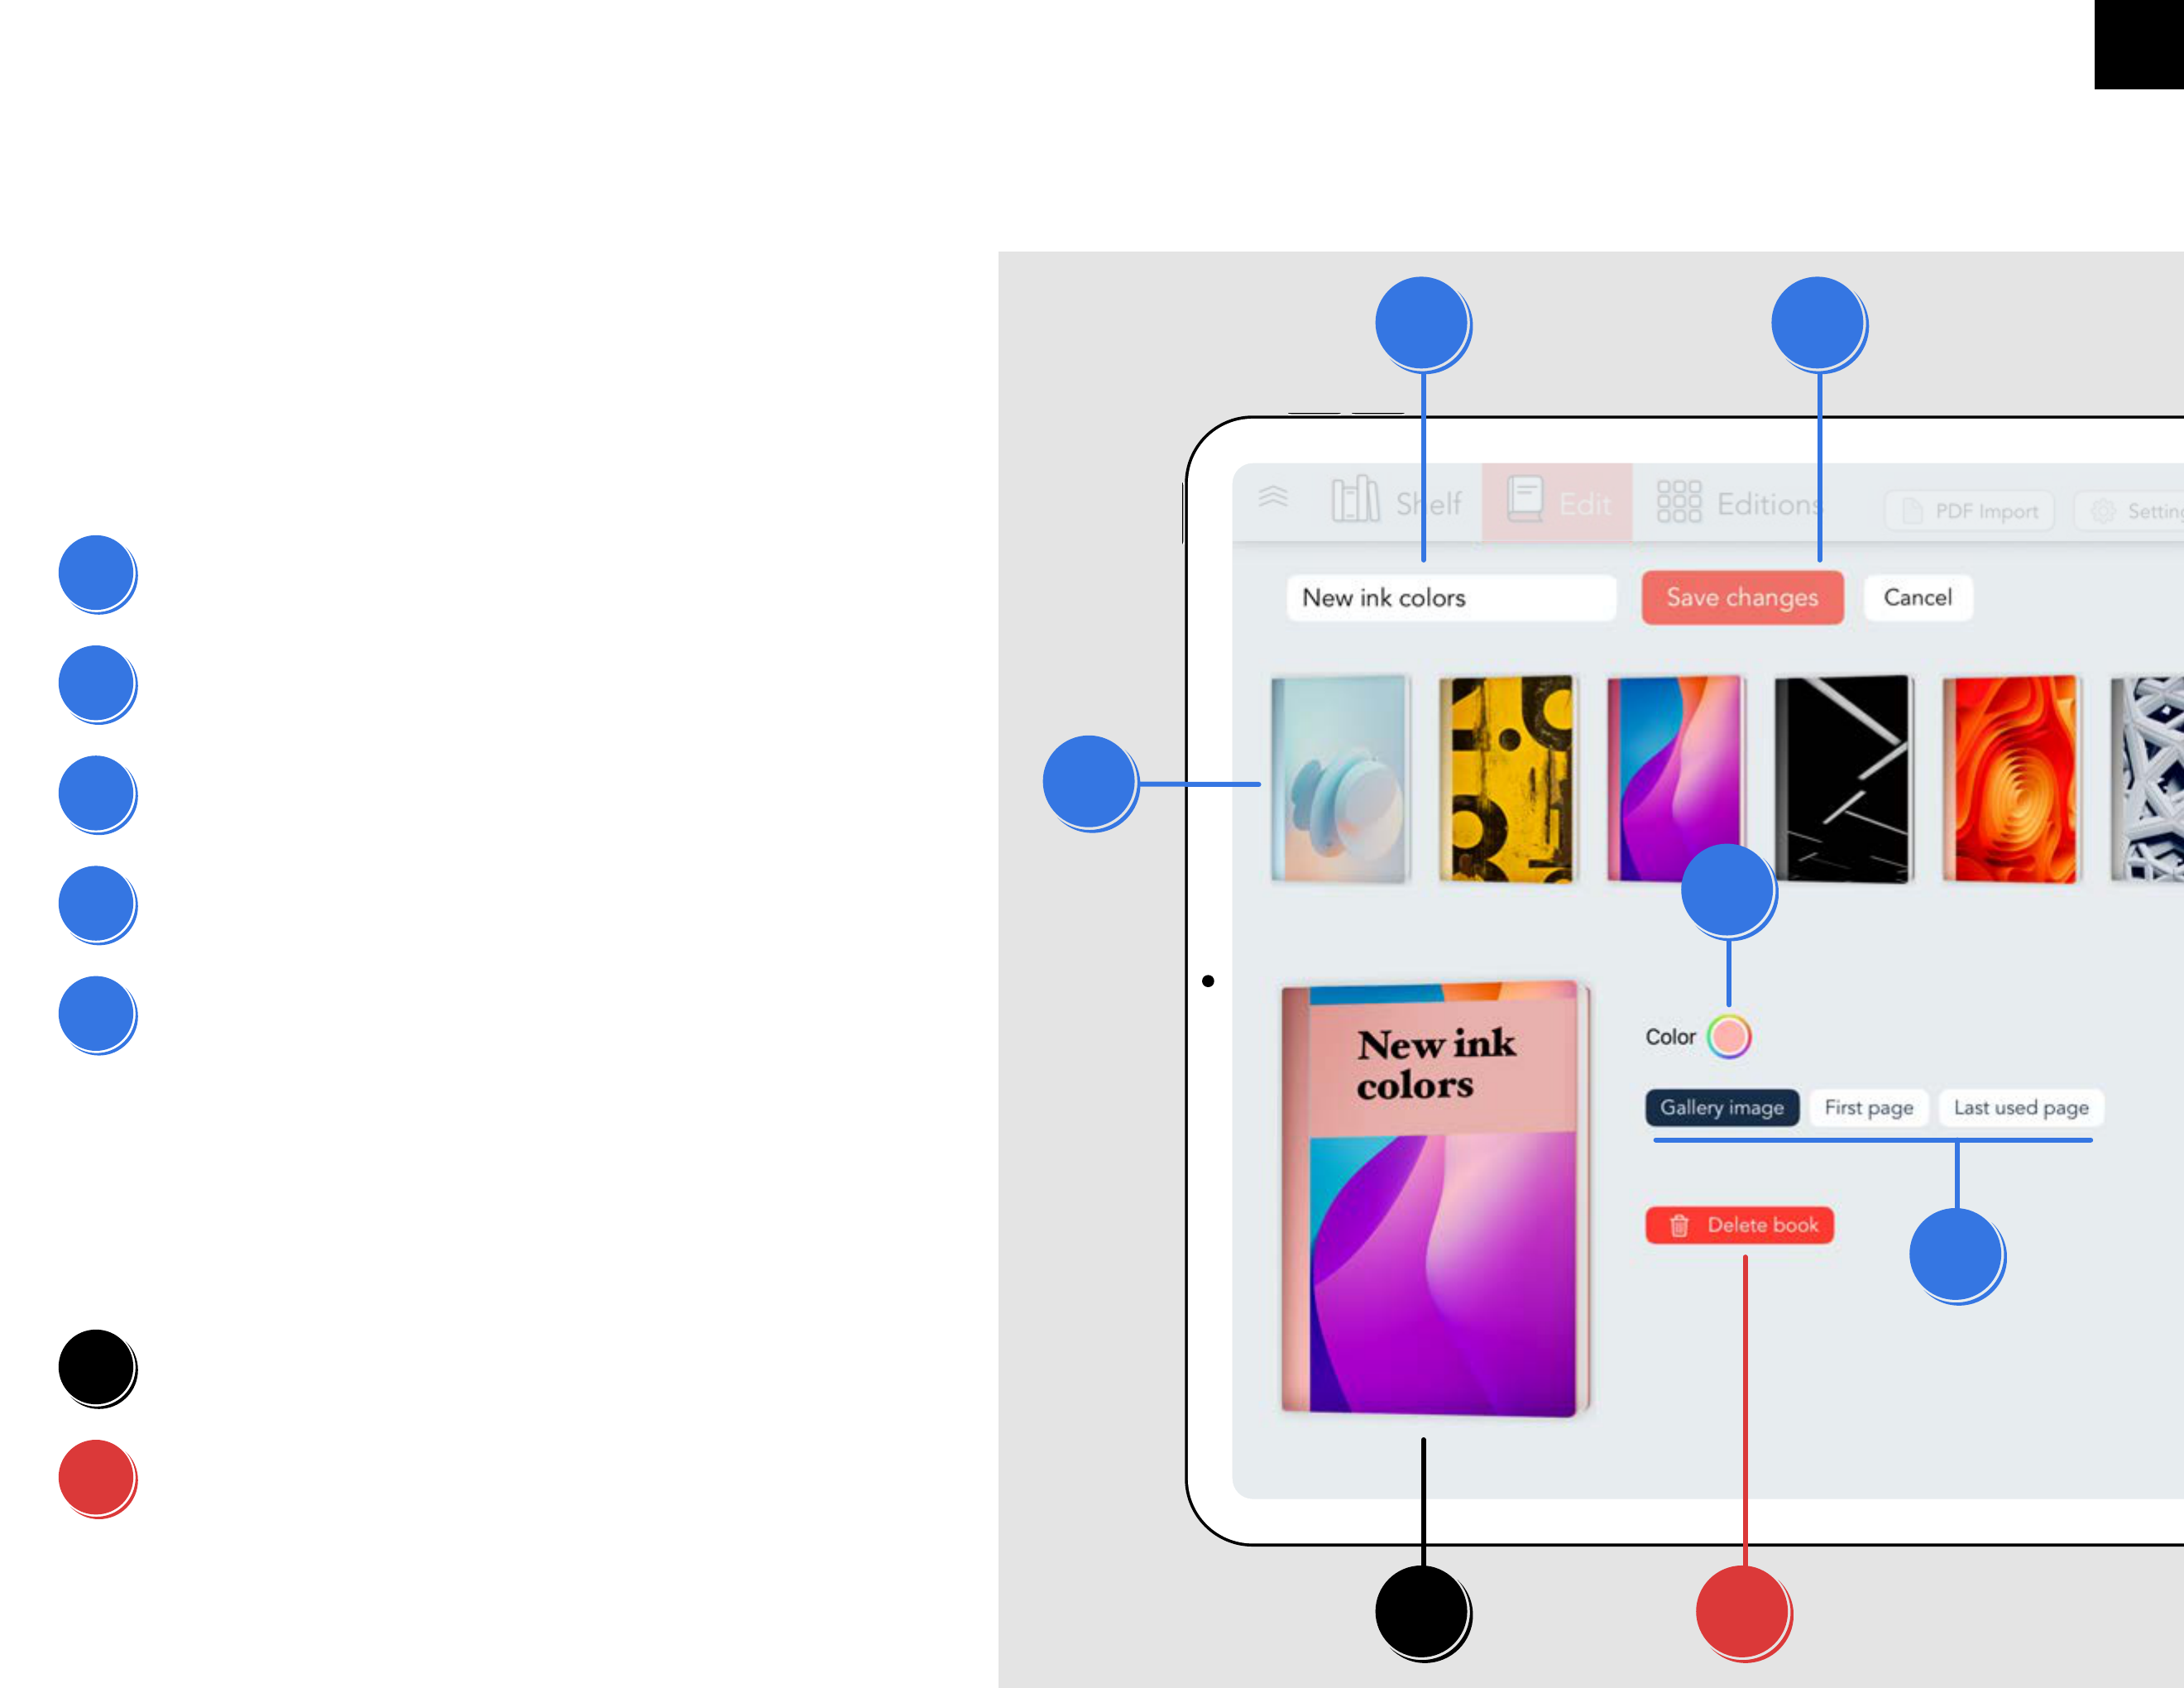
Shelf Editing a notebook
4
1
2
3
5
7
6
1
Change the notebook’s name
2
Save or cancel your changes
3
Select a gallery image for your cover
4
Choose a tint color for your cover
7
Permanently delete this notebook
6
A preview of the notebook’s cover
5
Cover type options.
“First page” will use the notebook’s first
page as the cover.
“Last-used page” will use the page most
recently viewed as the cover.
After you create a notebook, you
can edit its name, cover, and tint,
or delete it.
6
Shelf Create, edit, and add Tags
1
Tap here to stop editing Tags.
2
Enter a name for a new Tag.
3
Create a new Tag with the name you
entered.
4
Long-press on a Tag to change its name,
or delete it
5
Remove a Tag from the current
notebook.
6
Add a Tag to the current notebook.
You can create and edit Tags to
organize your Shelf.
1
2
3
4
6
5
7
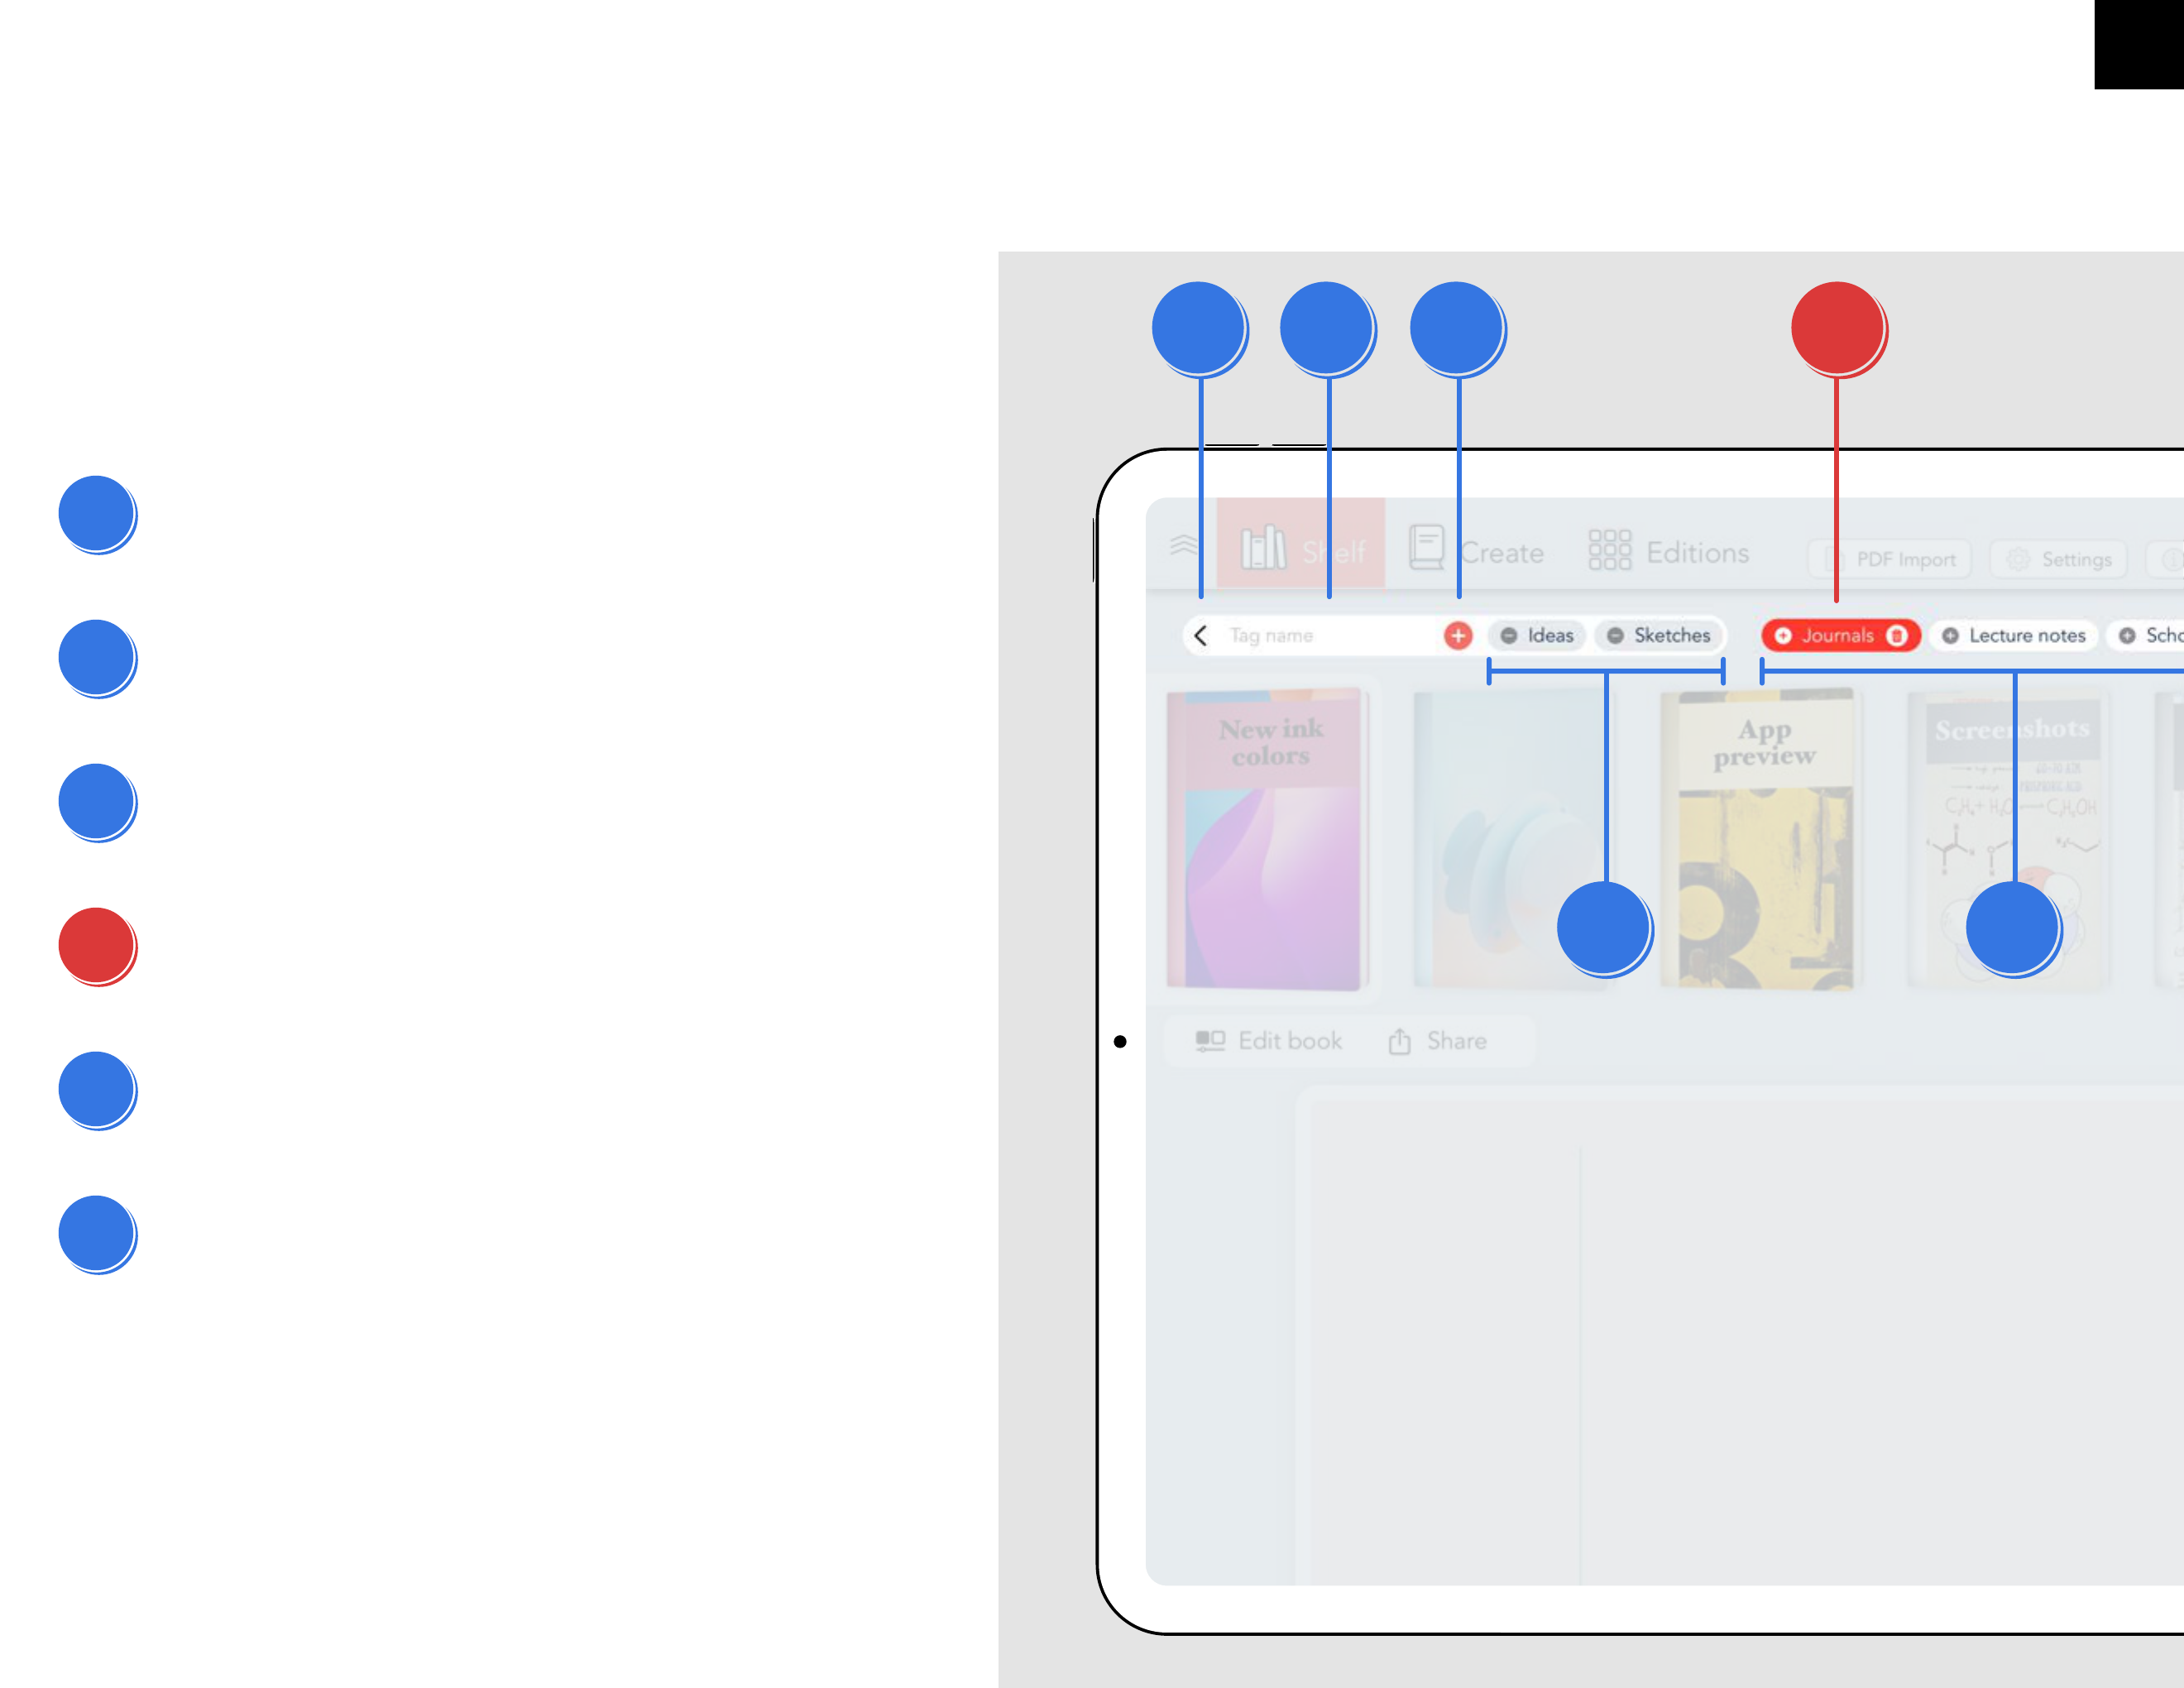
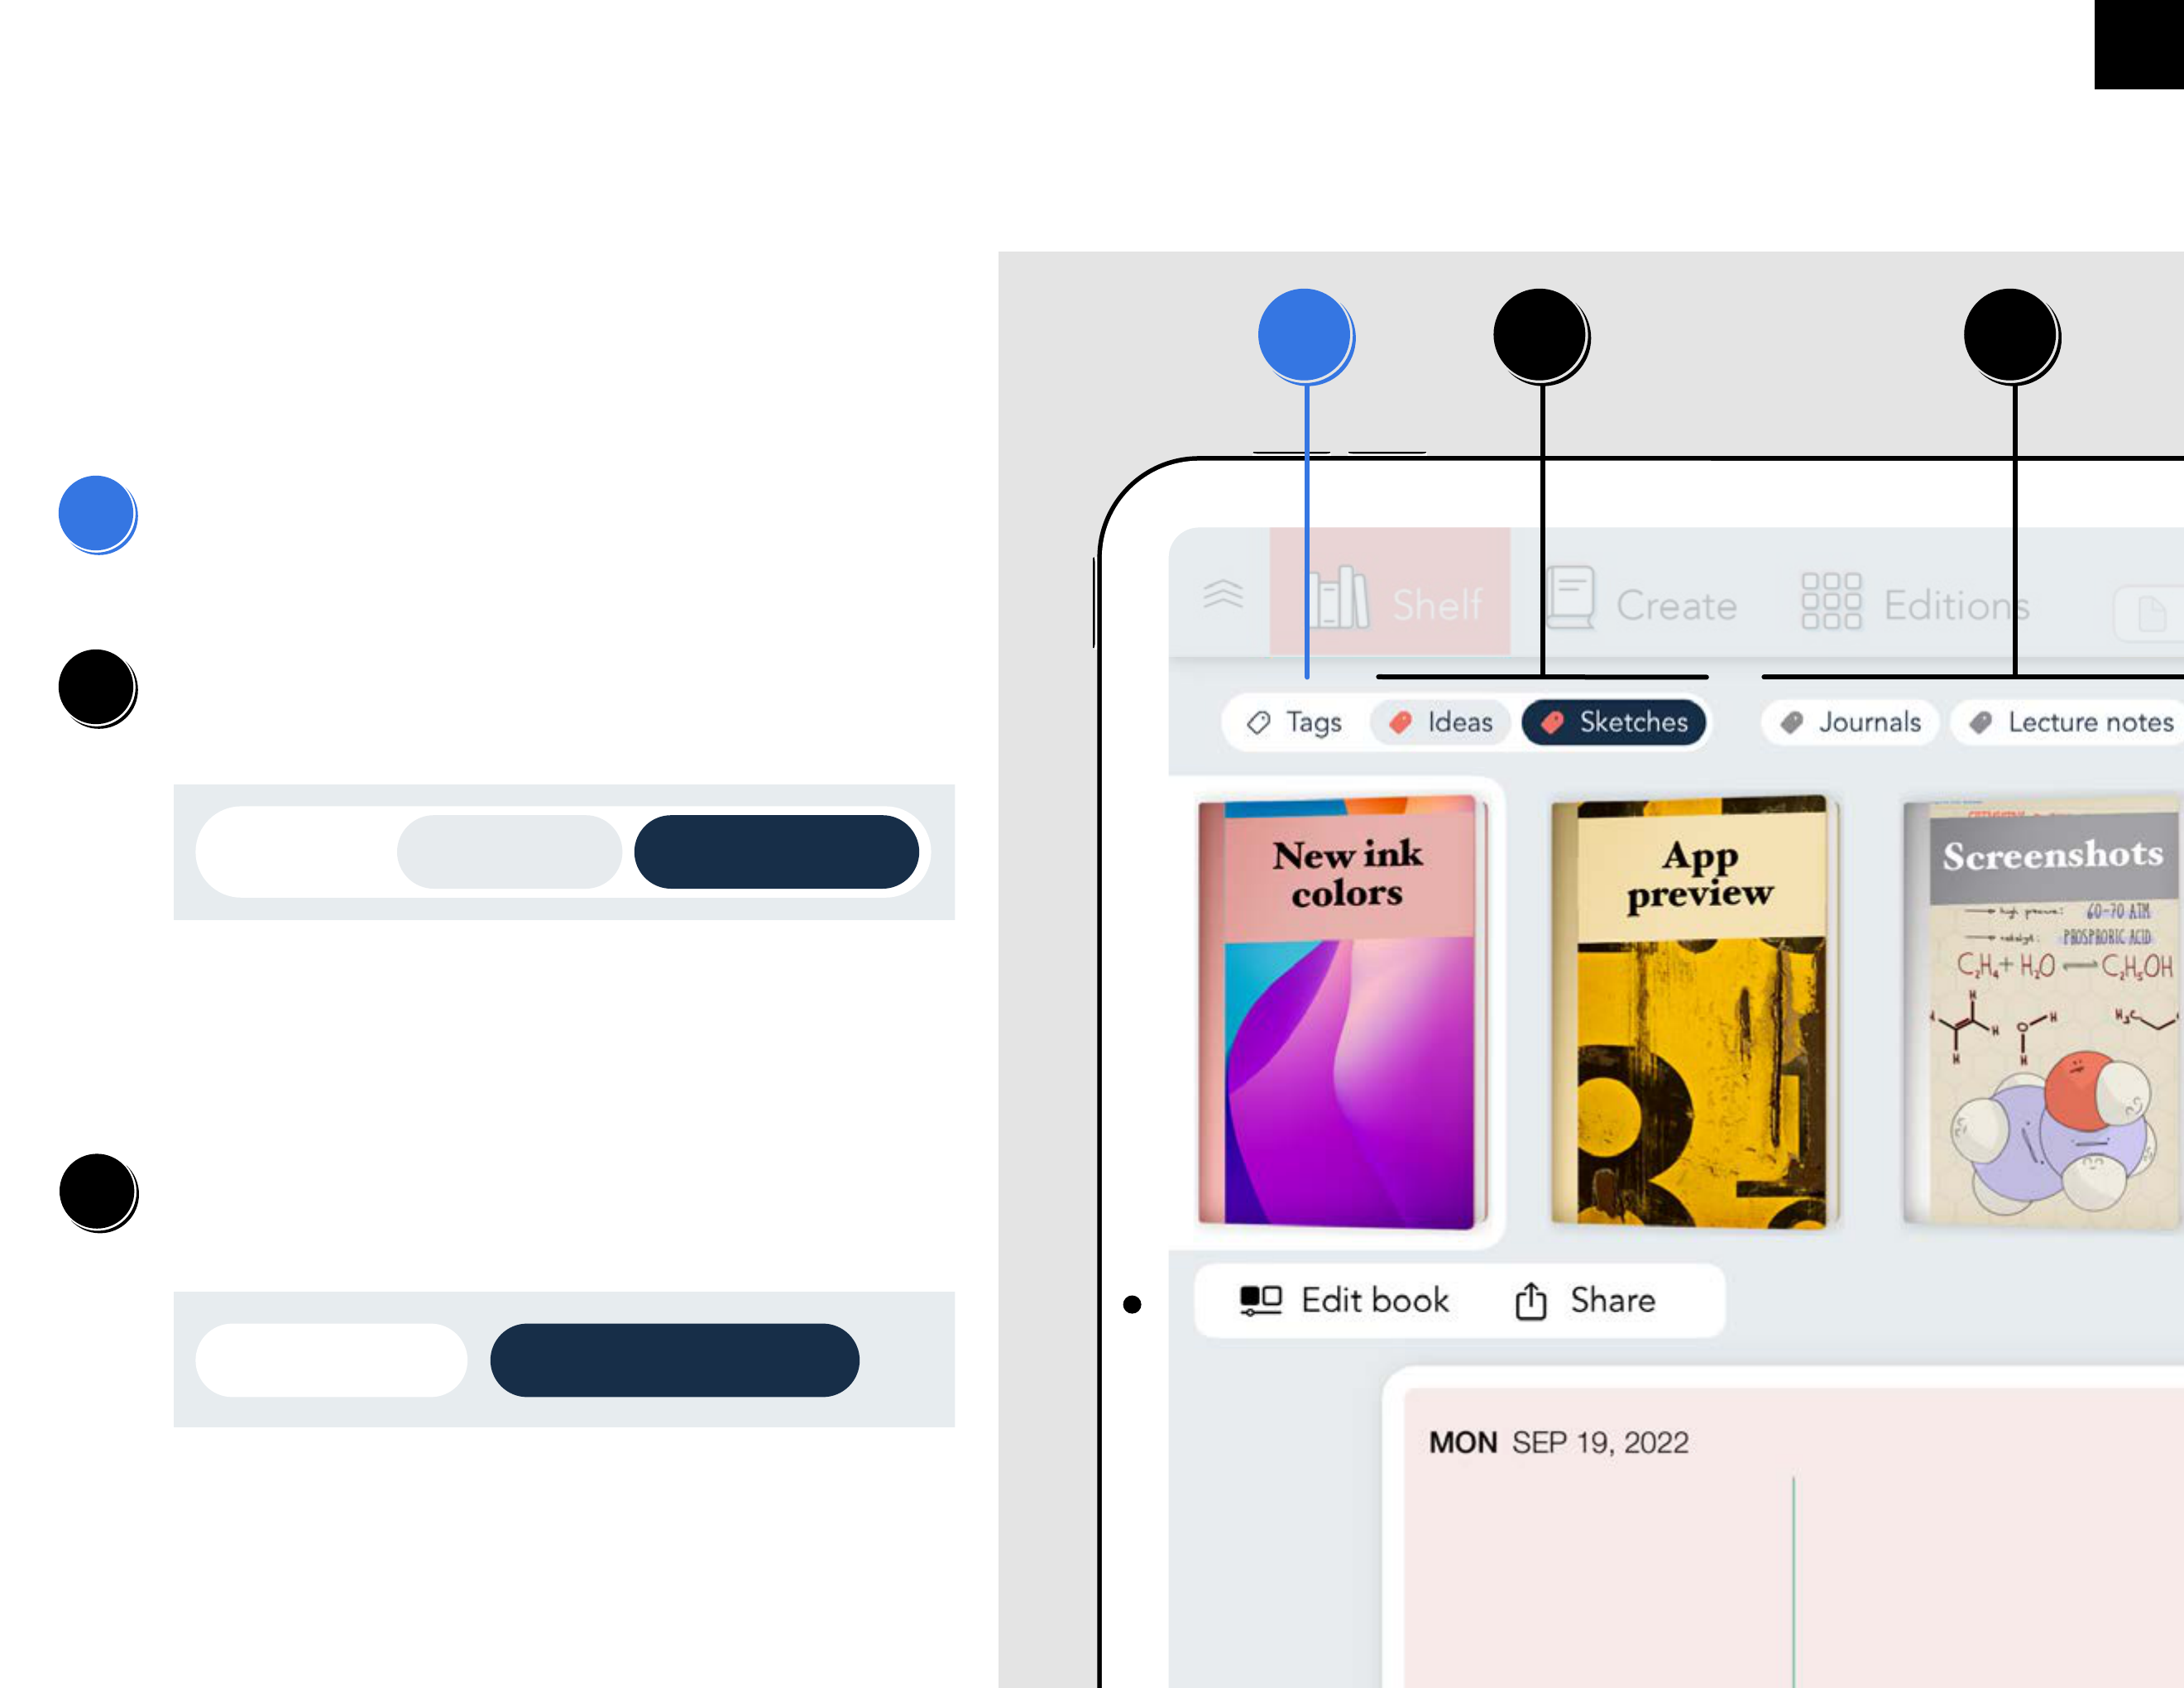
Shelf Using your Tags
1
Tap here to change the current
notebook’s Tags.
Ideas
Sketches
Tags
2
The current notebook’s Tags. Tap one to
filter your Shelf by a Tag.
Here, the current notebook is tagged Ideas and
Sketches. The shelf is filtered to show only
notebooks tagged Sketches.
3
Other Tags in your Shelf. Tap one to filter
your Shelf by a Tag.
Journals
Lecture notes
This shelf is currently filtered to show only notebooks
with the Lecture notes Tag. The current notebook
doesn’t have this Tag.
Organize your Shelf by adding
Tags to your notebooks.
1
2
3
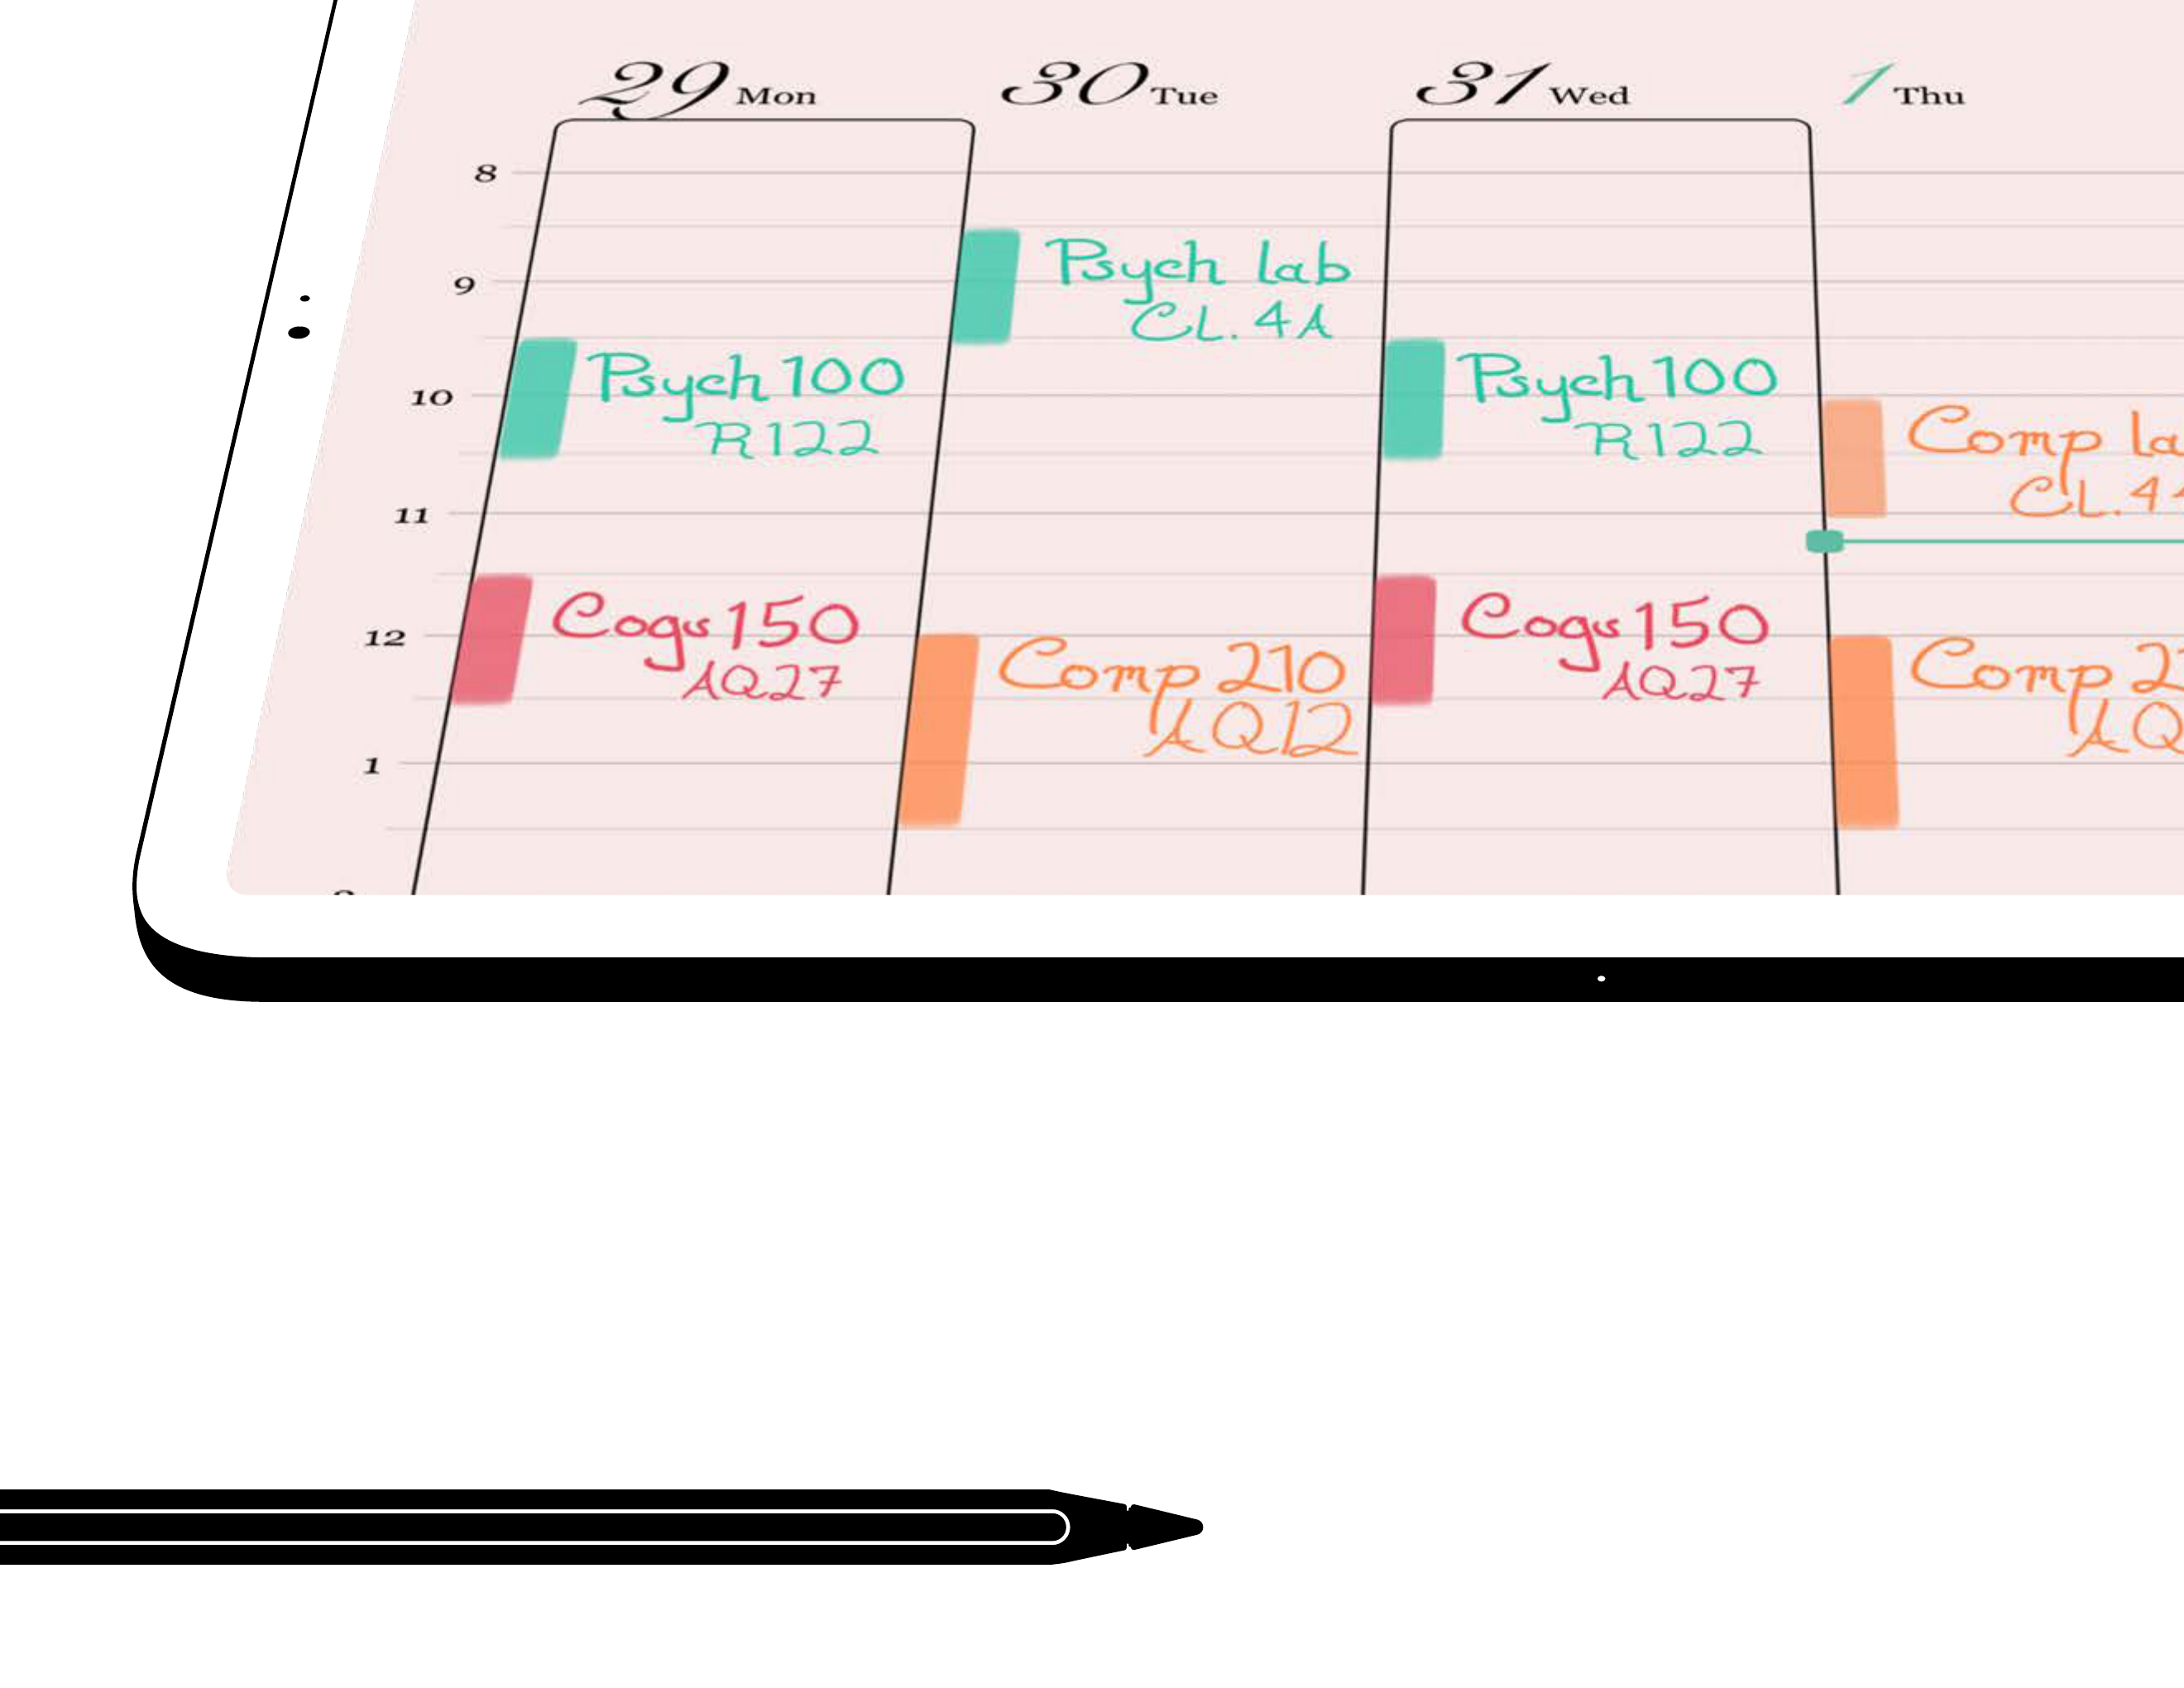
29
8
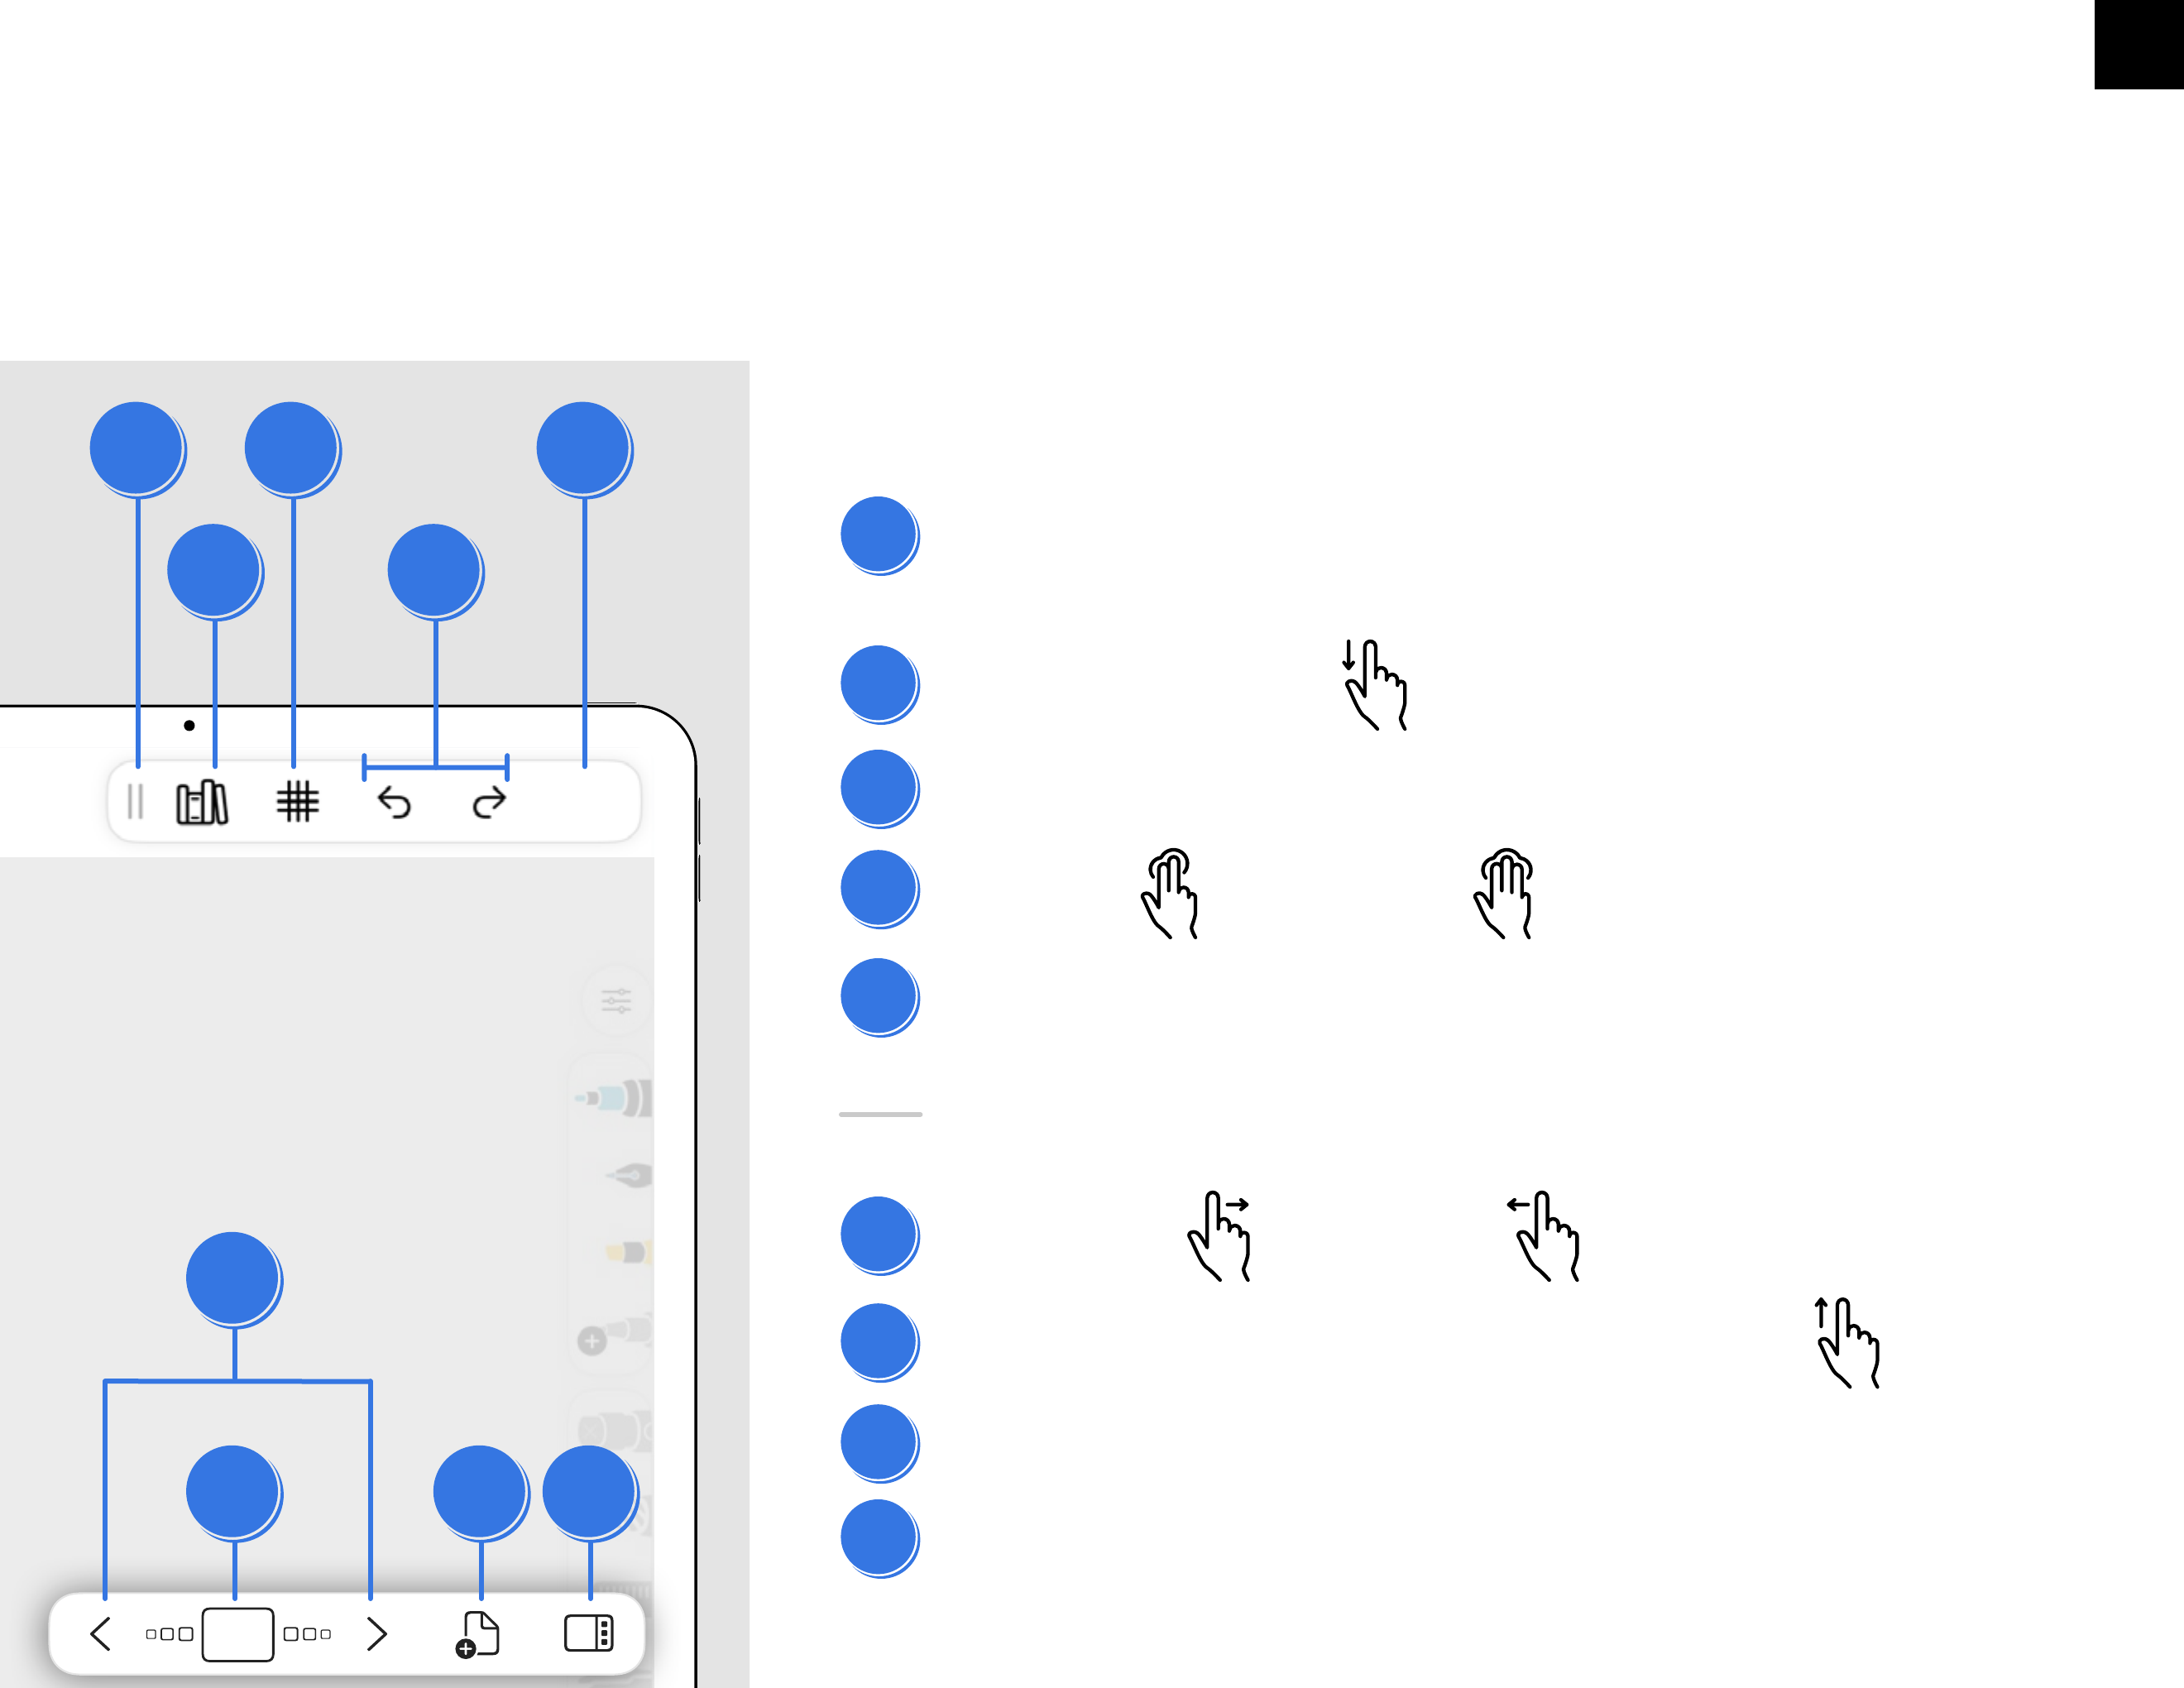
Writing Navigating the Writing Page
1
3
2
4
5
6
9
8
7
1
Drag handle. Move the menus to the other side of the
page, or collapse them off the nearest edge.
2
Show the Shelf
7
Minimap showing your notebook’s contents
9
Add Attachments (Pictures, Stickers, Washi Tape, Maps,
and Text Notes), and access the Scratchpad.
8
Add a new page
3
Stationery options
4
Undo and Redo
5
Share, duplicate, or import pages.
6
Previous and Next page
The Writing Page is the center of Penbook.
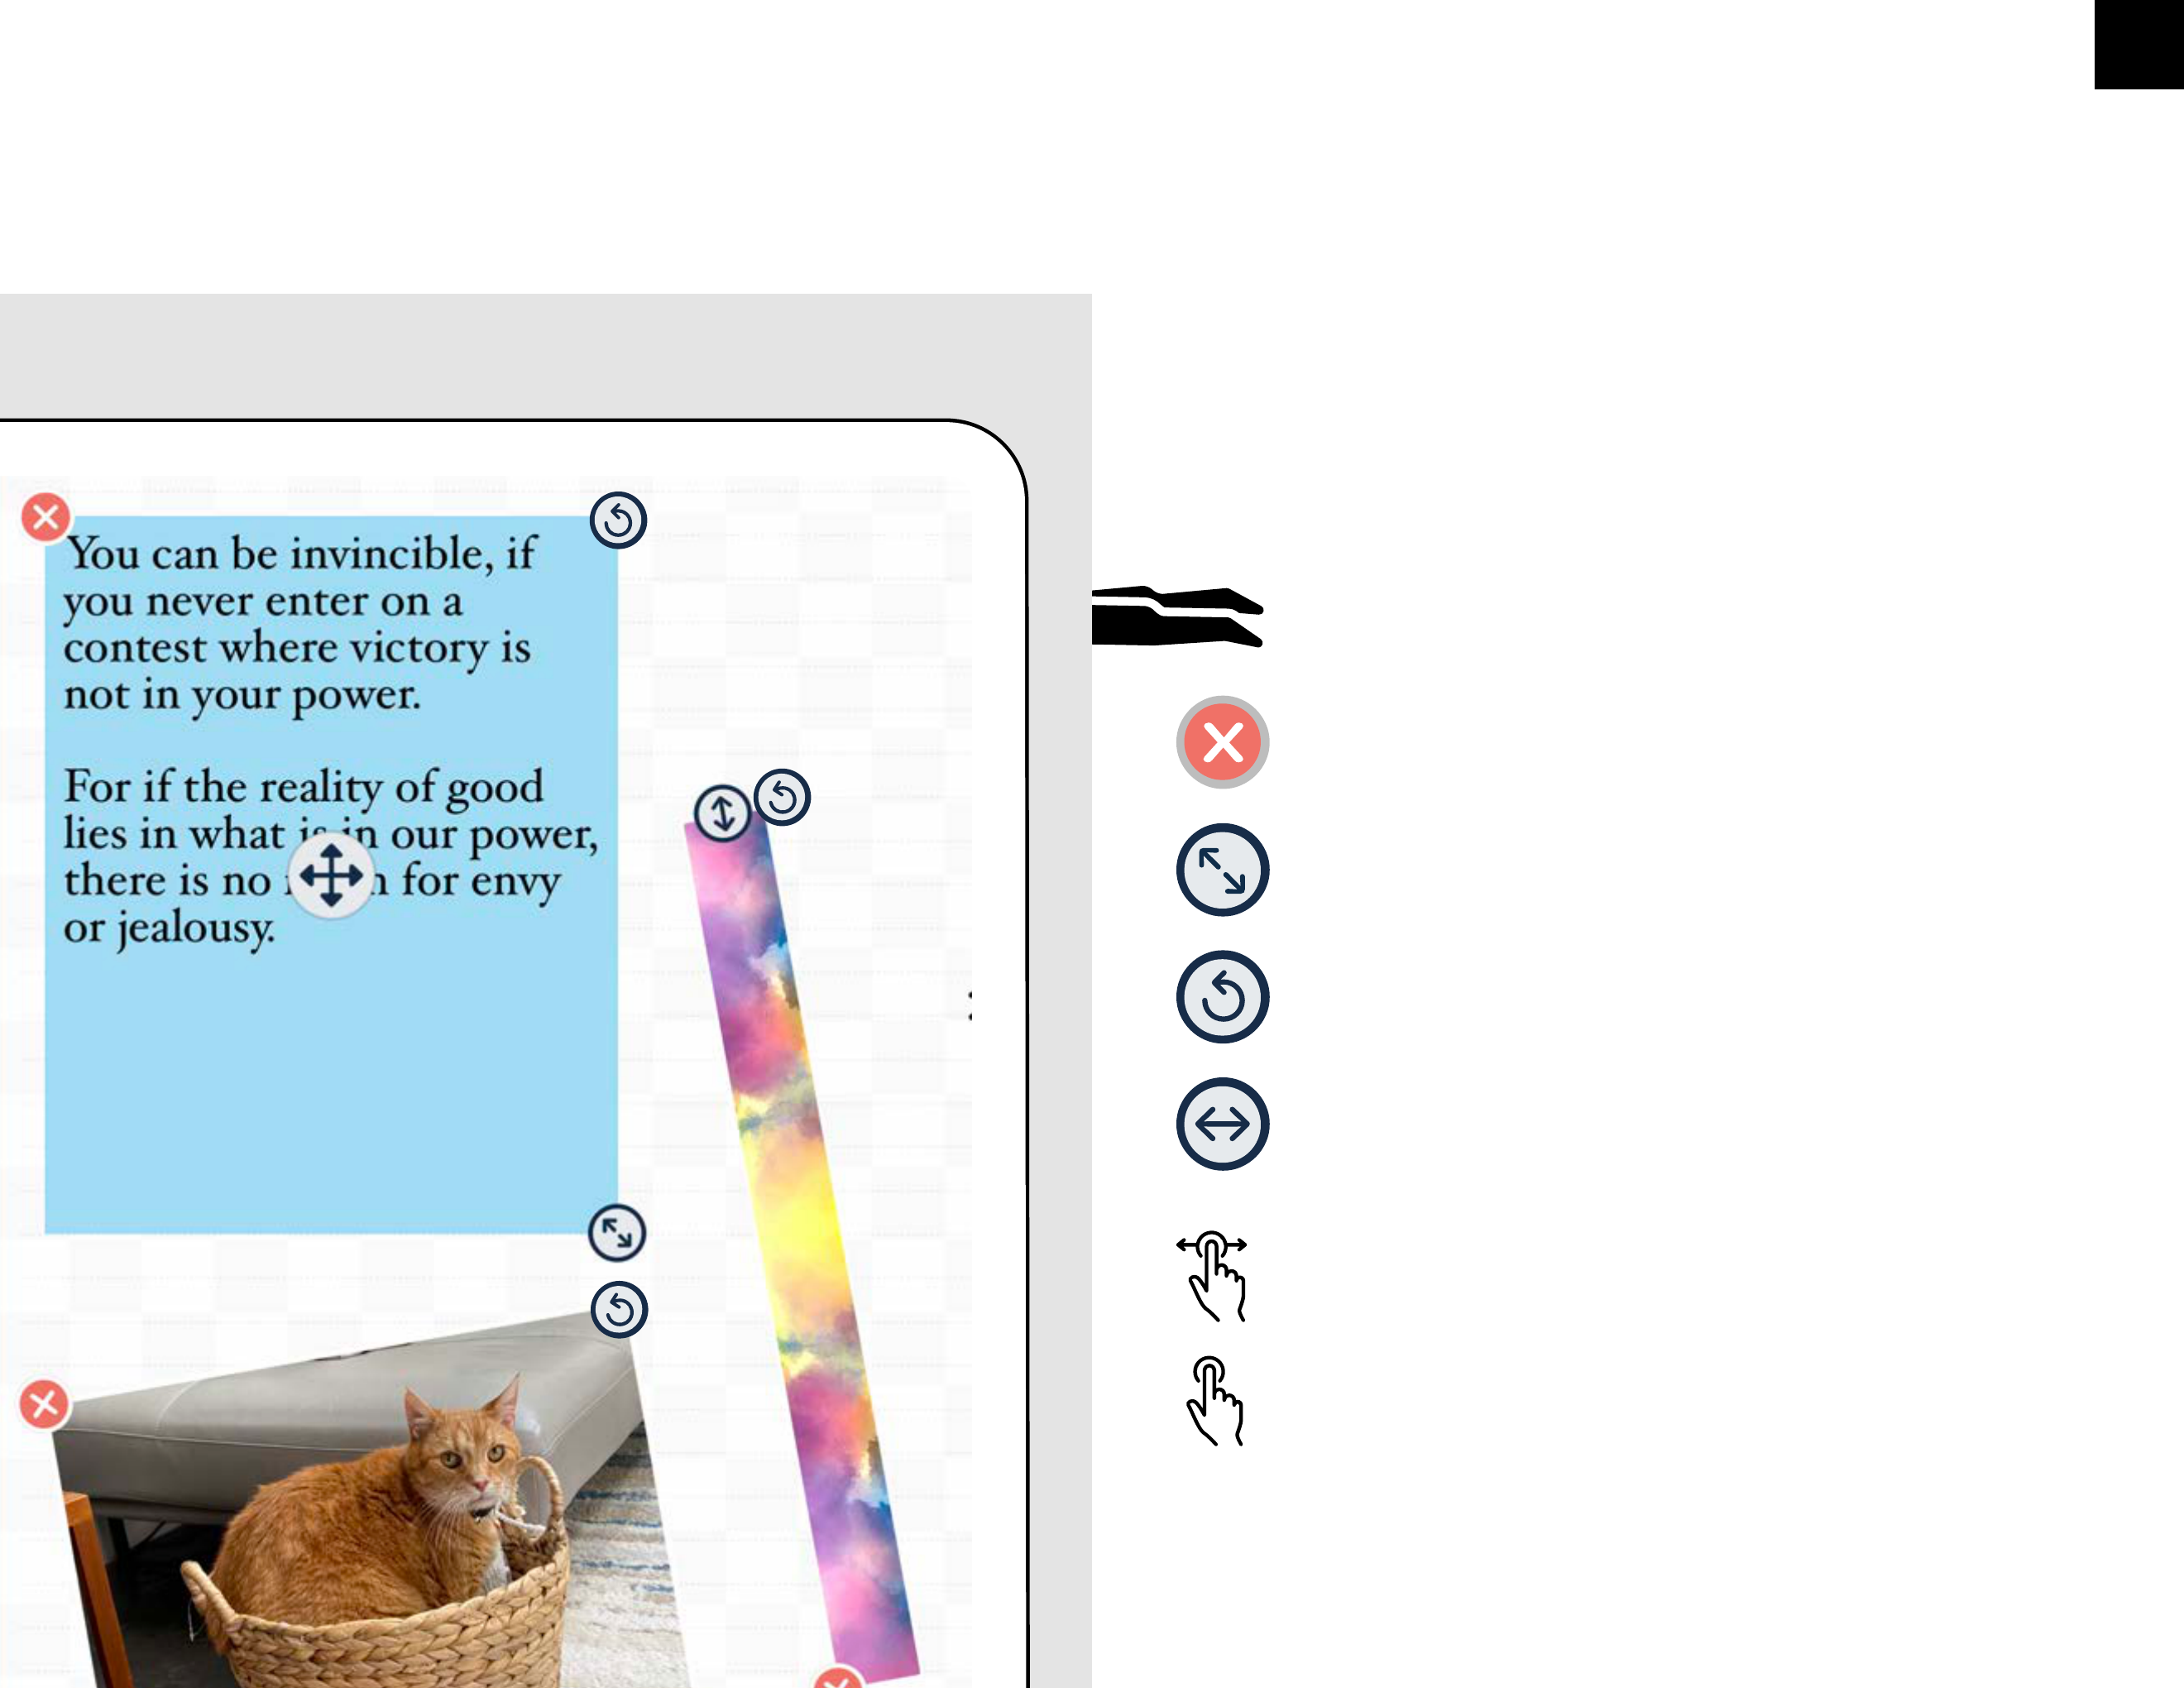
9
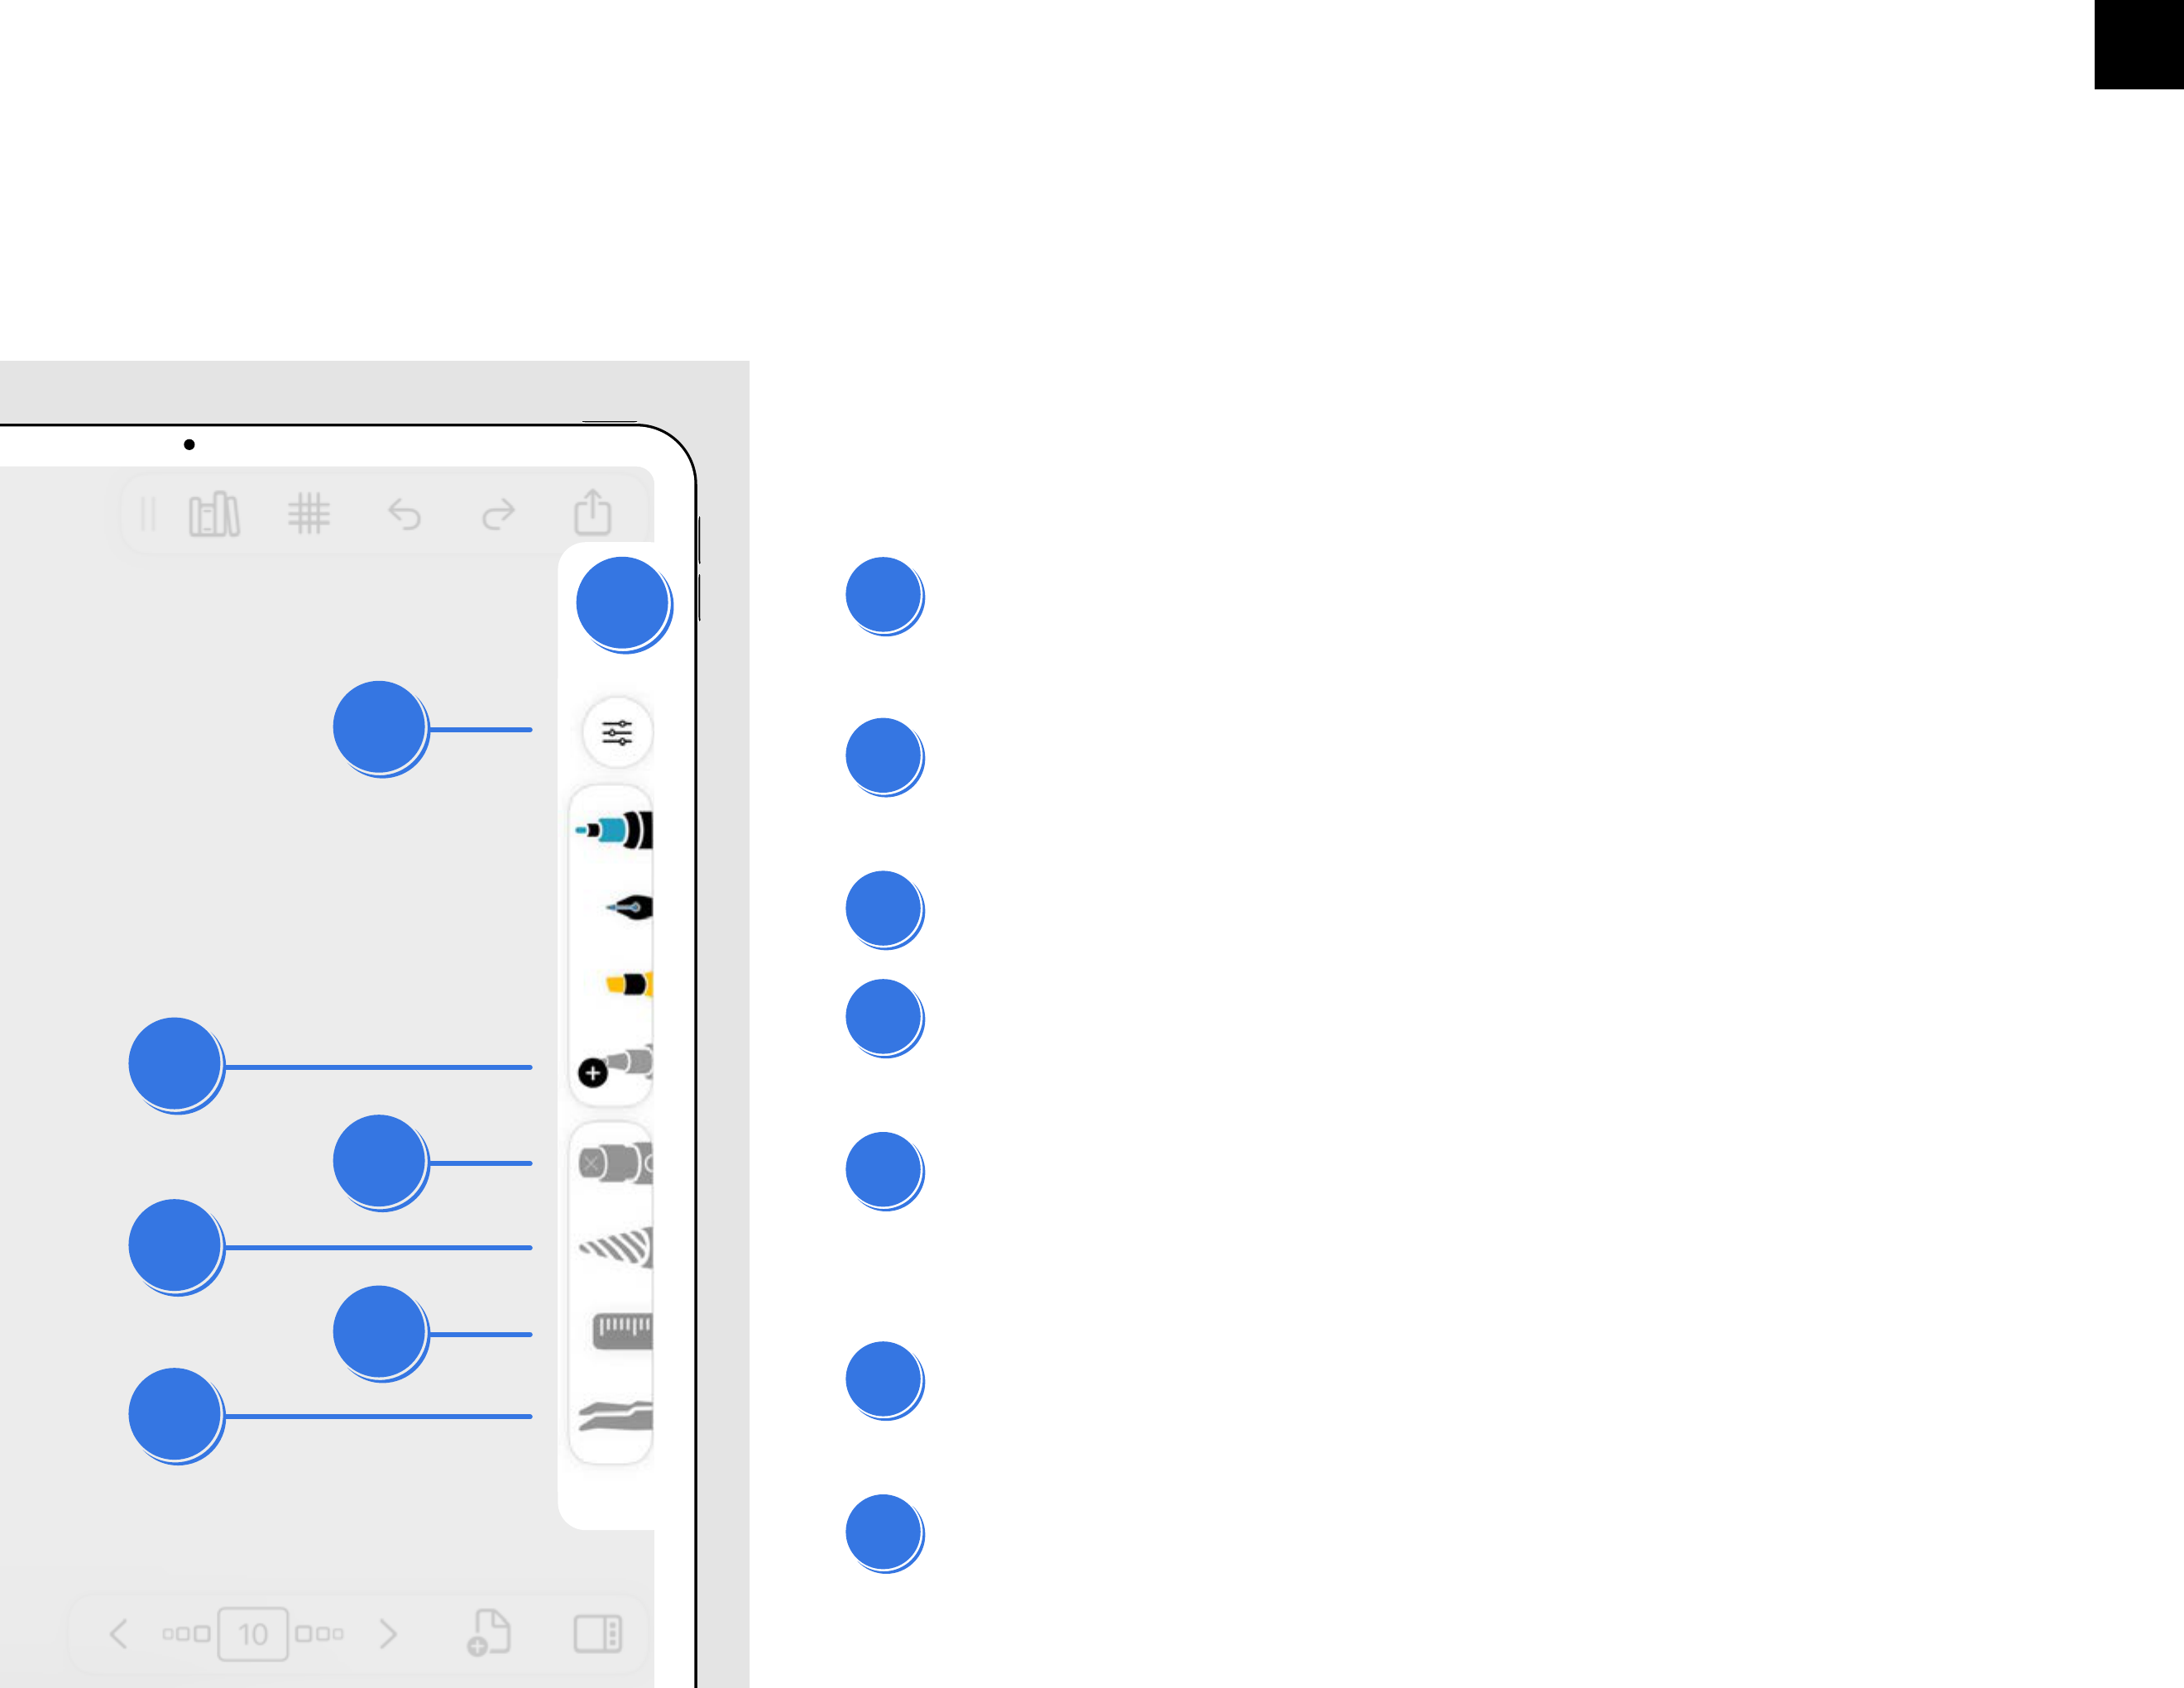
Writing Tool drawer
1
3
5
7
2
4
6
1
Writing tools. Up to 12 instruments, defined by you.
Reorder them by long-pressing and dragging.
3
Add tool. Add a new tool to your palette.
2
Change the current tool’s type, color, and thickness. You
can also delete the tool from here.
4
Eraser. Use its options to change between erasing your
ink bit-by-bit and erasing entire strokes.
5
Selection lasso. Draw a circle around ink you want to
move or copy. Tap this tool to bring up the Copy and
Paste buttons.
6
Ruler. Tap to turn it on or off. Rotate and move the ruler
with two fingers.
7
Tweezers. Shows the Layout Editor.
Penbook gives you 12 customizable pens, two
types of erasers, a ruler, and a selection lasso.

10
Writing Useful gestures
These gestures help keep you in
your flow while you’re writing.
Shape recognition: Change your last
stroke into a rectangle, ellipse, curve, or
straight line.
Long-press with three fingers.
Undo: Undoes your last stroke or page
customization.
Tap with two fingers.
Redo: Undoes your last undo.
Tap with three fingers.
Previous page
Next page
New page (when on the last page of a
notebook)
11
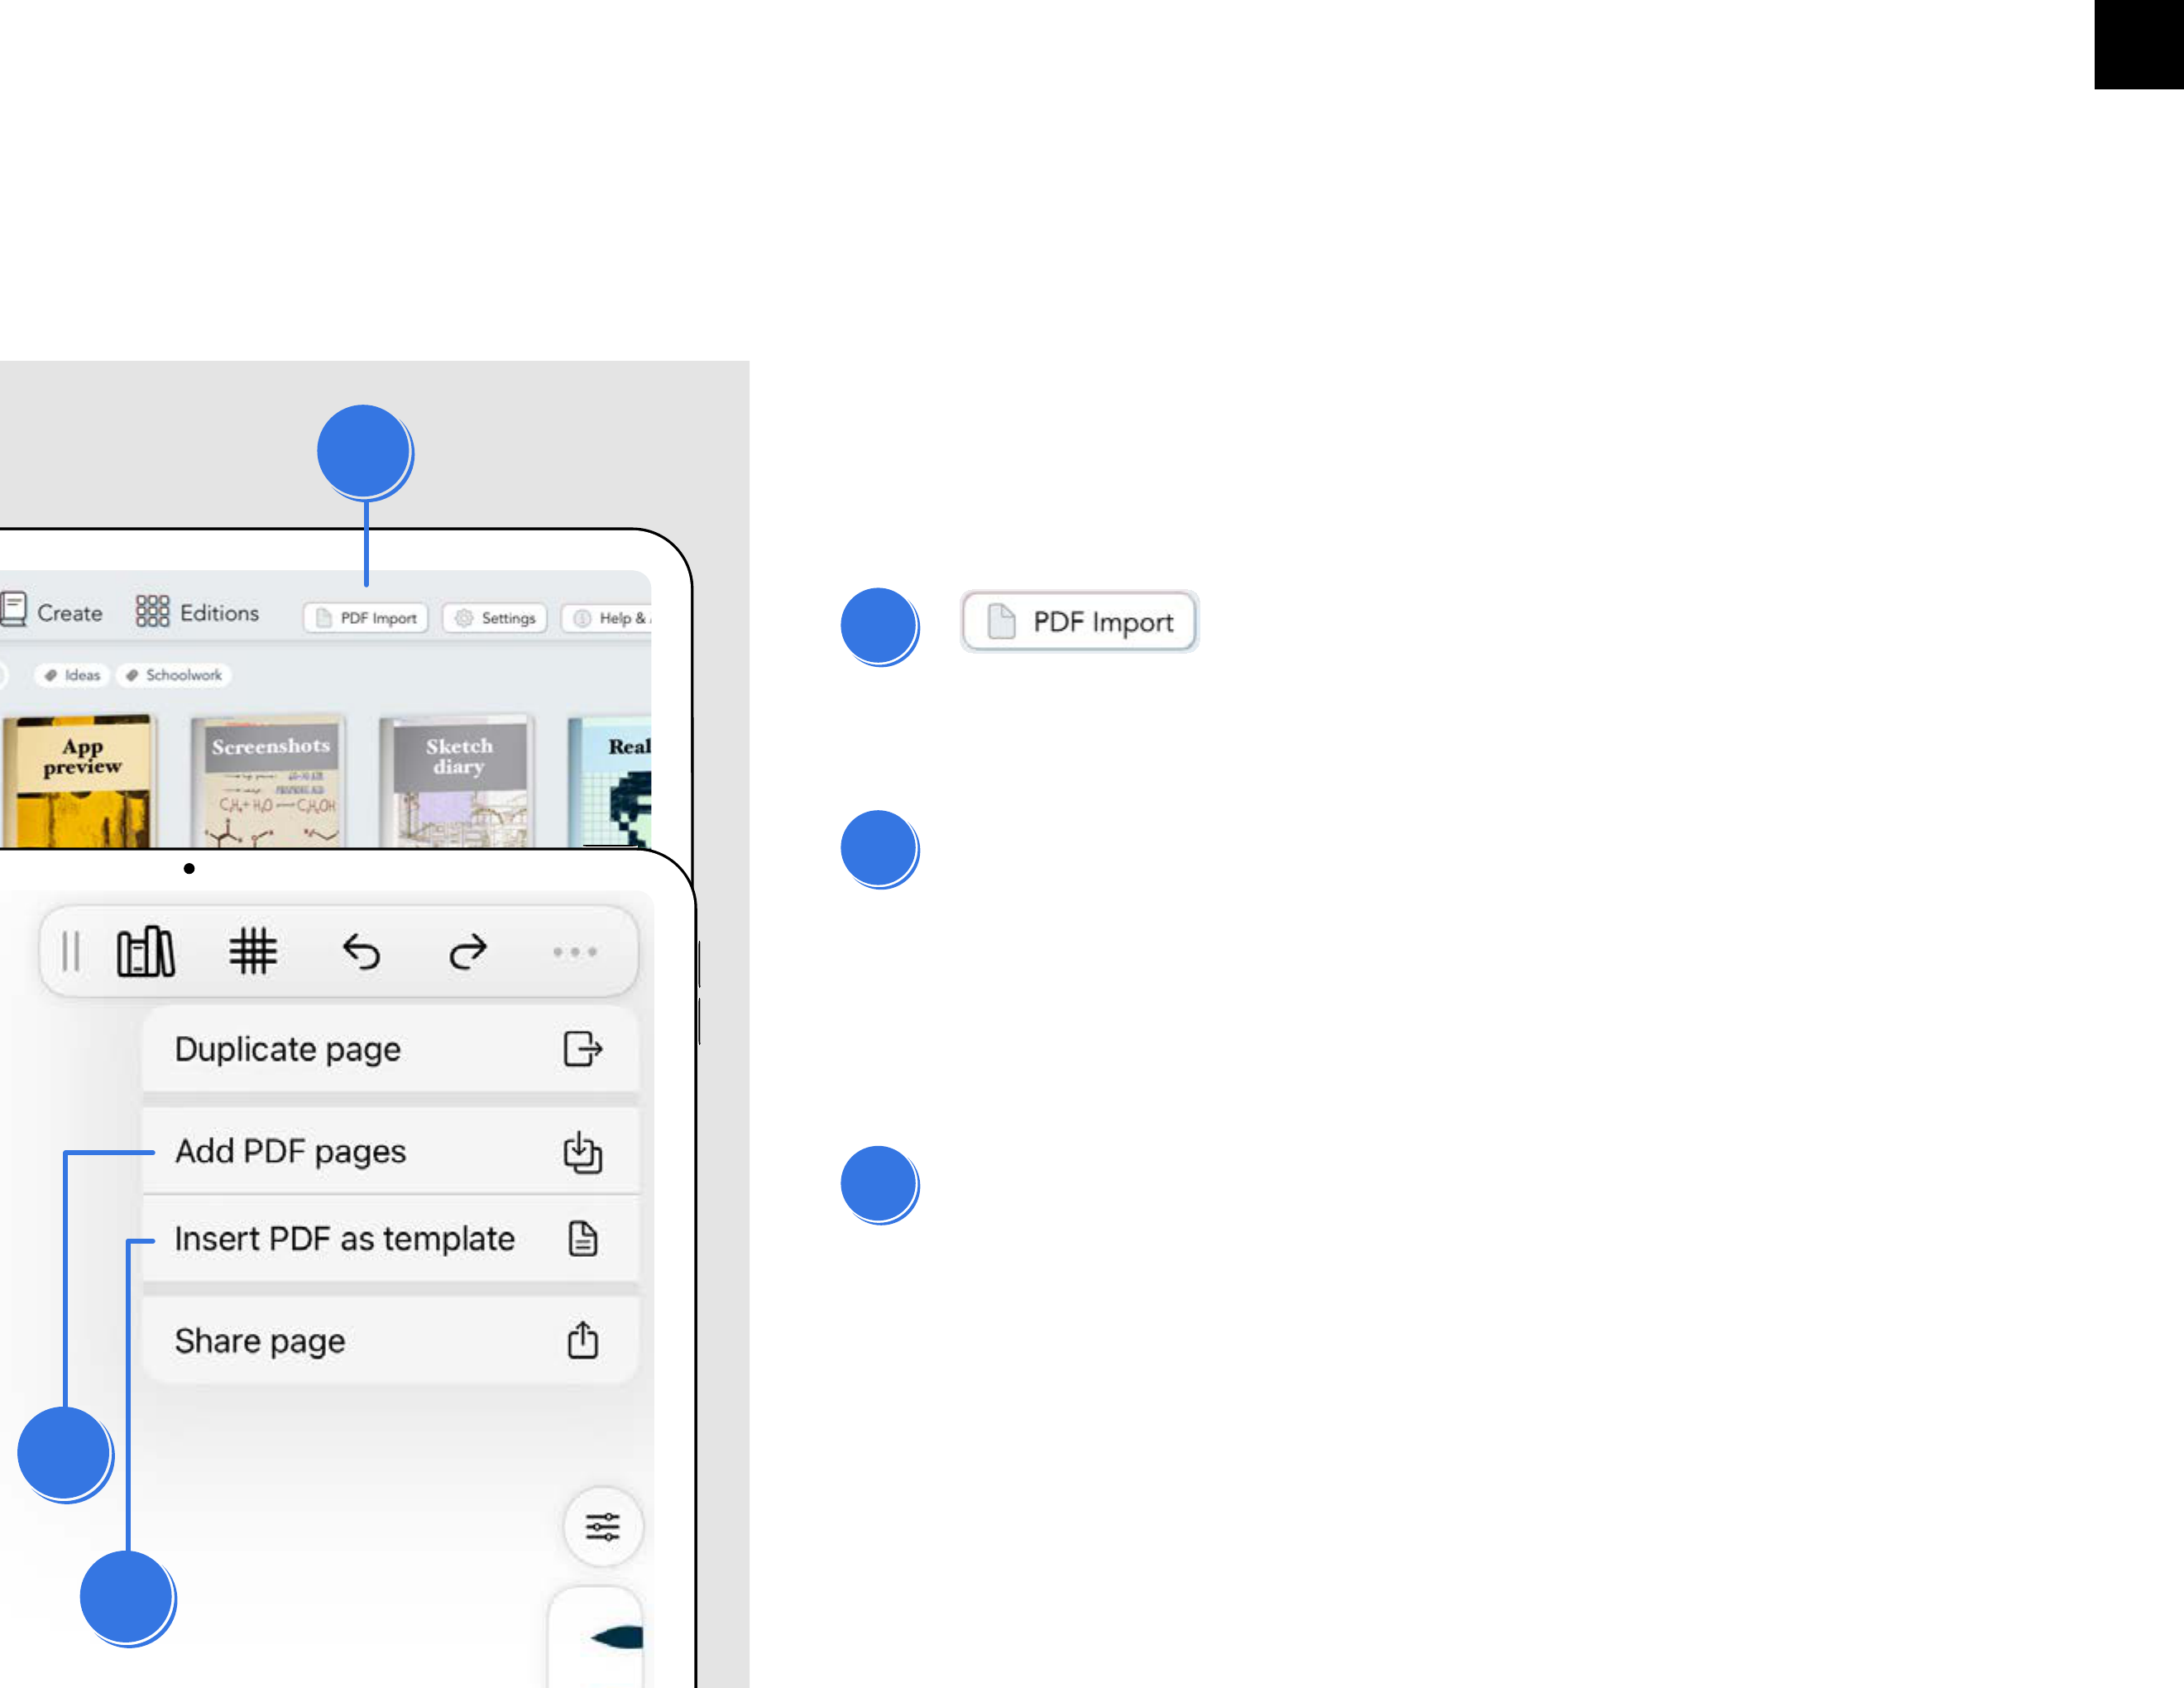
Using PDFs in Penbook
1
3
2
1
PDF Import. Create a new notebook from
a PDF. Works best when you want a notebook built from
a single PDF.
2
Add PDF pages. Adds a PDF as an image into your
notebook page. If the PDF has multiple pages, Penbook
automatically inserts more notebook pages to hold the
PDF page images. Works best when you want a
Penbook-style notebook with your PDFs in the middle.
3
Insert PDF as template. Replaces the current page’s
stationery with a single-page PDF. New pages created
from the current page will use your PDF stationery as
well. Works best when you want to bring your own
stationery to Penbook.
There are three ways to bring PDFs into
Penbook.
12
Attachments Adding Attachments
Attachments add flair and utility to your
notebook pages.
3
Add a Sticker from Penbook’s built-in sticker sheets
4
Place Washi Tape (cut to size) in your notebook
5
Insert a Text Note so you can type or Scribble on the
current page
6
Customize and insert a Map
7
Access the Scratchpad
8
Return to the Writing Page
1
Insert a Picture from your device's camera
2
Add a Picture from your device’s Photos library
1
3
4
5
6
7
8
2
13
Attachments Layout Editor
Delete the attachment
Enter the Layout Editor
Lengthen or shorten a strip of Washi Tape
Resize a Text Note, Picture, Sticker, or Map
Resize a Text Note, Picture, Sticker, or Map
The Layout Editor has tools for
changing and deleting
Attachments.
Move the attachment
Tap a blank part of the page to return to
the Writing Page

14
Attachments Typing in a Text Note
Attaching a Text Note takes you to
the Typing screen.
3
Make the Typing screen full-screen
2
Move the Text Note to another page
4
Add this design to your Faves
5
Edit typeface and size
6
Edit the text’s color
7
Edit the background color
1
Save changes and dismiss the Typing screen
1
2
3
8
9
4
5
6
7
8
Text input area. Tap here to type with your
keyboard, or Scribble here to convert your
handwriting to typed text. Supports
Markdown.
9
Preview of your typed (or Scribbled) text on
your notebook page
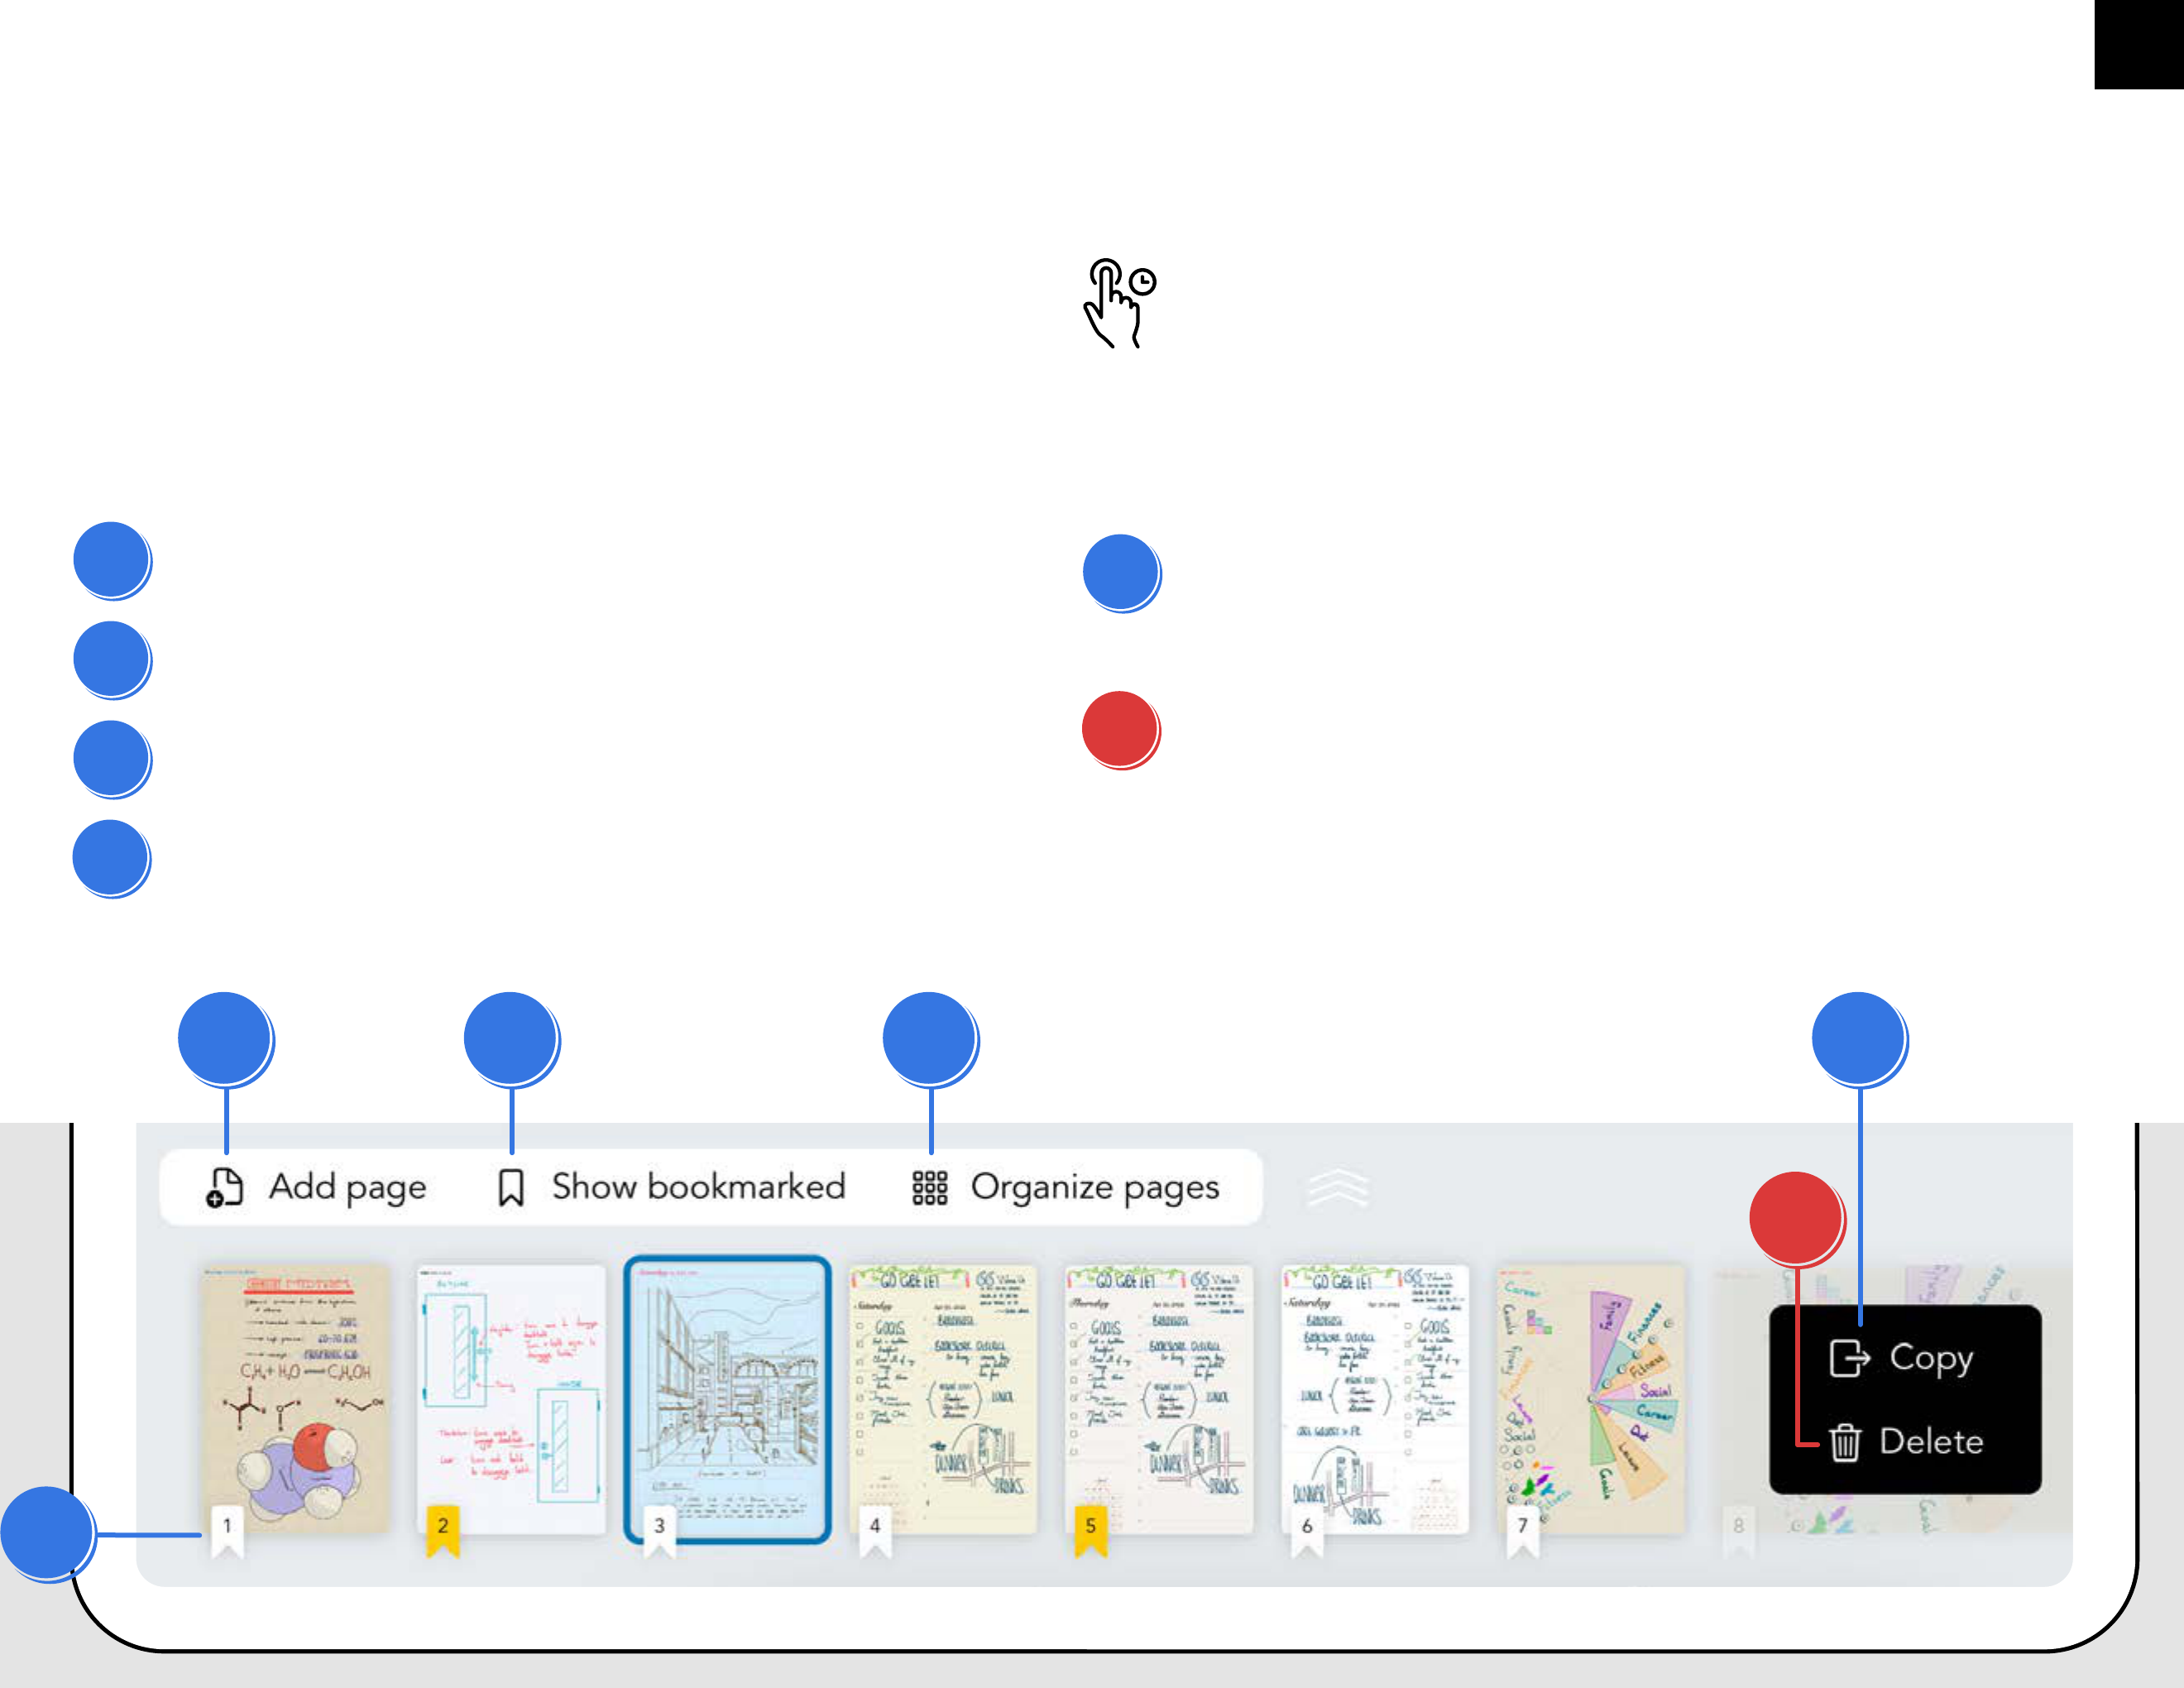
The Minimap lets you quickly
preview pages and navigate
within your notebook.
Long-press on a page in the
Minimap to bring up options.
15
Page management Minimap
1
2
3
6
5
4
1
Add a new page
5
Create a copy of this page, either in this
notebook or another one
2
Show only pages with a bookmark
6
Permanently delete this page
3
Show the Page Organizer
4
Add or remove a bookmark for this page
The full-screen Page Organizer lets you see more of your pages at once.
From here, you can reorder and delete pages, and search your notebook.
16
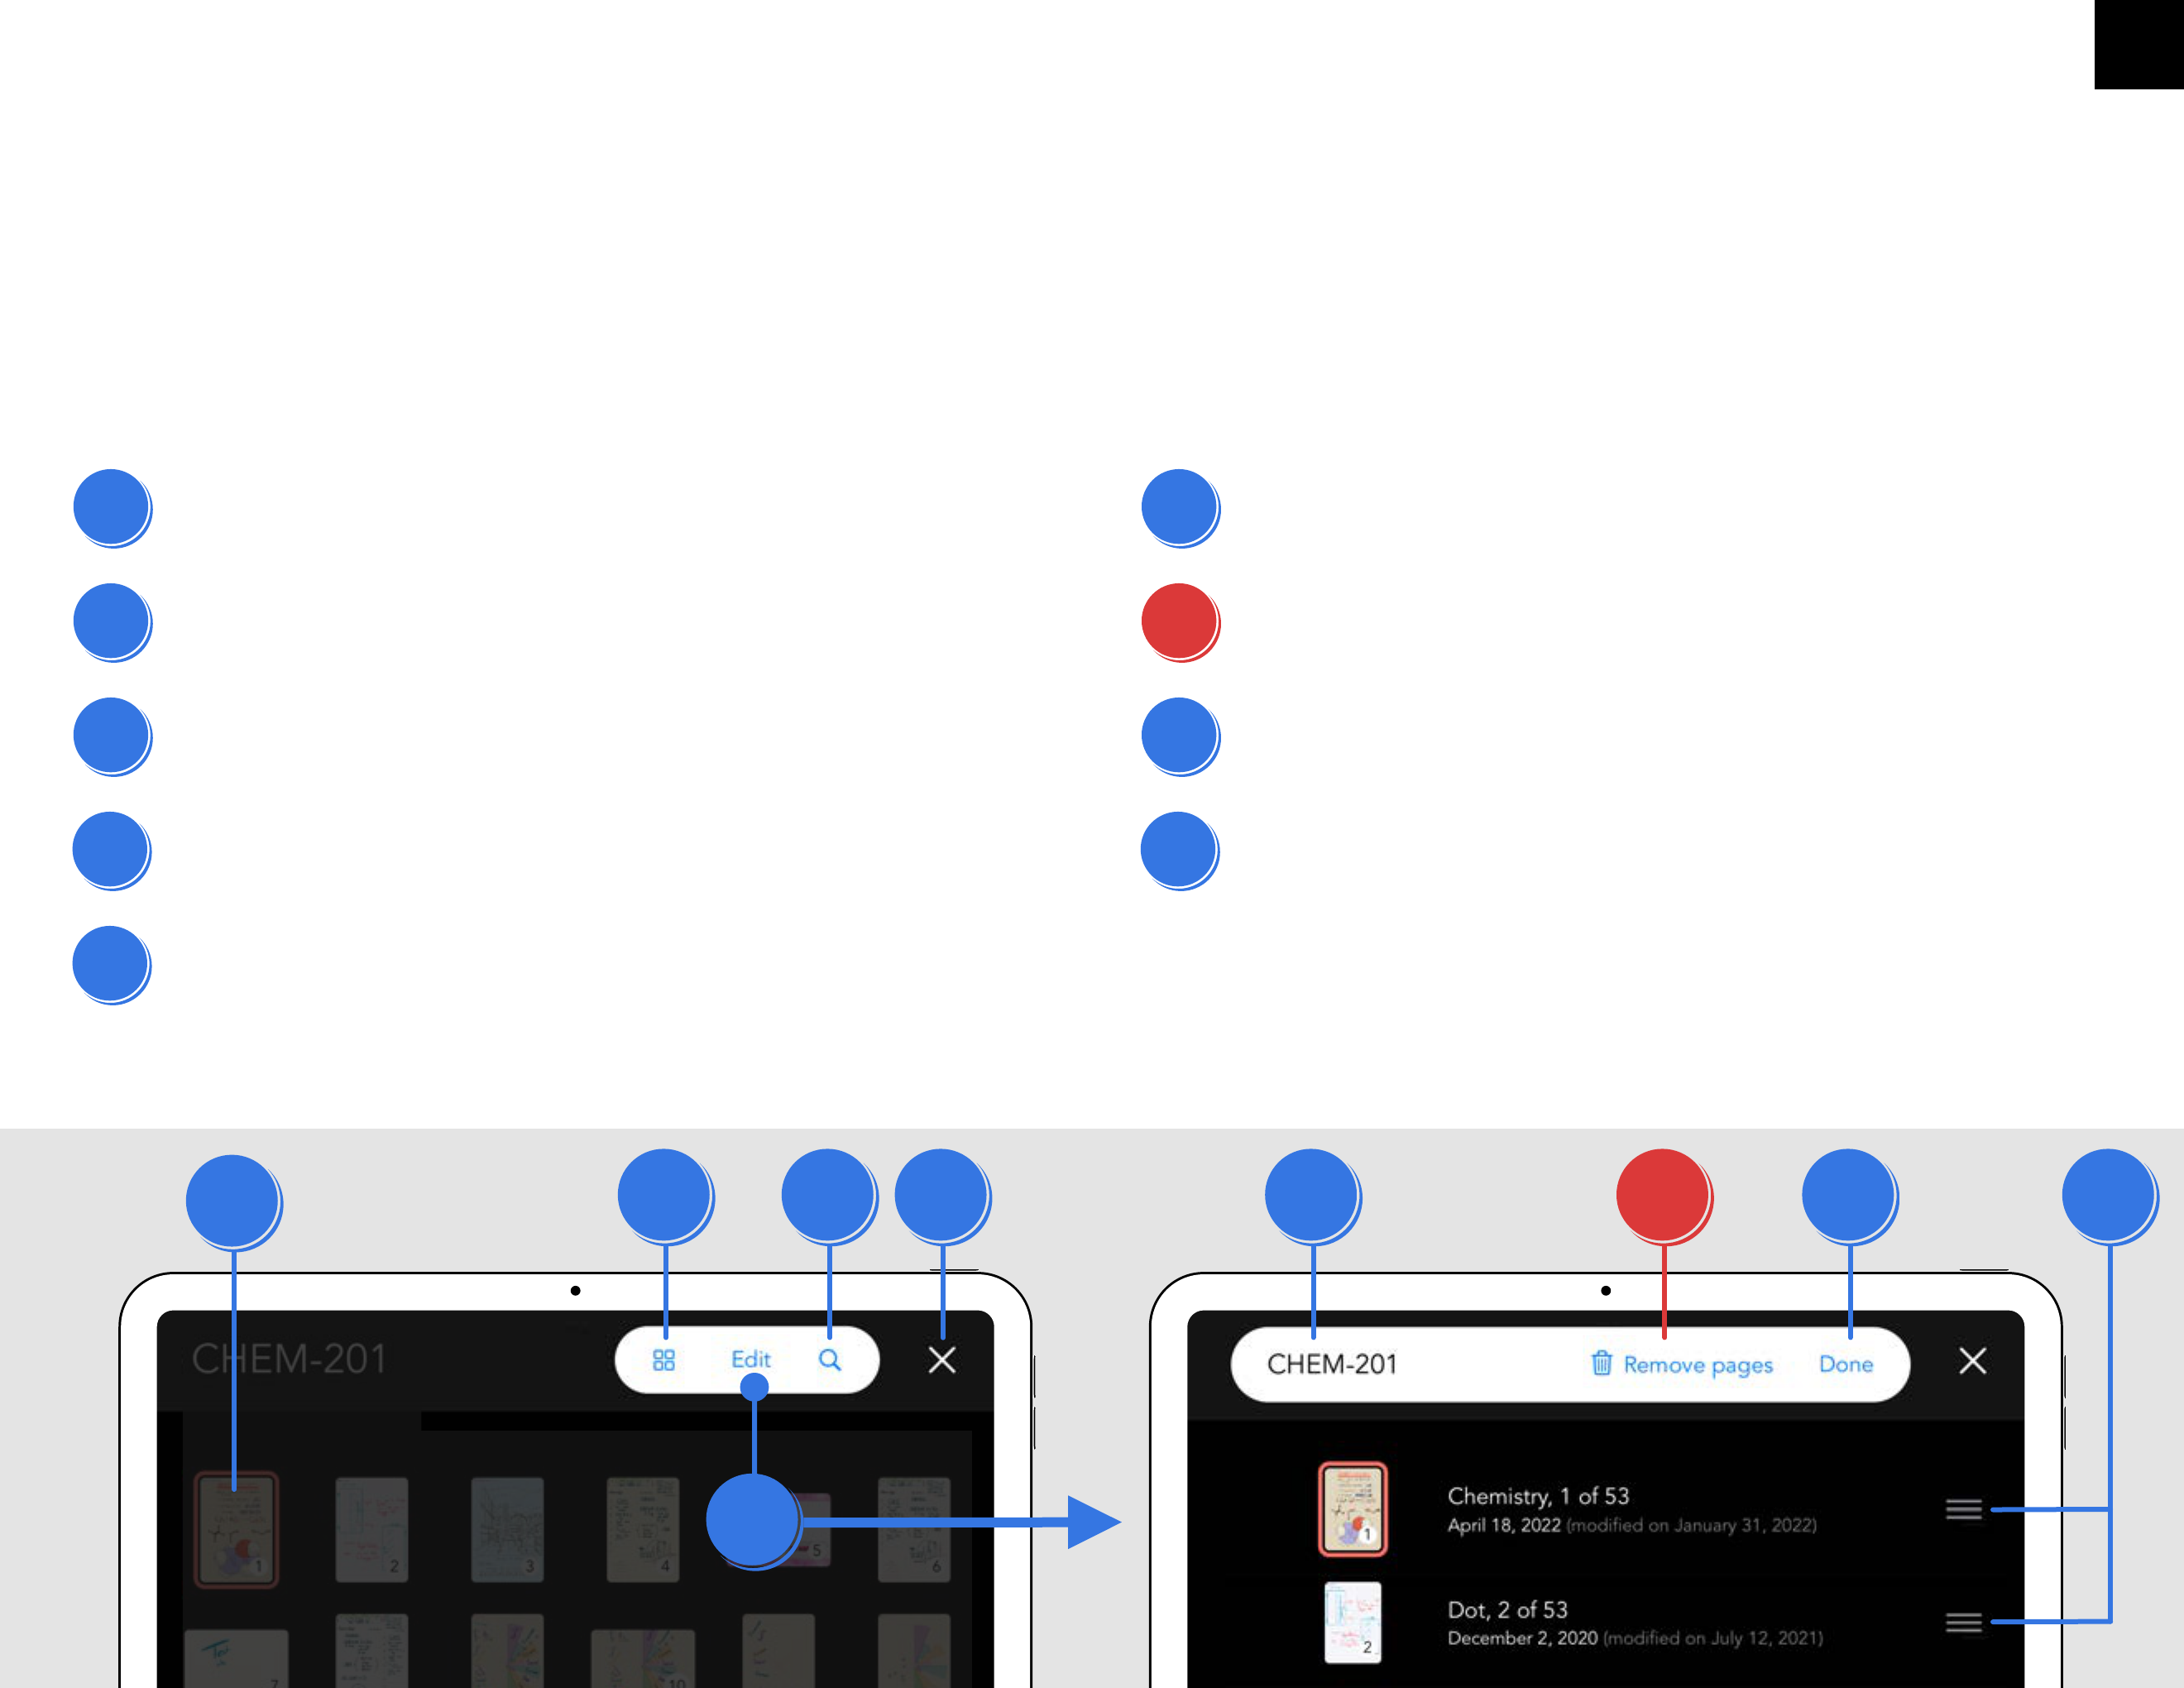
Page management Page Organizer
1
Current page (outlined)
6
Edit the notebook’s name
7
Choose pages for deletion
8
Dismiss Edit Pages mode
9
Drag here to reorder pages
2
Enlarge/shrink thumbnails
3
Edit Pages mode
4
Seach this notebook’s contents
5
Dismiss the Page Organizer
1
3
5
2
4
7
8
9
6
16
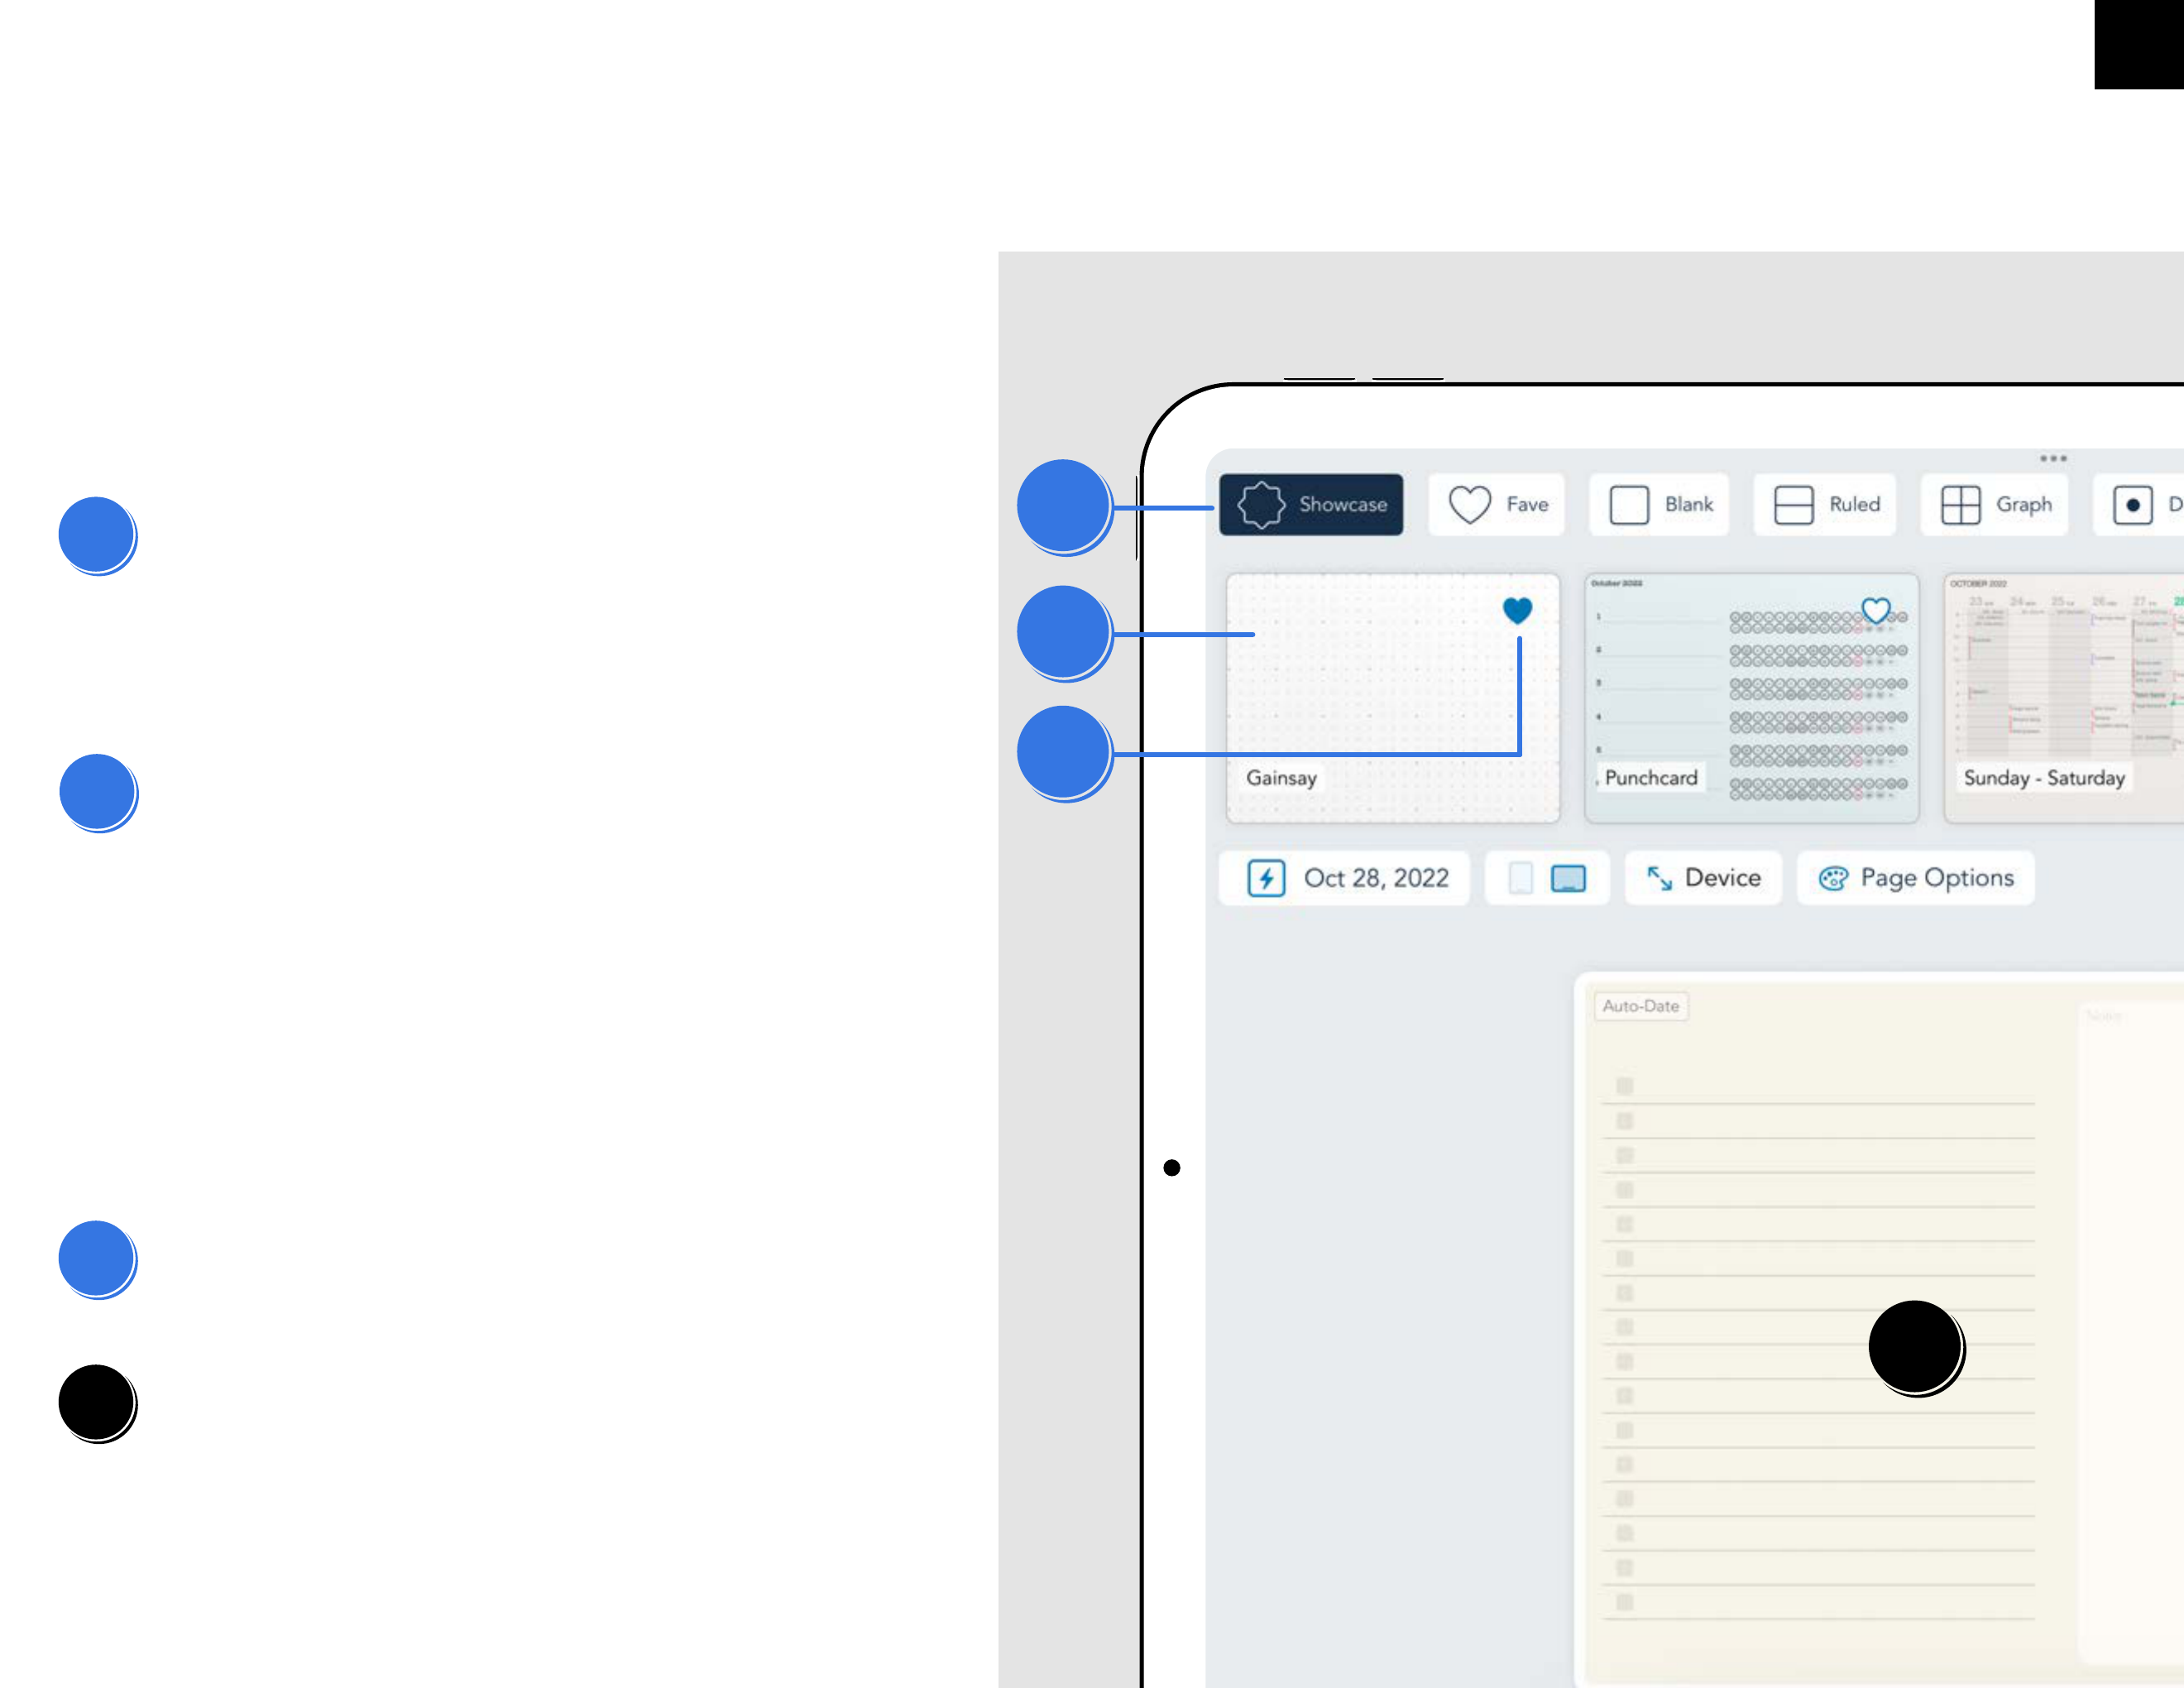
Stationery options Choosing stationery
2
3
4
1
Every page of your notebooks
can use different stationery.
1
Stationery categories. Scroll
horizontally here to explore the
categories of stationery that come with
Penbook.
2
Stationeries. Scroll horizontally here to
see all the stationeries in a given
category. Tap on one to select it.
Make sure to check out “Showcase” for
our curated list, or “Fave” (“Favorites”
didn’t fit) for the stationeries you’ve
favorited (“Faved”) with the heart icon.
3
Favorite button. Add or remove a
stationery from your Fave list.
4
Stationery preview
17
Stationery options Customizing stationery
Penbook comes with hundreds of hand-designed stationeries. Each
one can be further customized to create thousands of unique papers.
1
2
3
4
1
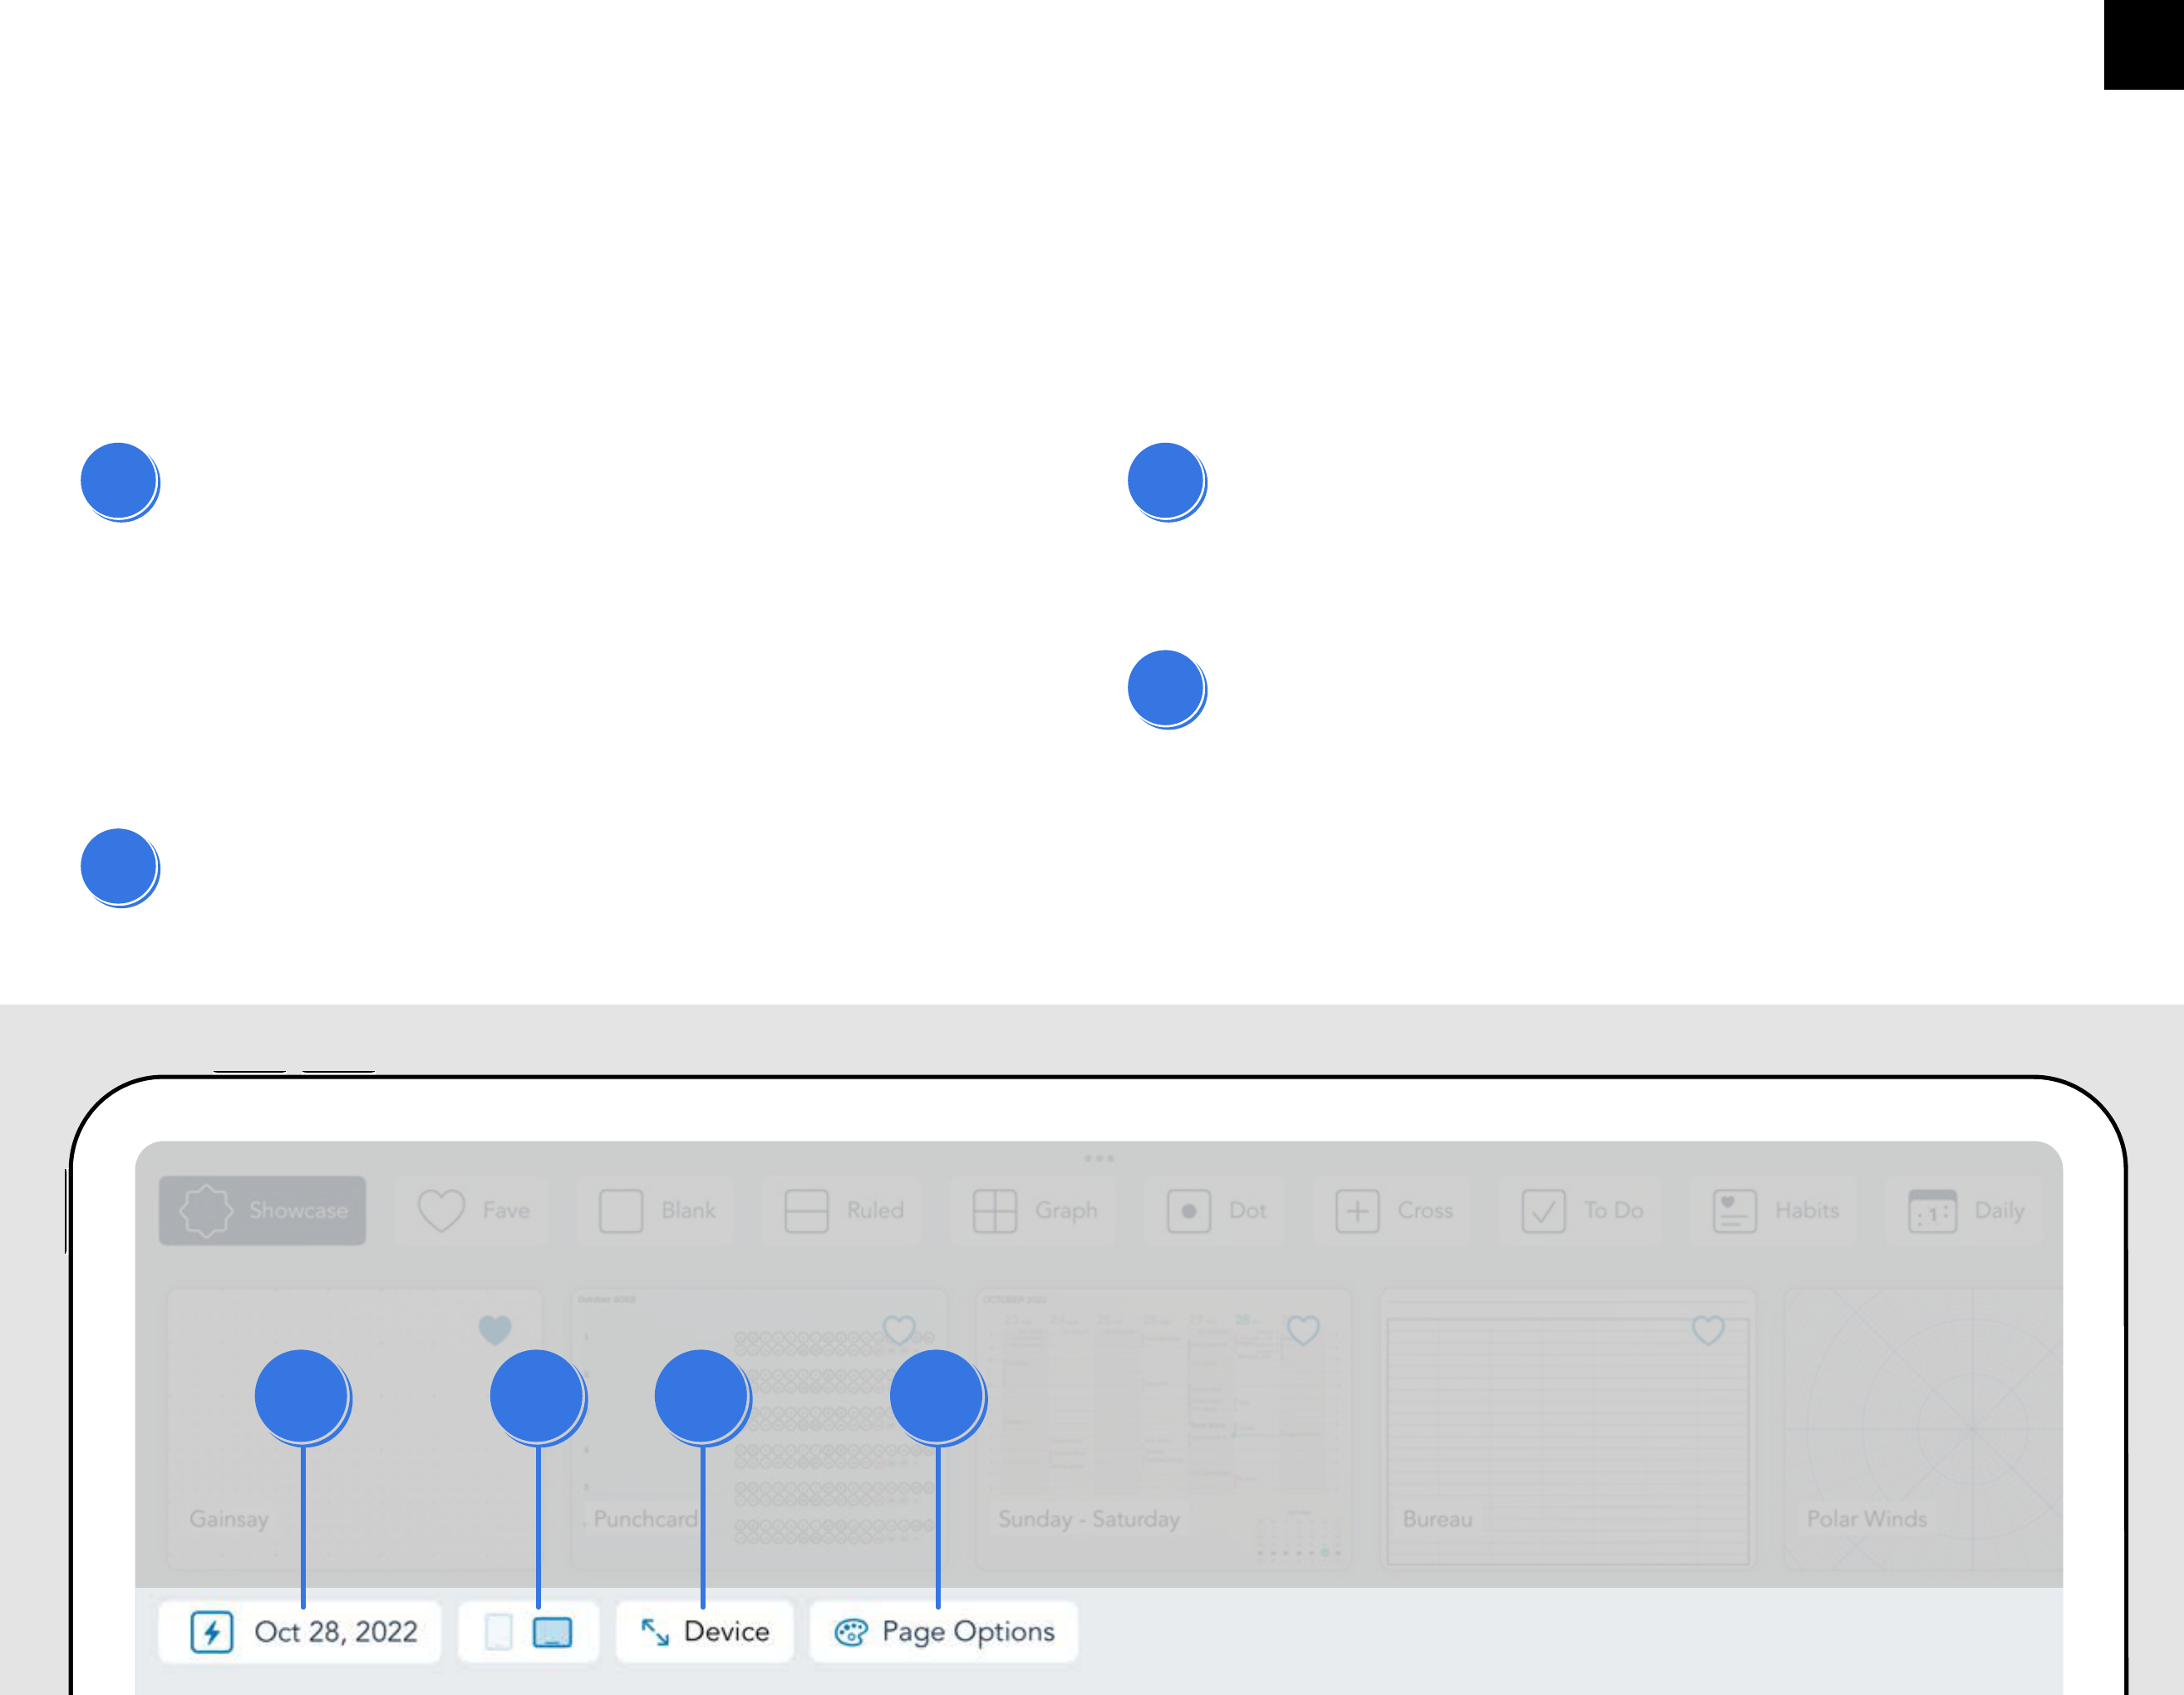
Page date. (Tap on the date to override it.)
Don't stamp the date on the page
Stamp the date of the page’s creation
Stamp the date the first time you write
on the page.
2
Page orientation. Toggle between paper
that fits portrait and landscape devices.
3
Page size. “Device” fits your iPad (or
iPhone) perfectly, but you can also use A4
or Letter.
4
Page options. Color, density, and other
stationery customization is in here.

18
Appendix A: Gestures
These are all the gestures you can use while
writing in Penbook.
Shape recognition: Change your last
stroke into a rectangle, ellipse, curve, or
straight line.
Long-press with three fingers.
Undo: Undoes your last stroke or page
customization.
Tap with two fingers.
Redo: Undoes your last undo.
Tap with three fingers.
Show your Shelf and the main menu
Reveal the Minimap
Reveal the Page Organizers (when the
Minimap is shown)
Hide the Minimap (when the Minimap is
shown)
Previous page
Next page
Add a new page (when on the last page of a
notebook)
Quick zoom: Alternate between zooming
in on the document, and showing the entire
document on the device.
Tap twice with one finger.
